Scottish Borders
Nanu said:Good choice of road, driven it many times
A nice sustained set of twisty, bumpy roads with some great straights…allied to some great scenery…glorious on a sunny day

Nanu said:Good choice of road, driven it many times

Christopher72 said:I can't wait for the movie...
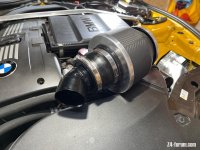
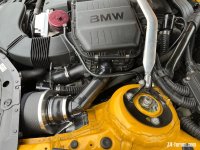
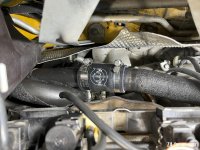
So, the Vargas reinforced silicone coupler.. was that a part of the aluminum charge pipe kit or a workaround by your indy?
I noticed that the left side clamp on the coupler is of lesser quality than the right -- it's probably worth using a higher quality clamp there, especially for the trouble to get to it.
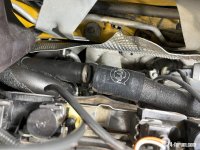
Will you have them source and replace the heatshield, or are you satisfied with your Amazon special?
Very nice -- I hadn't seen the Murray previously.B21 said:I’ve ordered some Murray turbo constant seal clamps but they are lost in the post..
Christopher72 said:Very nice -- I hadn't seen the Murray previously.B21 said:I’ve ordered some Murray turbo constant seal clamps but they are lost in the post..

B21 said:My insurance is up for renewal, and my broker Sterling was pushing agreed value insurance.
I always assumed it would be prohibitively expensive..in my case an extra £75 on a £300 policy for a heavily modified car.
As part of the agreed value policy they said they needed a list of all work done on the car.
When I asked 'what's all work?' they stated 'anything that was not mandated by maintenance or servicing and replaced on a like for like basis'
So last Sunday was a rainy afternoon and I went through what
I've done to the 35is since I bought it just under 2 years ago..
Here's my list..what's yours look like?
1 Zito 935s 235/40 18 265/35 18 Michelin PS4S
2 Front HALO angel eyes LED upgrade
3 Remove silver slats from lower grills
4 Reverse colours on valance and rear diffuser
5 Gloss black Kidney Grills
6 Inlet port walnut blast
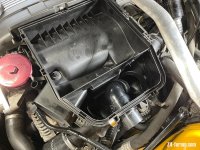
7 Mahle air filter
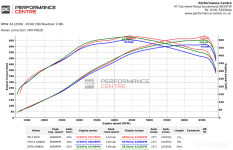
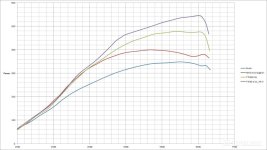
8 Dyno check 347 BHP 505Nm
9 2022 Map upgrade
10 Bluetooth s/w upgrade
11 MHD V9 stage 1+ 390 bhp 560 nm
12 xHP stage 1.2
13 NGK coils
14 NGK 1 stage colder plugs
15 Uprated oil thermostat
16 Redline ester based engine oil and Mahle filter
17 6 pot Brembo BBK front grooved /drilled
18 Uprated anti roll bars front and rear
19 Replacement parking brake motor
20 Engine bay strut tower brace
21 Zimmerman drilled / vented rear discs
22 Colour matched calipers Phoenix Gold
23 Catless down pipes
24 437M alloys with Michelin PS4s
25 Limited Slip Diff
26 MHD V10 stage 2+ 408 BHP 655Nm
27 xHP stage 1.3
28 Uprated HID bulbs
29 Revo boot rack
30 DCT aluminium deep sump
31 DCT oil and filter changes
32 Aluminium oil filter cap
33 Uprated suspension
34 Removal Adaptive ECU plus coding
35 Monoball bearing for front suspension arms
36 Evo 1 Intercooler
37 Z4 and 35is badges deleted
38 M3 E90 RTAB upgrade
39 Gloss black roll over hoops
40 437Ms refurbished in gloss black
41 E90 M3 front Suspension arms
42 Colour matched rear carbon fibre boot spoiler
43 Centre speaker upgrade
44 Door card speaker upgrade and door tweeter
45 Rear shoulder speaker upgrade
46 Rear centre speaker upgrade
47 Rear brake lights LED upgrade
48 Rear reversing lights LED upgrade
49 Pierburg alloy water pump + Mahle Thermostat
50 LCI side repeaters in gloss back
51 Retrimmed and flat bottom steering wheel
52 Later flappy paddles one sided action
53 5mm front wheel spacers
54 Arc 8 19" 8.5j 35 and 9.5J 33
55 Michelin PS4s fitted to Apex arc 8 in satin black
56 Arc 8 refinished in gloss black
57 245/35 19 275/30 19 Sports Contact 7
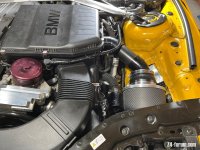
58 Meyle HD toe rods
59 Index 12 injectors
60 Stage 2+ DME re-map
61 Stage 2 TCU re-map
62 Stage 1 colder plugs
63 B58 Ignition coil kit
64 Uprated steering tie rods
65 Later all metal water pump
66 Adjustable toe and camber plates
67 Adjustable rear camber arms
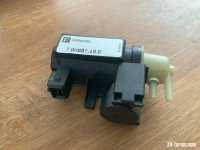
68 Alignment done
69 New rear boot struts fitted
70 Garmin 57 and Mini 2 dash cams fitted
71 Fox centre and rear exhaust system
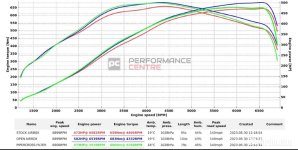
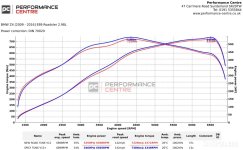
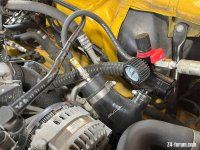
72 TTE 500 Hybrid Turbo Upgrade
73 Uprated turbo outflow pipes
74 Uprated turbo inlet pipes
75 Uprated charge pipe
76 Uprated 450 lph LPFP
77 Wagner EVO 3 FMIC
78 Forge diverter valves
79 Uprated GUIBO
80 Uprated centre shaft bearing
81 Tuning for new hybrids
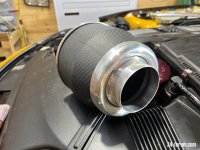
82 Pipercoss panel filter
83 Dyno test day 502 BHP 683Nm
84 Footwell woofer upgrade
85 New boost controller solenoids
86 Carplay adapter
87 Carbon fibre wrapped interior trim pieces
88 Retrimmed gear gaiter
89 Replaced snap in tray with general tray
90 New set of 437Ms
91 437m refurbished and finished in graphite grey
92 235/35 275/30 SC7s fitted to 437m
93 Brembo HP front pads
94 Rear adjustable toe in plates
95 Uprated RTAB and rear linkage bushes
96 New aligment less rear camber better toe
97 LED lights for map reading, boot, puddles
98 New G29 Z4 and M50i badges
99 Refitted turbo oulet pipe silicon hose + heat shield
100 Mr.5 Inlet modification

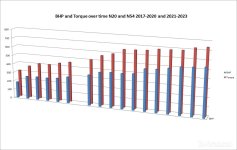
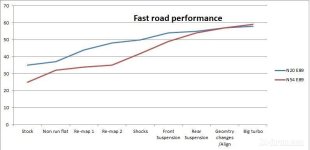
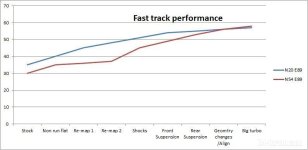
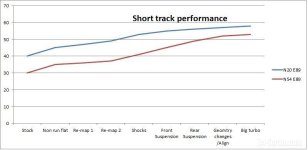
ronk said:Y axis is data (assume speed or %) but X axis is surely just a list of mod/additions?

 Ohio
Ohio