You are using an out of date browser. It may not display this or other websites correctly.
You should upgrade or use an alternative browser.
You should upgrade or use an alternative browser.
Z3 project...no going back now!
- Thread starter Pondy
- Start date
- Featured
 North West Surrey
 At the summit of the picturesque fens
Me too, mate. Me too!MikeyH said:I just hope I live long enough to see the completed car in all it's glory
Pondrew said:Me too, mate. Me too!MikeyH said:I just hope I live long enough to see the completed car in all it's glory


Pondrew said:Bit of progress...
Front of body all cut, trimmed, filled and sanded. I trial fitted the brightwork and lights to the front. Bonnet fits OK. Fog/ driving lights will be changed for larger (and prettier) ones.
Rear is in progress but lots of work needed, especially to the bootlid which doesn't fit at all.
I spent yesterday in the garage getting the new wires to fit. As they are 15", the fronts didn't fit over the Z3 calipers. I knew this but didn't know how much they would be out. I was concerned about grinding brake calipers down, from a safety point of view.
It turned out not to be as bad as I thought (that's a first). I only needed to take a few mm off a small part of each caliper. I am confident it will not affect the integrity of the calipers.
I took this one as a small victory and another job to taken off the (massively long) list.")
Piccies...
IMG_9379.JPGIMG_9382.JPGIMG_9380.JPGIMG_9392.JPGIMG_9391.JPGIMG_9395.JPGIMG_9396.JPGIMG_9385.JPG
Looking great, I like the use of the patio to shore things up
Wheels look gorgeous. I remember when I used to be a member of Z Roadster.net and a chap fitted some wire wheels with knock off centres onto his Z3 and got absolutely slated for it. I actually thought they looked quite good.
Tim.
I was thinking of torque values for the 'spinners'. I always have gone with the 'rule of thumb' of 10 x the thread diameter for wheel nuts/ bolts in Nm.TitanTim said:Wheels look gorgeous. I remember when I used to be a member of Z Roadster.net and a chap fitted some wire wheels with knock off centres onto his Z3 and got absolutely slated for it. I actually thought they looked quite good.
I measured the hub threads on the wires; they are 82mm. By my reckoning they will need to be tightened to 820Nm!

I have done a rough calculation on 'pendulum theory' and deduced that I will need a socket bar length of 15ft.
Haven't been to visit this thread for ages......what excellent progress Sir.......its going to look epic when it done......
Eat your heart out FERRIS !
Eat your heart out FERRIS !
Pondrew said:I was thinking of torque values for the 'spinners'. I always have gone with the 'rule of thumb' of 10 x the thread diameter for wheel nuts/ bolts in Nm.TitanTim said:Wheels look gorgeous. I remember when I used to be a member of Z Roadster.net and a chap fitted some wire wheels with knock off centres onto his Z3 and got absolutely slated for it. I actually thought they looked quite good.
I measured the hub threads on the wires; they are 82mm. By my reckoning they will need to be tightened to 820Nm!
I have done a rough calculation on 'pendulum theory' and deduced that I will need a socket bar length of 15ft.
I'm not sure how you torque spinners, I thought as they did in the days of old used brute force with a mallet
Tim.
I have a specially made spinner 'tool' which has a 36mm hex nut on it, so to not have to hit them with a mallet! Biggest socket I have is 32mm!TitanTim said:I'm not sure how you torque spinners, I thought as they did in the days of old used brute force with a mallet
Pondrew said:I have a specially made spinner 'tool' which has a 36mm hex nut on it, so to not have to hit them with a mallet! Biggest socket I have is 32mm!TitanTim said:I'm not sure how you torque spinners, I thought as they did in the days of old used brute force with a mallet
Every day is a school day I wondered how you could ensure it was torqued correctly.Tim.
My MGB had 2 wings and all they got was a wack with a mallet that an old chap up the road gave me from an old Blackburn motor of some kind. It had a brass or copper head one side and some sort of rolled up animal hide the other side. Worked a treat and the wheels never fell off, remember they do up left or right thread depending on the side they are fitted so presumably they tighten as you drive.
Correct
Yeah that's the idea. Left side is a right handed thread, right (off) side is a left handed thread.MikeyH said:remember they do up left or right thread depending on the side they are fitted so presumably they tighten as you drive.
Strange then that 'normal' wheels nuts/ bolts aren't handed. All right handed, so the offsides should, in theory, fall off a lot. But they don't! :?
Now that would be funnyPondrew said:Yeah that's the idea. Left side is a right handed thread, right (off) side is a left handed thread.MikeyH said:remember they do up left or right thread depending on the side they are fitted so presumably they tighten as you drive.
Strange then that 'normal' wheels nuts/ bolts aren't handed. All right handed, so the offsides should, in theory, fall off a lot. But they don't! :?

Things are starting to move 'apace'.....
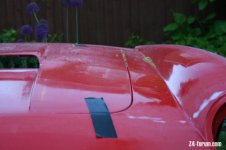
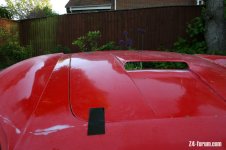
As said earlier, my bootlid was a Country mile out of fitting in the 'hole'. I really don't know who moulded my GRP, but all I can assume is they are either blind or just crap at what they do! Still; at least I only paid way over the odds for it!
So, for the last four days (yes four whole days) I have been making the bootlid fit. I have got the panel gaps to an even 3mm all around. I would have liked 2mm but I couldn't as in a few places they were just under 3mm as it came.
I have taken over 15mm (yes 5/8") off many parts of the GRP bootlid to get it to fit nicely. I did the whole lot with a sander and 60 grit paper. I was going to use the grinder to take a lot of the material off, but was worried I may slip. So did it the hard way!
I fitted the boot brackets (old Z3 ones modified a bit with elongated slots). The offside one needed slightly packing out on the tub side...around 5mm down to 0mm.
The offside, however, needed packing out by 14mm down to around 6mm. Again, the moulder has put the metal brackets bonded into the bootlid in the wrong place!
Once all sanded and corners shaped with varying paper down to 240 grit, I bolted the bootlid to the brackets. As I tightened it the nearside kept pulling down and ended up around 5mm 'inside' the body.
I was scratching my head for ages trying to work out why. Turns out the moulding on this side where the bracket holes are, is on a 20 degree slope (the offside is flat). So as I tightened the bolts, it was pulling the bracket out of level and pulling the bootlid down.
So I spent most of yesterday making a small wedge to level the bootlid back up! It has worked but I am not happy with how it looks, even though you can't really see it under the boot bracket. I shall re-address this at a later date.
The bonnet has also been 'fine tuned' to give a 2mm panel gap all around. It has a slight 'bow' in the centre so was sitting a bit low on both side at the centre. I taped some packers to the body and have put the bonnet on and held it down with some strong gaffer tape to try and 'remould' it. I will leave this for a good week or so.
I have also cut the boot lock holes.
A few pictures of progress:
Attachments
Then after all the hard work, I got two presents in the post.
One box contains my new seat foams, seat shiny bits, a super shiny ashtray and internal door pulls.
The other two big boxes are my stainless steel bumpers and over-riders all the way from Vietnam!
I do like a bit of bling!


One box contains my new seat foams, seat shiny bits, a super shiny ashtray and internal door pulls.
The other two big boxes are my stainless steel bumpers and over-riders all the way from Vietnam!
I do like a bit of bling!
There's 'right' and everything else is wrong in my book. I don't do 'near enough'.MikeyH said:you really are a very fussy bugger.
Which is why these plastic 'near enough is good enough' kits are not really my bag. Too late now, so have to do the best I can.
We shall see, Mikey.MikeyH said:It’s going to look amazing
I am more confident than I was, but still not overly! :|