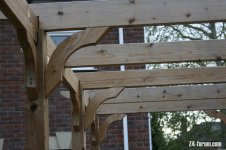
Pergola build

ihadablackdog

Senior member
I’ve ordered 2 joist hangers for a pergola I’m going to be building and need to paint them black for cosmetic reasons.

They are galvanised steel, so hoping rust wouldn’t be an issue, but they are obviously going to be outside.

So, would I use normal spray paint or enamel? Is there a difference, and would I need a primer of some sort?

This is the hanger (obviously there is also the corresponding right hand side as well):
https://www.nailfastonline.co.uk/00...46170-Face-Fixed-45-Degree-LEFT-Skewed-Hanger

and this is the bad boy I’m building: [youtube]q-b8r56DGoE[/youtube]
 
You need etch primer for a glavanised surface or the top coat will just flake off. Then I'd use hammerite or similar.
 
ihadablackdog said:
and this is the bad boy I’m building
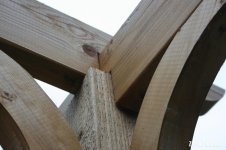
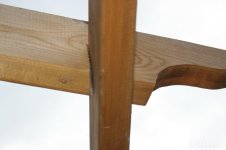
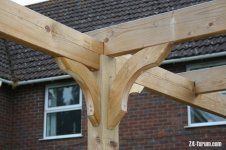
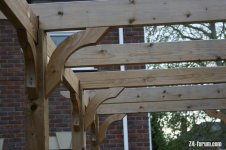
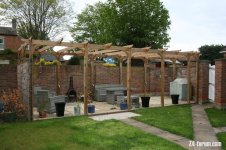
Are you building it from a kit or from ideas from the video? I built one last spring (lockdown 1 project) and didn't use any hangers. I slotted the main rails over the posts to give a more natural look. Mine is done in a slightly different way to the one in the video; one main purlin rather than two and the perpendicular joists slotted over the purlin. It is much stronger than the one in the video, looks more natural and can't twist. Mine has been up for 13 months now and looks exactly as it did the day it was completed. I can send you some pictures if you wish?
 
Pondrew said:
ihadablackdog said:
and this is the bad boy I’m building
Are you building it from a kit or from ideas from the video? I built one last spring (lockdown 1 project) and didn't use any hangers. I slotted the main rails over the posts to give a more natural look. Mine is done in a slightly different way to the one in the video; one main purlin rather than two and the perpendicular joists slotted over the purlin. It is much stronger than the one in the video, looks more natural and can't twist. Mine has been up for 13 months now and looks exactly as it did the day it was completed. I can send you some pictures if you wish?

Thanks. I’d like to see your pictures. Our design is pretty much fixed on this one as the wood has practically been ordered (just waiting for the sawmill to get back to me to take deposit). What wood did you use? We’re going to use a mix of Douglas Fir and Larch. Thinking of not staining it as apparently it has a 15yr durability, although we’ll make that decision later. Most of it will be air dried but some might be green, which I’m not sure about as some people say that’s not good as it will shrink a bit when drying out....but it’s an external structure so never going to dry right out.

Using the one in the video as a guide and found some plans which I think he based his on, so took some details off those plans etc.

Notching is still an option instead of putting the rafters straight on top, looking at others it doesn’t look too difficult.

Is yours triangle as well or square? There’s only two hangers, on the 45 degree angles for the side beams.

I’ve bought the post bases to attach to the patio. It’s going on slabs so I’m trying to decide on chemical anchors (glue threaded rods into the hole) or concrete screws. Cant use anything that expands as apparently that could crack the slab. I know slabs aren’t as good as digging out a proper hole etc but with the weight of it I don’t think it’s going to fly away (which is why it’s got an open roof....and not a gazebo) and the support is more lateral. I guess I’ll find out eventually if I’m wrong.

I’m not a builder so everything is from YouTube and the little bit of talent that I think I have 😂

I suppose you could say this design is the lazy mans design 😂
 
Hi. I don't want to interfere; just trying to help as I have 25 years of building/ carpentry experience. It is obviously your baby and your money. if you build it in a similar way to the youtube video you linked, I would give it a year, two at the most before it buckles and twists. That was not built to cope with the great British climate!
I made mine from 6"x2" C24 pressure treated softwood (joist timber). It is the best quality construction softwood. The posts are 4"x4", as 3" are too flimsy and are prone to twist and buckle at that height, mine are about 8 foot.
The only tools I used were an electric jigsaw, a hand crosscut saw, a battery drill/screwdriver and a builders' bucket to radius the pretty bits.
The cantielver/ corner supports are for show only and are just screwed on. Obviously mine is a rectangle, but it will work just as well as a triangle; in fact better as the triangulation gives it more inherent strength.
IMG_8238.JPGIMG_8239.JPGIMG_8241.JPGIMG_8242.JPGIMG_8243.JPGIMG_8243.JPG
I stained the timber with light oak stain, just because it was a lot lighter than the posts. I was going to danish oil it but didn't get around to it so it is bare.
 
I don't know what you are paying for your timber, but the C24 (available from any builders' merchant or timber supplier was about £3.00 per linear metre which was expensive as it was lockdown and most places were shut so I didn't have a lot of choice.

All of the notched timbers are screwed from above aswell as below. This has not moved an inch in over a year.
 
I don't see it as interfering, appreciate your input. Looks really good. I like the way you've notched the wood....so the top of the posts are square and its the beams etc that are notched?

The posts I am going for are 6x6, also 8ft, and the front and side beams are 2x8 and the rafters 2x6. The front span is quite long which is why i'm using 2x8.

What do you mean by twist and buckle, and do you think by notching the rafters onto the beams would be ok?

Probably going to still attach the beams in the same way, but intrigued by your notching method for the rafters.

Also, is this ok for the primer for the galvanised hangers:
https://www.halfords.com/motoring/p...primer/halfords-etch-primer-500ml-370400.html

and hammerite:
https://www.halfords.com/motoring/p...ammerite-satin-finish-black-400ml-141150.html
 
ihadablackdog said:
I don't see it as interfering, appreciate your input. Looks really good. I like the way you've notched the wood....so the top of the posts are square and its the beams etc that are notched?

The posts I am going for are 6x6, also 8ft, and the front and side beams are 2x8 and the rafters 2x6. The front span is quite long which is why i'm using 2x8.

What do you mean by twist and buckle, and do you think by notching the rafters onto the beams would be ok?

Probably going to still attach the beams in the same way, but intrigued by your notching method for the rafters.

I did start to notch the top of the posts to "lay" the purlins/ beams (the main edge pieces) into them, but found because the posts were not exactly in a straight line (it is timber we're dealing with there is no such thing as a perfectly straight piece) it was pushing everything out of square and putting strain on everything. So I left the posts as they were and slotted (notched) the purlins as they could then sit where they fell. Much easier and no "pulling" of the posts by the purlin timber.

Your timber sizes look more than sufficient.

Timber will always move, it shrinks and expands by quite a lot if left to it's own devices, mainly due to moisture and heat. In the youtube video they lay the top joists onto the purlins and use "L" brackets to attach them. Those brackets are not sufficient to stop the timber moving, so it will twist and buckle (or bow) as there is very little to stop it apart from a flimsy metal bracket. If you slotted the joist over the purlin at both ends it can't move (well a tiny amount but that's OK because if it couldn't move at all it would just split). The slotting at both ends prevents twisting as it is held by the perpendicular purlin it is slotted into. It also can't bow (bulge if you like) for the same reason but on the opposite plane. I'm now confusing myself! Basically notching, or slotting one piece of timber into (or over) another gives rigidity in two directions; front to back (buckling) and side to side (twisting). I need a drink now! :D

You will probably be OK to attach the beams (main purlins) to the posts with brackets if you are going to notch (or slot) the joists (top pieces) onto those, as this will give rigidity anyway. The ones in the video are "s" brackets not joist hangers, or purlin hangers.

If you understood any of that well done, as I was confusing myself. If I could do a drawing and attach it on here it would be a lot easier. :thumbsup:

BTW I would seriously steer clear of any non dried timber (green) as you have no control on how it wants to dry and what it will do while it does. As long as it's dried (kiln or air) it will be OK. Moisture from rain and the ambient air is not the same as inherent moisture in timber.

Don't let me put you off though; and I want pictures of the finished article, I'm sure it will be great :D
 
ihadablackdog said:
Also, is this ok for the primer for the galvanised hangers:
https://www.halfords.com/motoring/paint ... 70400.html

and hammerite:
https://www.halfords.com/motoring/paint ... 41150.html

If you are using galvanised brackets you don't need to etch prime them. Hammerite should stick fine, if it doesn't just give the galv a buff with some heavy sandpaper of a wire brush to create a key.

www.screwfix.com for hammerite and screws etc. They are truly exceptional in all departments. I would buy paint on smooth black hammerite for your brackets and bolts. :thumbsup:
 
Thankyou.

These are the brackets I’ve got to attach the front beam to the posts https://ozcobp.com/product/8-post-to-beam-ls/ they are different to the ones in the video but effectively the same thing. The wood will be screwed through into the post also. And the 45 degree joist hangers are on the back to hold the side beams and the side beams will be screwed into the back post.

Some of the wood was going to be green....I’m waiting for them to tell me what would be green and what would be air dried. Apart from the posts (which seem rare) I can get everything else from Travis Perkins etc etc so you reckon pressure treated kiln dried is the way to go?

Where do you recommend getting the pressure treated wood from...or is it all effectively the same? There is an independent builders merchant round the corner from me that my neighbour recommended (but they don’t do 6x6 posts).

I saw that they do hammerite in paint on form but as it’s only these two hangers, which are almost out of sight anyway and the paint is cosmetic, I thought the spray would be easier. I said primer as that was advised above. The paint on tin might be cheaper though so will check. Just want to paint them matt or satin black to match the front brackets.

Leaning more towards notching the rafters as I definitely don’t want it to look sh1t in a couple years or fall down!

Might leave the top cross beams initially (not order the wood) they were 1x2 but not essential to begin with so can re-assess when the main structure is built. I think the guy in the video used 2x4 but I felt that would make the top too high, but might not be a concern if I’m slotting the wood etc.

Was going to ask about screws. I have a tub of screws that I used for the raised planter I made a few months ago, I’ll get the details, but they are zinc coated I think.

How long did yours take to build!

(thanks for your help so far)
 
Hello. Those "S" brackets look very nice. :thumbsup:
6"x6" posts are BIG (and I'll bet expensive); you will struggle to find them off the shelf. 4"x4" are the largest I've seen as a standard size.
Regarding timber; I use C24 as it is standardised and graded to be consistent for use as structural timber (house joists and roof rafters etc). It is all dried to a certain percentage, selected for grain consistency and should have minimal knots. As it is very common it is reasonable cost, reliable to use and easy to cut and work with. It is also pressure treated against rot so is long-lasting. The downsides are that it is not the prettiest looking unless it is dyed or stained and can still have quite a few small knots.
Any plated screws will be fine for many years. Zinc plated are common and cheap. The are many other options which all get more expensive including stainless steel which is overkill IMO unless you plan to sail it. :D If you have any screw head visible, a dot of hammerite will keep them looking good for ages.
HTH

I took about a week to do the structure, but I have electric cable for lights channelled into six of the posts so that took a while with my router. I work quite slowly with things like this, as I have a bit of OCD that everything is straight and level at all times so lots of measuring etc. That's just me though! :)
 
I’ve just ordered the wood from a local timber place that manage the woodland and only use wood local to Devon or surrounding counties. They had everything except the strapping as dried wood so just removed the strapping from the order. Hope I don’t regret not buying the type you got.

It’s not cheap!

How did you cut the notches? I’m fine with the two edges, but how do you get the middle cut? I’ve seen people make lots of cuts with circular saw or does it just chisel?

I’ve got a week off work (the upcoming bank holiday week) but hope to do it in 2 or 3 days as long as it’s not raining....then I can sit under it with my Thatchers Gold 😂
 
I cut down both sides of the notch with a hand saw, then cut round to the lower edge with a jigsaw in the first cut slot. You can then cut the rounded piece with the jigsaw on a second pass. A coping or fret saw will do if you don't have a jigsaw but obviously harder work. You could do it as you mentioned with multiple cuts and a chisel but that's too much like hard work for me. Also a chiselled cut is difficult to get straight and even. As this is going to sit on the other timber the neater the better.

Thatcher's Gold and living in Devon? Nothing like a stereotype then? :lol:
 
Ah, a jigsaw, why didn’t I think of that! Now you explained it I know what you mean, so yes, the notches should now be easy!!!!

Do you have any advice on fixing the post bases to the slabs? They just need one bolt/screw etc and my current thinking is a chemical anchor or concrete screws (only found they exist the other day).
 
ihadablackdog said:
Do you have any advice on fixing the post bases to the slabs? They just need one bolt/screw etc and my current thinking is a chemical anchor or concrete screws (only found they exist the other day).
What are the slabs laid on? If it's just sand/ soil or anything that's not concrete or mortar, I would just use a decent length and size rawlplug and screw TBH. If there is nothing under the slabs to fix into then you are only anchoring into the 50mm concrete of the slab (presuming they are concrete) so anything else is a waste. Concrete screws are more for blockwork, I don't think they will drill directly into a slab, although I've never tried. The secret is A) drilling a correct size hole for the plug so it fits fairly tight and B) using a screw that is as tight a fit as possible into the plug. Most rawlplugs (other brands are available :) ) will give the minimum and maximum size of screw recommended. Go for the maximum, or even the next width up, then you should get a nice tight anchor.
For extra piece of mind you could squirt some Gripfill (don't use solvent-free though it won't work outside and is crap anyway) on the underside of your bases just before screwing them down. The slab and post support need to be clean and dust free though. This will also help level any undulations in the slabs if they have a textured finish.
As you mentioned earlier, don't use anything that expands (eg rawlbolt), it will just shatter the slab as soon as you tighten it.
HTH
 
Thank you.

The patio was laid on top of a previous patio from what I can see at the edges. No idea what is under that, so it’s slab, concrete, slab. I suspect the concrete between the two slabs is just dollops and not a complete covering.

I was thinking of getting something long enough to also go into the bottom slab for a bit of extra strength.

I’ll rule out concrete screws.

Will the pressure from the screw going into the plug not crack it? I guess it’s just molding the plastic but there will be a bit of sideways pressure. I could test though, I have a spare slab.

This is the type of thing I was thinking about (not necessarily this kit), although I only need about a bolts height above ground or I’ll need to drill a hole in the bottom of the post if it sticks out too much https://www.screwfix.com/p/rawlplu...polyester-resin-175ml/4100r?_requestid=387237
 
If you have more masonry underneath your slabs that's great (the more masonry the better in my experience).
You won't break slabs with nylon plugs, unless you are fixings very near the edge but anything will crack them then.
Those chemical fixings look more than sufficient but I've never used anything like that (too much faff and I'm a cheapskate)! They look like bolts with nuts; how will you sit the posts in if there is a stud and nuts sticking up? You would have to then drill out a piece of the bottom of the post to create a recess? If that's the case it's a lot of faffing about (as you can probably tell by now I like things to be easy and with minimal faff).
These are good for a deeper hole: https://www.screwfix.com/p/easyfix-frame-fixings-8-x-100mm-10-pack/19356 and they come with screws to suit.
Whatever you use, just go steady drilling through the slabs. A percussion drill (hammer drill) can crack slabs if you go too mad at it. I have a professional hammer drill which has quite a bit of "hammer" so I just go really gently and at slow speed. I have drilled literally hundreds of slabs (used to often fix our work equipment to them) and never had an issue so they are quite resilient but are relatively thin.
 
Back
Top Bottom