My Second Zed Thread (2010 E89 sDrive30i)

Silverstar said:
Thanks for the tip, but the problem I am facing is how to get this PCB board out of the black phone cradle without breaking it apart.

Not sure if these will help, but they show 2 cradles, one with the 2 pieces assembled together, one apart - you might be able to see a bit better what needs to be persuaded open but it does just need a bit of force.
 

Attachments

  • 20200303_002131.jpg
    20200303_002131.jpg
    205.8 KB · Views: 1,542
  • 20200303_002155.jpg
    20200303_002155.jpg
    191.4 KB · Views: 1,542
  • 20200303_002213.jpg
    20200303_002213.jpg
    180.4 KB · Views: 1,542
  • 20200303_002230.jpg
    20200303_002230.jpg
    171.6 KB · Views: 1,542
Rassi said:
Just a heads up that https://www.hubauer-shop.de (BMW online dealer) are selling the 19" Style 276 as a set for 623 euro (free shipping over 290 euro) with handling it comes to 647 euro.

Thanks for the tip - I did mention those wheels earlier in this thread actually as I quite like them, but from a different source which comes in at about £720 delivered. Your link is a good chunk cheaper at £543 - but that excludes delivery and I think they only deliver within Germany. Good option for some though (your 2nd part number has a minor typo too - should be '36116782907').
 
So, I didn't hear from my wheel chap over the weekend which was a bit odd, he came to see me tonight. Another chapter in this car's history unfolds :rofl:

Long story short, 1 of the 4 face sections has come up a slightly different colour - he thought it was some kind of simple mistake and acid dipped/powder coated them 3 times over the weekend but got the same result each time. The explanation was lost on me a bit, but he thinks for whatever reason the composition of one of the faces was subtly different and it didn't achieve the same temperature each time as the other 3.

In daylight and even in the garage under lights, it's hard to spot the difference - but in the photos below you can see quite clearly one is coloured differently to the other 3. The pictures make it look far worse than it actually is.

To be fair, he actually arrived with a 10 pack of Thachers Cider as an apology and was adament he wasn't going to take any money as he was so disappointed in the result. I thought that was a bit much, though there are a fair few other imperfections that if I were paying £400+ for I would be disappointed with (3 of the most obvious bits are in the holes where the valves go - I wonder if this is where he had them hanging up). I gave him £120 in the end (previously agreed £180) as they're 90% decent and perfectly usable, plus will no doubt be curbed at some point in the next 6 months anyway so I don't need them perfect.

Onwards!
 

Attachments

  • 20200302_191749.jpg
    20200302_191749.jpg
    257.8 KB · Views: 1,539
  • 20200302_191823.jpg
    20200302_191823.jpg
    151.5 KB · Views: 1,539
  • 20200302_191856.jpg
    20200302_191856.jpg
    269.1 KB · Views: 1,539
  • 20200302_191911.jpg
    20200302_191911.jpg
    298.1 KB · Views: 1,539
  • 20200302_191942.jpg
    20200302_191942.jpg
    185.7 KB · Views: 1,539
  • 20200302_192104.jpg
    20200302_192104.jpg
    192.7 KB · Views: 1,539
  • 20200302_192119.jpg
    20200302_192119.jpg
    189.6 KB · Views: 1,539
Powder coated items need to be earthed before the spraying process as the powder carries a charge & is attracted to the item, giving a better coverage. As you say, it looks as though the piece of wire/hook has been located in the valve recess leaving an obvious mark.the other marks look like poor prep, possibly not tacked down or blown clean with an airline.
Just a bit sloppy really :|
Rob
 
I think I would have gone for a different coloured centre like black to mask the different colour as that would annoy me.
I am having my X6 wheels redone as one of them had laquer lifting after the tyres were changed, the powder coaters could not give a good enough match as their silver was brighter than the silver already on the wheels so am having the 4 wheels redone.
 
Timmyboybunter said:
Silverstar said:
Thanks for the tip, but the problem I am facing is how to get this PCB board out of the black phone cradle without breaking it apart.

Not sure if these will help, but they show 2 cradles, one with the 2 pieces assembled together, one apart - you might be able to see a bit better what needs to be persuaded open but it does just need a bit of force.

Thanks for the photos so from what I can see the cradle has three sections the top cover which releases so you can fit the appropriate phone snap in adaptor and then the cradle itself comes apart in two pieces. So looking back at my photo it seems I just need to separate the two pieces of the cradle and that will then allow me to remove the PCB board?
 
Silverstar said:
from what I can see the cradle has three sections the top cover which releases so you can fit the appropriate phone snap in adaptor and then the cradle itself comes apart in two pieces. So looking back at my photo it seems I just need to separate the two pieces of the cradle and that will then allow me to remove the PCB board?

If I understand the design correctly, yes it's a 4 section layer - your last photo shows the bottom 2 layers, then a snap in connector sits on top of this appropriate your chosen phone (albeit all 10 years out of date :)) and finally your phone slots in at the top into the snap in connector. You need to pull apart those bottom 2 sections which are currently attached together in your photo - by moving the little tab connectors aside that you can see at the bottom. Like I mentioned, I snapped mine right at the top but this made it a lot easier to seperate the 2 sections as you can simply lever the inner section up and out through the broken tab.

I wouldn't worry too much about damaging or not damaging those parts however unless you're planning on re-installing at a later date - I can't see any future owner would get much use out of them and they don't really go for anything second hand.
 
Smartbear said:
Just a bit sloppy really :|
Yup - I think at the 3rd attempt he was probably already at the 'bugger it' stage and resigned to giving them back to me for nothing, may explain the lack of care. He was recommended by about 15 people on a local Facebook group.

Nictrix said:
I think I would have gone for a different coloured centre like black to mask the different colour as that would annoy me.
I'm not a huge fan of different coloured sections, though it does depend on the colour choices - I've seen some 108's looking nice, I think Mr Wilks had a set with a slightly darker outside rim.

I'm not overly bothered really - will reserve judgement until I've got them assembled and take a view then, I'd still only be £140 down even if I didn't go ahead. I also have the option of sticking the original tyres back on rather than forking out for a new set - they're perfectly usable with brand new rears, it's just they're run flats, bridgestones at the front but budgets (albeit brand new budgets) at the rear - rather than springing for the frest set of non-run flats I had planned.
 
Timmyboybunter said:
Silverstar said:
from what I can see the cradle has three sections the top cover which releases so you can fit the appropriate phone snap in adaptor and then the cradle itself comes apart in two pieces. So looking back at my photo it seems I just need to separate the two pieces of the cradle and that will then allow me to remove the PCB board?

If I understand the design correctly, yes it's a 4 section layer - your last photo shows the bottom 2 layers, then a snap in connector sits on top of this appropriate your chosen phone (albeit all 10 years out of date :)) and finally your phone slots in at the top into the snap in connector. You need to pull apart those bottom 2 sections which are currently attached together in your photo - by moving the little tab connectors aside that you can see at the bottom. Like I mentioned, I snapped mine right at the top but this made it a lot easier to seperate the 2 sections as you can simply lever the inner section up and out through the broken tab.

I wouldn't worry too much about damaging or not damaging those parts however unless you're planning on re-installing at a later date - I can't see any future owner would get much use out of them and they don't really go for anything second hand.

Thanks, I will give it another go this weekend. I am planning on removing the cradle and putting in its a place a rubber mat and leaving the cup holders intact. I don't drink in the car so I use the cup holders for holding small objects like coins keys etc makes it much easier to locate them afterwards. The area where the phone cradle is, is still sufficiently large once the cradle is removed :D
 
In less position news, I have a new issue today which means the car is off the road :thumbsdown:

Put something in the boot, got back in the car, odd noise coming from the back - went back outside to find the soft close mechanism constantly grabbing and releasing the boot lid (i.e. soft closing and then releasing the soft close immediately afterwards). I can just interrupt it enough to open the boot, but if I close it again the cycle repeats - the only way to stop it is to have the boot just sitting closed and not latched - so not secure.

Quick google shows similar problems reported e.g.

https://z4-forum.com/forum/viewtopic.php?t=91766

So looks like I'll be tearing into the boot come the weekend.
 
Short video of the roof issue:

https://youtu.be/o1_rXxUM8rY

Took the locking mechanism away from the boot lid, not too bad a job, to find this.

20200306_183611.jpg

Hmmm, where's the rubber sleeving I see mentioned in all other threads? Why is it wrapped in insulating tape? WHAT'S WITH THE CABLE TIE!

It's had this issue before :D

Clearly see here previous repair, each wire had been soldered at the 'known' manufacturing weak spot and heat shrink tape applied. The blue wire had become loose again however.

20200306_184036.jpg

Made good that wire, all assembled, boot now working. 3 hours roughly, could do it again start to finish in 45 mins. Hardest bit is refitting to the boot lid on your own.

Continued thanks to the forum, is the first Google result when searching.
 
Thanks to your help I finally managed to remove that stupid phone cradle. :yeah: took the tray out gave it good clean and put it back. I have sent an email to my BMW dealer and ordered the rubber mat to go in place of the cradle.

IMG_7962.jpeg
 
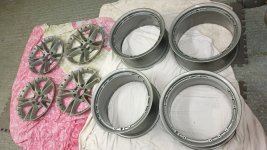
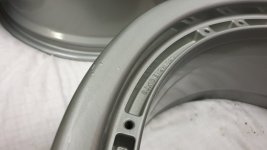
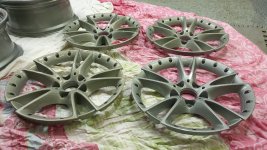
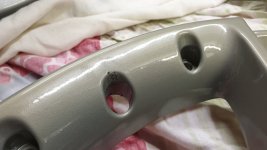
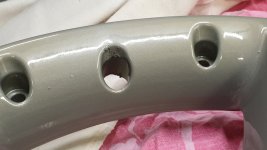
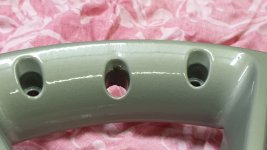
Not so great update on the alloys - unfortunately the additional thickness the power coat introduces means the center sections on each wheel won't slot into the outer rim. I did think about getting the mating surfaces masked off, but just to ensure they would fit together nicely without any movement down the line if the powder coat was disturbed - but didn't bother in the end as I concluded it wouldn't be a problem.

Didn't consider for a moment that I'd have fitment issues post power coat - actually quite funny, full on Homer 'DOH' moment.

Not sure next steps - may buy an abbrasive disc for my angle grinder and just grind down the 2 offending surface, needs some thinking time.

Other than that, following the boot fix yesterday it's been a positive 24 hours :D

Wiper blades changed today as they had become very noisy - managed to pick up some genuine BMW ones on Ebay for £40, still a bit more expensive than most of the after market options (are they OE Bosch?) but takes all of the guesswork out regarding fitment or quality. Easy to fit, 2 minutes tops. Gave the glass a good clean and also used some 'Rainex' I had sitting in the garage, usually used for my motorcycle helmet visor. Never used on a car before so thought I'd give it a try.

Also fitted my new M-Sport wheel. Once I'd seen it in the flesh, I ditched the idea of swapping over the chrome bits from my wheel - all black actually looks a lot nicer.

Before: (apologies ///M police, it was there when I bought it)

20200307_131942.jpg

After:

20200307_132845.jpg

So, so nice. Amazing what a difference it makes just the added thickness and different texture. I had the same experience in my E85 when swapping out the standard skinny wheel for a Z4M wheel. Highy recommended. This is forum member Rassi's wheel, all the way from Belgium - perfectly packaged and pretty much pristine condition.

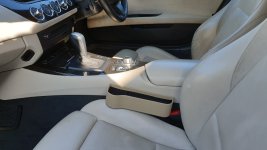
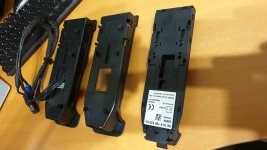
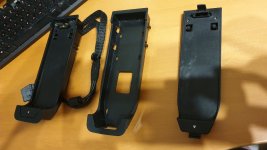
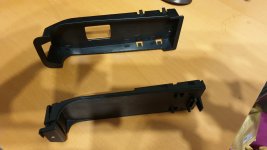
Also fitted a Smart Top I picked up on the forums. Fairly straightforward as the instructions are excellent - the only issue I hit was when fully assembled, I had a red flashing 'error' light on the module and taking everything apart and trying again didn't solve it.

Again, as per the instructions (mentioned in there in case of error) I removed the outer casing of the replacement harness and it finally worked ok, so it was 100% a connection issue. Looks like the chap I bought from also took this option as there were minor marks on the connector casing where it had been removed before.

Had the gap-tech on my E85 and the missing 'one touch' roof operation (both from a single button press inside the car, and from 3 presses on the remote) was annoying me, so a worthwhile mod.

20200307_134318.jpg
20200307_141808.jpg
20200307_141821.jpg
20200307_142458.jpg
 
The other cupholder arrived, far better than the black one - perfect fit for my travel mug, nice and secure when slotted into the cap in the passenger seat.

Not the best colour match to my ivory white interior but not overly bothered - will be tucked away behind the passenger seat when not in use for a long journey.
 

Attachments

  • 20200322_141714.jpg
    20200322_141714.jpg
    176.1 KB · Views: 1,557
Wheel update:

Well this really has been an exercise in exactly how NOT to refurbish a set of split rim alloys :D

Bought a flap disc for my air powered angle grinder - first time I've used it, but unfortunately my puny air compressor (standard Lidl 'Parkside' job - the smaller version) can't produce enought air to run it for more than a few seconds. Bugger.

Good excuse to buy additional man-tools, so now own an electric version.

20200314_114532.jpg

Had to grind 3 seperate surfaces in the end, including the main wheel and the face section. The flap disc makes short work of powder coat (and, as it happens, alloy wheel - need to be very careful) but took a good few hours to complete. I also found that contrary to what my wheel guy told me, there was no acid dip in between his multiple attempts - I found at least 3 layers of powder coat all sitting on top of each other so no wonder the wheels didn't fit together. Picture below shows newly ground bare alloy on the right hand side.

20200314_115549.jpg

20200314_132440.jpg

20200314_132453.jpg

Yup - they're a mess. Thankfully when assembled, all that ground alloy is hidden.

Cleaned everything up, then reassembled. Used blue loctite on each bolt, decided on 22 foot pounds of torque in the end (assuming my cheap, old torque wrench is vaguely accurate) which felt fairly tight but no-where near what might snap another bolt.

Thankfully the reassembly went 95% to plan. The only issues I had, both on the same wheel, were one single bolt could not be tightened properly - it would only tighten so far then just spin loosely in the thread so is as tight as possible (which is 'reasonably' tight) but hopefully the loctite will hold it fast. Fairly sure this was the bolt hole that snapped and my mate drilled out, catching the thread - and one bolt for some reason would not screw all the way in before becoming too tight - so sits a couple of mm off where it should be. I could have forced it a bit more but was again in bolt snapping territory didn't want to risk it.

Will these 2 issues on one wheel - plus all the grinding on all wheels - affect their ability to balance or hold air etc? Haven't a clue.

I now have 4 looking like this:

20200314_135711.jpg

Only had to use one of my aftermarket bolts in the end (to replace the single bolt I snapped when disassembling). Happy to report it works perfectly fine and torqued up without issue. It actually looks better than the original BBS bolts as sits very slightly lower in the bolt holes and as my earlier picture shows has a different shape.

Original on left, replacement on right:

20200328_131026.jpg

Different angle, original on right, replacement on left:

20200328_131056.jpg
 
Managed to pop out with some Z4 chums last Sunday for a blast around the Mendips (Edited: NOT the Cotswolds!) - glad we did now as the lockdown came into force a couple of days later.

I thought the car felt a bit vague a couple of times, but didn't think too much of it at the time. Turns out, the nail I spotted in the front offside tyre a couple of weeks ago must be a new addition, as when I checked the low-looking tyre today I found it to have exactly zero PSI. Impressive things these run flat tyres.

It's half good news in a way - there's no way I'm buying a 'new' 17" tyre, so this makes up my mind to fork out for a brand new set of 18" tyres for the newly refurbished wheels and see what happens.

On an unrelated note, the M-Sport wheel is just a lovely, lovely thing - both the width and the feel of the material. Would recommend this cheap/easy upgrade to anyone with a standard skinny wheel.
 
Timmyboybunter said:

Since you have the time now I would respectfully suggest that where you ground the paint back on the wheels to bare alloy you treat the bare alloy with an aluminium anti corrosion treatment such as alodine or chromate..you’ll find that bare alloy, especially with trapped moisture and dissimilar metals ie your bolts will corrode like crazy but hidden from view..
 
Ta, I did give that some thought - but lost patience with these wheels long ago so didn't bother in the end. All the now bare bits are inaccessible since the wheels have been reassembled but agree there will probably be corrosion between the mating faces of the 2 wheel sections. The bolt holes will be fine however, they had silicon bungs present during the refurbishment process.

Opted for Dunlops in the end (SportMaxx RT 2), mobile fitter coming on Thursday.

Also forgot to mention for the curious, the face sections are different between staggered front and rear - they have matching rim sizes stamped on the spokes which can be matched to the corresponding sizes stamped on the main wheel.
 
Next hurdle passed - the tyres all fitted ok, only 1 required additional weights to balance which is a result. Fitted to the hub without any additional grinding required, but as they're basically connected on fresh powder coat I'll keep more of a careful eye on the torque than I usually would - not that I'll be going anywhere soon until the lockdown passes.

Before and after pics, but the new wheels already need a good clean to get rid of the tyre lubricant and some rusty powder that has come off the wheel nuts.

Just need to see if they hold air and don't fall apart :) but looking positive.

Tyres were sourced from Black Circles, mobile fitters were 'Wiltshire Tyres'.

Edit: withdrawing recommendation for mobile fitter "Wiltshire Tyres" as they've taken a chunk out of one wheel. Grrr.

1.jpg

2.jpg

3.jpg

Before.jpg

Before_2.jpg

During.jpg

After.jpg
 
Back
Top Bottom