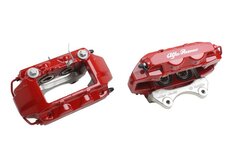
Machine monkeys zed

Mister T said:
GuidoK said:
It's not possible to mill a flat on where the lugs of the calipers are? and then drill a hole through or maybe a blind hole with thread insert?
That way you can make an angular bracket what is normally used.

You can definitely do that with a 17Z or 18Z caliper, not sure there's enough meat on those Alfa ones

You have hit the nail on the head. There just is not enough room to do that.

I have even thought about machining up a threaded blank and screwing it into the thread on the caliper. Then welding that. But the new hole will be right on the edge of the blank and very close to the outside edge of the caliper.
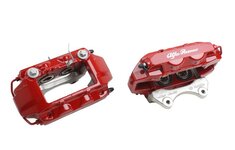
 
Our coded welder has had a look at what i am planing on doing. He has not got a problem with welding cast steel. he is going to sort it out for me. I have showed our designer to. And he thinks what i am doing is belts and braces and should be ok??? I guess i will do it and take a look and see what i think.

The spindles cost me £30 so its not a big waste of cash if it dose not work. I might have to give one of the spindles to the guys in materials or engineering and do some destructive testing on it :evil: :evil: :evil:
 
Well if you give the lug after welding a good wack with a hammer and it doesnt break, its probably OK.
Usually it's either internall stress that cracks the weld or due to all the carbon, it'll get brittle and a hammerblow should probably show that.
At least the breakingforces aren't sudden shocks but gradual forces.

If you can heat the lug (or better said the weld) before and after welding with a blowtorch, it will unstress more gradually. Just be careful that the complete knuckle doesnt get so hot that it damages the bearing etc.

But usually they make something like this:
6973_1.jpg
I think this is an alfa GT caliper, that already has the holes to mount up with an angular bracket.
And with that bracket you design the offset and rotorsize compared to the knuckle
 
Great news on the brakes.

So, it took me since I first logged back on but I've just read through and caught up!

Brilliant thread Mat, a real credit to you. Colour looks immense.

As for the roof, when my motor packed up, I didn't listen to the advice on here and refurbished it myself. Got it working very easily, drilled a few drain holes and it's been fine ever since.

All I did was remove the motor, clean it up with some cleaning spray, few taps with a rubber mallet and some rust fell loose, repeated a few times whilst turning it over by hand, then got it connected up to a battery with some fly leads. Lubricated it and run it for about 5 mins in each direction. Good as new. Cost, about £10 in fluids. For someone such as yourself it should be bloody easy!
 
GuidoK said:
Well if you give the lug after welding a good wack with a hammer and it doesnt break, its probably OK.
Usually it's either internall stress that cracks the weld or due to all the carbon, it'll get brittle and a hammerblow should probably show that.
At least the breakingforces aren't sudden shocks but gradual forces.

If you can heat the lug (or better said the weld) before and after welding with a blowtorch, it will unstress more gradually. Just be careful that the complete knuckle doesnt get so hot that it damages the bearing etc.

But usually they make something like this:
6973_1.jpg
I think this is an alfa GT caliper, that already has the holes to mount up with an angular bracket.
And with that bracket you design the offset and rotorsize compared to the knuckle

Agreed my boss the coded welder has been doing this stuff for years and years.
If he is happy with it when it's done I will be too. He has said about ore heating I am just going to leave him to it.

I have seen this sort of bracket and there is no way of me doing it with what I have. The lugs I have made will be welded on and then additional webbing put on. The lug I have made are actually bolted on using the original spindle holes. As well so I am sure they are stronger than what was originally there.
 
RJS-Z4 said:
Great news on the brakes.

So, it took me since I first logged back on but I've just read through and caught up!

Brilliant thread Mat, a real credit to you. Colour looks immense.

As for the roof, when my motor packed up, I didn't listen to the advice on here and refurbished it myself. Got it working very easily, drilled a few drain holes and it's been fine ever since.

All I did was remove the motor, clean it up with some cleaning spray, few taps with a rubber mallet and some rust fell loose, repeated a few times whilst turning it over by hand, then got it connected up to a battery with some fly leads. Lubricated it and run it for about 5 mins in each direction. Good as new. Cost, about £10 in fluids. For someone such as yourself it should be bloody easy!

Thanks buddy I gave been busy since you stopped checking in hear.

I am not worrying about the motor yet I think that's due to the weather!!
But I am sure once it brightens up and the oily mechanical stuff is done. I will pull my finger out read a how too or two and get cracking.
 
Machine monkey said:
RJS-Z4 said:
Great news on the brakes.

So, it took me since I first logged back on but I've just read through and caught up!

Brilliant thread Mat, a real credit to you. Colour looks immense.

As for the roof, when my motor packed up, I didn't listen to the advice on here and refurbished it myself. Got it working very easily, drilled a few drain holes and it's been fine ever since.

All I did was remove the motor, clean it up with some cleaning spray, few taps with a rubber mallet and some rust fell loose, repeated a few times whilst turning it over by hand, then got it connected up to a battery with some fly leads. Lubricated it and run it for about 5 mins in each direction. Good as new. Cost, about £10 in fluids. For someone such as yourself it should be bloody easy!

Thanks buddy I gave been busy since you stopped checking in hear.

I am not worrying about the motor yet I think that's due to the weather!!
But I am sure once it brightens up and the oily mechanical stuff is done. I will pull my finger out read a how too or two and get cracking.

You certainly have mate, but it's looking brilliant for it. I know how long the paint has bugged you for!

Well if I happen to have a free weekend when you decide to do the roof motor, I'd be more than happy to pop over to monkey HQ and give you a hand. Especially if the weather's nice and I can come over on the bike!
 
The first one is done and welded. And I have smacked the crap out of it every witch way!
I will post pictures once they are done. But these things won't be braking any time soon!! I really really really hope!! I may have added a little weight but really not much over the original spindles (13kg)
 
Mm

Remember rotating mass is your enemy,especially on a track toy, reducing unsprung weight on suspension parts is a simple way to improve efficiency and handling on track where every advantage to going faster is needed,,could you get lightweight rims and two piece discs to try and offset your weight gain ??
 
I am really not worried i will have added a few grams with what i have done. And the calipers are again a few grams more. But my coilovers where lighter than the standard set up so i am sure it weighs no more than the standard.
 
Brilliant progress mate, wish we could have done this ages ago! I think it'll be a brilliant upgrade!
 
RJS-Z4 said:
Brilliant progress mate, wish we could have done this ages ago! I think it'll be a brilliant upgrade!

Let's wait and see still lots could go wrong!! You won't miss these when your driving a Porsche :thumbsup:
 
Machine monkey said:
RJS-Z4 said:
Brilliant progress mate, wish we could have done this ages ago! I think it'll be a brilliant upgrade!

Let's wait and see still lots could go wrong!! You won't miss these when your driving a Porsche :thumbsup:
Quite true mate! Keep up the good work though, I look forward to seeing these go on. Do you want some brembo stickers to stick on there? You can order them on eBay if I remember rightly?
 
Back
Top Bottom