>

Dan's New Z4M Coupe!

DSGRNMCM said:
I can see how buying an expensive car and running one are two different things. If it was my only car I would be buggered!

True, but look on the bright side!

Barring anything unforeseen if you stick to the BMW schedule you'll only need an oil service in the next 2 years. :D
 
Well having just had an Inspection 2 and new bearing shells in my Coupe that's what I'm telling myself (and my bank account). :lol:
 
Evening All!

So picked up the Zed today at 0830, then back to WFH and at 1300 was out taking it to bits! the garage did the remedial work, bearings / shells and CDV delete. I have to say for me it feels a lot better in 1st and 2nd, when cold. I still paln to change the gear box oil tomorrow.

Worn shells, second set, not recorded in SH.upper and lower bearing.jpg

Garage did:
AC Belt
NS headlight nozzel replacement
HEL Brake lines and pipes all round
rear pads and discs
removed drive shafts and replaced with reluctor rings???
replaced both suspension arm bushes
brake fluid change
rear plate lamps
Inspection 1
cleaned VANOS unit
replaced ARB links
unwould rear suspension to rise it
removed clutch delay valve ( i will go back for an armoured pipe, as they may be a danger of the pipe bulging with no CDV apparently.

Then I got the spanners out:

ZHP swap over, the old one popped off. Both knobs.jpg
New one
ZHP stick.jpg
old one
Old stick wires.jpg

then de badged (Used teh kettle then dental floss method, with Turtle wax and WD40 to remove tar.)
Badge resedue.jpg

not sure weather to have no badges, or put a black one on the right side. As in Driver side and I believe the correct side.
Both badges.jpgBoth M badges.jpg

Then whipped out the old broken glove box, changed the lock / hand;e and job done. Glove box.jpg

One of the angel eyes was loose, So I had to take apart the front bumper, which is now wonky to get to it.
headlight lens.jpg

Bumper chamge.jpg

It was well and truly pre bodged!
 
Hi, regarding the M badge, if you moved it to the other side, then I would mirror it's outboard position?
m.JPG
 
DSGRNMCM said:
Cheers Z4C_er,

Do you have any measurements for that position?
Tomscott has since provided a link, but failing that, I'd put masking tape on the car (vertically) and measure the offset to the CHMSL then repeat on the other side.
 
Another busy day learning about my car. Two things that are apparent are: this forum and Piston heads are a wealth of knowledge and helpful people, so thank you!

Secondly my car may not have been as well looked after in its life. Having discovered missing screws, glue on glue and masking tape on a damaged headlight all point towards not the best care. But I'm happy to sort this out and get it back to scratch. It is slightly annoying diverting my funds from enhancements (Roof wrap, CSL / Style 32 alloys, upgraded speakers) to spend on getting the car back up to OEM standard. But I enjoy it and I know I'm building a better car!

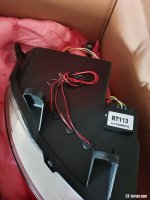
So today I did the sound insulation:

I used this from Ebay, £10.99. Only to find out afterwards, my neighbour has loads as he is doing out his Mercedes van... Anyway this roll was enough for some strips inside the doors.

https://www.amazon.co.uk/gp/product/B07QKDQ45Y/ref=ppx_yo_dt_b_asin_title_o05_s00?ie=UTF8&psc=1

Sound material size.jpg
1: 71cm x 19cm Upper door panel (There is a double strong point / line in the centre of the door)
2: 66cm x 8cm lower door panel
3: 12cm x 19 cm rear of door in upper panel

The glue was not set, and like Tar so I recommend using gloves, and slowly peel the foam free. Next summer I may take all the grey foam off and remove all the glue and insulate it properly.
rhs door rear insulation.jpg

I hate working on the interior of cars, things tend to either release as intended or bloody snap off! today just 4 clips and the "Airbag" cover were casualties! I had some spares in my Bits & Stuff drawer.
bits.jpg

Then we went for a quick spin round the Barbarian and Hoe, the Mrs had her first drive and likes it! (which is good as we are off to France next week!rhs street middle middle.jpg

Rear Street.jpgrhs jetty barbican.jpg

I'm liking the no badges!

Then I washed, waxed the cars. Although may have left my window down initially when using my new Amazon snow foam lance....
all 3 snow foam.jpg

I have ordered some new fixings for the front bumper, as some are missing, some are odd and it sits funny since I was looking at the LH headlight. My new ones should arrive next week prior to us going away! It is really annoying me, but I want to minimise the removal of the bumper. front barbican.jpg
 
Wow - I thought my shells looked bad! You must be glad you got them replaced Dan.

And I can definitely relate to your experience of sorting "niggles", although you seem to be making good progress. Still it's a relief to hear your Mrs likes it!

But like "bakes100" says the rear of your car looks like it's sitting way lower than I'd expect with standard Eibach lowering springs.
 
I only have partial paperwork for the springs with an eibach header on it.

I do feel hapier knowing that teh big issue has been put to bed , for a few K.

Now wrestling with the Headlight. thought wing mirrors were disproportionately expensive.
 
Afternoon All,

So we got back from France last night, after 5 days away. Not bad , but a bit of rain on the last 2 days.

It was my first proper drive of the car after the garage work, so got to know it a little better. Even with the CDV delete it is still a git to shift to 1st and 2nd, I still have to swap out the gear box oil.

I feel (maybe in my mind) that when the car is cold it feels more solid, then when it is warm more loose and clunky? I'm thinking engine / gear box mounts? or is it just me?

Didn't really get to drive to its full potential in terms of speed, as loads of slow roads, and a few cameras. I also got flashed on a dual carriage way, so I will wait and see what the post turns up with.

Had to park the car opposite the Air B&B, and away from some roof work.
Air B and B.jpgAir B & B 2.jpg
car park home.jpgreflection.jpgsea front.jpg

The huge Sub Pen in Saint-Naziere
SN sub pen.jpg
 

Attachments

  • 3rd party head light drls.jpg
    3rd party head light drls.jpg
    120.4 KB · Views: 1,868
When We got back my 3rd party head lights were here and my code reader!
box.jpg

so that is two things to do when it is dry: Headlights and Gearbox oil!

I cleared the Airbag light with my £49.99 Amazon device C310+

https://www.amazon.co.uk/gp/product/B01MPZTM5Q/ref=ppx_yo_dt_b_asin_title_o03_s00?ie=UTF8&psc=1
 
So head lights returned, OEM just ordered! Put off the gear box oil change, due to rain.

The original headlight, is now letting in water! bugger.

Still in two minds about the plasti dip, but will try it as can be peeled off.
 
Afternoon All,

So today was going to be headlight and Gearbox oil day (The sump plugs were cheaper from BMW!)

So I thought I'd just do the headlights after seeing how small the working space I would have contend with working on the car using jacks. I'll get it on a ramp for the gear box oil change.

Top Tip: Have a second person help you refit the front bumper! and make sure the lamp wash hose is secured out of the way when re fitting.
Top Tip 2: Order some panel supports before taking the bumper apart as mine snapped. (LHS 51117165179, RHS 51117165180) 23EUR each. from here part 17, then select left and / or right.

Link https://www.hubauer-shop.de/en/carp...-coupe-vehicle-trim-du91/du91-515960-verklei/

So off with the tyres, I'm still working how best to use the jacks and axel stands. I used the tyres and cardboard to support the bumper as it is still connected to the water supply for the jet washer. I undid the lower fixings, then side ones (Wheel arch) and finally the upper ones in the engine bay.
q1.jpg

There are many tell tales about a cars life, and the previous owners intent or level of care. This is a good one, a number of fixings are missing or mixed types. I've got a load on order.
fixings.jpg

4 Torx T25 bolts hold the head light unit in, 3 on the front and one on the side. There is a lot of movement to allow correct sitting of the headlight. The inner bolt has the crash bar in front of it, so I had to use a small ratchet.
q2.jpg

Next was to remove the small connector by squeezing in this bottom clip and then used a screw driver to leaver it up and off.
q3_LI.jpg

The large one, you pull the housing to the side and it self lifts off.
q4.jpg

Here the two headlights, my new one was from Habauer-Shop.DE, a German OEM supplier. It did not come with Ballast, Igniter or main lamp. The side lamp was included. I had a new ballast as the old one was wetter than a dolphins eyelid.
q5.jpgq6.jpgq7.jpgq8.jpg

After undoing 3 spring clips, I twisted the main lamp off, but could not fit it to the new unit. A quick facebook ask got a rapid and helpful response that the lamp comes out of the unit. DOH!
q9.jpg
 
q10.jpg

These clips go over the black lamp housing. then click / screw the igniter on.
q11.jpg

This was the old ballast, covered in tape and clingfilm. Which made me think, should I water proof the new one?
q12.jpgq13.jpg

So after all that was done, plugged the headlight in, put a single bolt in, then tested the lights and it all works.

RHS one is from 2007, and LHS one from 2019 or 2020. So it does look different, might give the old one a clean and see if they will match up.
When replacing it, I'd recommend screwing all 4 bolts part way in, then position the headlight before tightening up for the final fit.

Fitting the bumper was a PITA, check the lamp washer hose is clipped in, and use a second person as I was getting frustrated. The LHS snapped, so more on order.
q14.jpg

Finished product!
front end.jpg
 
Back
Top Bottom