Atacama Yellow 35is build thread

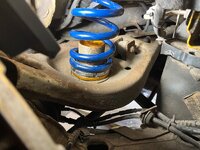
So today I took off the rear prototype BBK parts and carefully inspected them for any signs of failure / distress…

All’s well..smothered everything in blue loctite when assembled after an initial loosening of a bolt ..boy it makes it hard work to undo..even after you’ve cracked the nut..

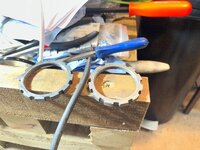
You can see how the Nordlock hardened steel lock washers bite even to the steel bracket..

Very pleased to see that the pad sweep is perfect and the combo of Ferodo DS2500 pads and F01 7 series 370mm disc are all good.

So about 5,000 miles and all well…

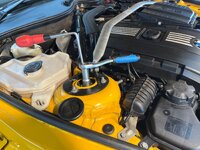
Just finishing off painting the production version of the brackets prior to fitting those.IMG_0806.jpegIMG_0805.jpegIMG_0804.jpegIMG_0803.jpeg
 
I'll have a peek now!
Well…contrary to your assertion…lo..H&R ARBs in a fetching blue and what look like stock ARB drop links..

The confusion may occur when E89s are severely lowered as in B+C etc..?IMG_0802.jpegIMG_0799.jpegIMG_0798.jpeg
 
Apologies, what a bizarre setup, not to mention inconvenient!

How has this guy got his BC perch the right way round on e89? They can't really be much different?


So it looks like it’s a B&C set with notoriously short springs..with an elongated perch ..if you look on an E89 the inner lip of the steel wheel well has a curtain of steel that precludes getting c spanners in there in a range that Ohlins uses.

Ohlins has a long tradition of long travel softer springs with sophisticated damping ..IMG_0798.jpeg
 
yes i can see the issue from the KW instructions. God knows how much time you'd need to corner weight the thing!
Interesting though that they also say to mount it from the top.

kw.JPG
 
yes i can see the issue from the KW instructions. God knows how much time you'd need to corner weight the thing!
Interesting though that they also say to mount it from the top.

View attachment 287039
Ah..well you could do the same with Ohlins I guess using that logic..

I'll see how they fare on the NC500 next March....always always a good test!!
 
Another couple of hours spent fettling rear brakes….cleaned the rear calipers and put some etch primer on the caliper cradles…bolted up the satin black painted BBK adapter brackets..with blue loctite and funky Swedish lock washers ..IMG_0816.jpegIMG_0815.jpegIMG_0814.jpeg
 
So today my ebay purchase of a Audiotec Fischer MATCH MEC BT add in card for their DSP/amps arrived.

This little baby gives the ability for the DSP/amp outside of any interfaces to the car to stream audio in high res bluetooth from say your phone.

In addition it also allows the DSP PC based tool to access the DSP when tuning/changing stuff..rather than relying on a USB connection.

Since my Match 10 DSP/amp is buried deep inside the boot it will save leaving a trailing cable that can snag etc.

The DSP s/w allows lots of very clever tricks like deciding which input..this bluetooth or the car main input have priority..

Quite why I'll use that connection for say music at this stage if beyond me..but..

All part of the winter update program..

For late night readers..

https://www.audiotec-fischer.de/media/pdf/c5/80/b9/BA_Extension-Card_BTzpj6hdi0ZYhGT.pdfIMG_0844.JPGIMG_0843.JPG
 
Following on from my using some Hyperco 96nm/mm rear springs in lieu of the broken, rusted (maybe coil bound) 70nm/mm orginal Ohlins spring.., I decided to tackle the front end.

As Ohlins only made one kit for all E89s I pondered how they manage with say a 28i Manual with 1480kg weight 705/774 f/r and a 35is at 1610 with 795 / 815 f/r to work out one set of springs would work..given I've got another 30kg at least plus roof down..say 870kg rear..

So there's a 12% difference on the front and 5% rear and for me with roof down 12% difference.

Sadly Ohlins UK distributor couldn't find any of the 70nm/80nm spare springs..not helped by refusal to disclose the actual part numbers..

Repeated searching for a solution finally resulting on a chap selling a set of Ohlins R+T springs for a Boxster 987.2..and voila..some brand new springs 70nm/80nm for a snip..about 25% of the Ohlins price if available..

So got these brand new babies..

96nm rear springs over 70nm is a 37% change and with 80nm fronts that will be 33% change..so at least an equal change proportion.

General advice seems to be not to get over fussy about ride heights etc until they've been run for a while to settle down.IMG_0849.JPGIMG_0848.JPGIMG_0847.JPGIMG_0846.JPGIMG_0845.JPG

In addition these Hilka spring compressors look like I can compress the springs in situ to reduce their height to aid removal..and then use them rebuild the coil overs with the Ohlins R+T Boxster 80nm rear springs!
 
Decided to change the plugs..a lot of internet hype about various ‘necessities’ plug wise on re-mapped and upgraded N54s..

My tuner chap reckons the stock Bosch/BMW 3 claw are as good as with a better idle…so 6 of those babies are going in..

Found some oil in 2 and 3 around the plugs..hoping it’s not the cam box…IMG_0854.jpegIMG_0859.jpegIMG_0855.jpegIMG_0857.jpegIMG_0856.jpegIMG_0858.jpeg
 
B21
Elite
ua Scottish Borders
Site Supporter
A moment ago
New

Add bookmark
#638
A slow n steady day..

Disconnected all the banjo bolts and drained out all the brake fluid..

Took all four calipers off for minor refurb…2 fronts are Ford Shelby Mustang Brembo 6 pots ..rears are F10 5 series M5 calipers..

Tackled first front strut..

The little tool to force open the bottom clamp on the knuckle is essential..

After many hours of messing around the right hand strut is out.

With the preload backed of there’s no preload on the spring..I thought it had settled.

However once out and the strut on the bench the and spring off the original 60nm/mm spring has not really settled.

Fitted the 80nm/mm spring but need a weird 21mm deep ring thing to be able to lockup the top nut..ordered..IMG_0879.jpegIMG_0877.jpegIMG_0293.jpegIMG_0878.jpegIMG_0292.jpegIMG_0876.jpegIMG_0880.jpegIMG_0291.jpegIMG_0290.jpeg
 
A bit of more work between either the rain coming horizontally through the garage / workshop doors or -5c frosts …

So today managed to reconcile how to tighten a 22m nut that fixes to the Ohlins internal damper strut that uses an Allen screw internal to the nut that requires holding to lock it..

I have 3 other versions of a 22mm locking device on order…issue is the nut is recessed in the damper tube..very little room for most socket types..

Meanwhile I spent ever hours with some 120 scotch pads roughing up the caliper paint and using more meths to clean the crap off..

Then sprayed them topsides with etch primer before hopefully tomorrow turning them upside down to spray the rest before the Phoenix gold and 2 pack lacquer..

Whilst they were drying refitted the first Ohlins damper carrying the 80nm/mm vs 60nm/mm spring..

Even routed the abs cable (on second attempt) the right way around the leg ..unlike the Ohlins service centre…naughty .IMG_0905.jpegIMG_0907.jpegIMG_0904.jpegIMG_0902.jpeg
 
Another day..

So finished spraying the primer on the other side of the calipers..

Then tackled the right hold Ohlin's strut..

Like so many things once you've climbed the learning curve life becomes so much easier.

Use the spreader tool on the bottom of the knuckle, sprayed loads of penetrating fluid in the gap..

Left it a while then the knuckle would slide down quite easily and managed to get the knuckle off the end of the strut with little difficulty.

So swapped another 80nm spring in place of a 60nm...looks like a bit of coilbound on the old spring..but no sag..

In the menatime got some lovely BMW Phoenix Gold spray paint on the the caliper top side..lovely colour..

Not sure whether the Brembo logos should be in white rather than blakc this time?

After that slippedthe RH strut in easy enough.

The folks before me have made a mess of the brake / ABS brackets so a bit of tidying up required.IMG_0918.JPGIMG_0917.JPGIMG_0914.JPGIMG_0912.JPGIMG_0911.JPG
 
Prevaricated on whether to go with white or black Brembo decals on the Shelby Mustang front calipers..in the end went black..

Spraymax 2k clear lacquer seems pretty epic stuff..

Used 3 cans of Phoenix Gold on the 4 calipers but only 1 can of lacquer.. IMG_0923.jpegIMG_0925.jpegIMG_0924.jpegIMG_0923.jpegIMG_0922.jpeg
 
Prevaricated on whether to go with white or black Brembo decals on the Shelby Mustang front calipers..in the end went black..

Spraymax 2k clear lacquer seems pretty epic stuff..

Used 3 cans of Phoenix Gold on the 4 calipers but only 1 can of lacquer.. IMG_0923.jpegIMG_0924.jpegIMG_0923.jpegIMG_0922.jpegIMG_0925.jpegIMG_0920.jpeg
 
A mixed day..carefully and successfully buttoned up the front end…thought I was on a roll…

On the backs I was trying to re-use the old M5 rear calipers and their cradles..all lovingly painted..

However..the now ‘proper’ brackets I’ve made for 345mm and 370mm rear BBKs are now machined and the odd combination of M5 cradle with 345mm ‘proper’ bracket fouls in various ways unless I use spacers..the whole idea of the ‘proper’ bracket was to remove the need for spacers to avoid clamping / flex / vibration issues..

So I’ll have to do it ‘properly’..that is use a F10 5 series cradle (the M5 caliper and the F10 5 series caliper are the same bar colour) with the ‘proper’ 370mm adapter bracket…of course I’ve run out of paint so there will be a delay…

If you followed all that you’re doing well..IMG_0927.jpegIMG_0926.jpegIMG_0928.jpegIMG_0929.jpeg
 
Took the opportunity to see how the car settles / sits on its new springs 80nm/96nm vs 70nm/80nm even though I’m waiting to fit the rear brakes..

Although the wheel gap to my eyes according to the steel ruler we are not far off..

Depends what you’re comparing things to..stock non MSport suspension, MSport suspension, Ohlins recommendations..

Figures show my measurements..Ohlins in brackets to the side, stock figures below in each group..

However pretty close to Ohlin’s suggestions ..all within about 5mm which not bad for just a guess on the preloads ..

Strangely according to Ohlins the front sits about 10mm higher than the rear when stock..Ohlins suggestions are equal height all round.

So good enough for a few road trials when we can..

Put front dampers one click harder 9 vs 10 clicks and rear 8 vs 10 clicks for initial evaluation.

May ask why such a gap..

Well the final tyre combos are going to be 245/40 19 and 285/35 19 (437m) and 235/40 19 and 275/35 19 (Apex Arc-8s)

Compared to the stock tyres that’s another 20mm of side wall height and 20mm of tyre width..

So keen to make sure tyres have plenty of room to move around..given the NC500 is my favourite ‘test track’.IMG_3942.jpegIMG_3941.jpegIMG_0933.jpegIMG_0930.jpegIMG_0932.jpegIMG_0931.jpeg
 
One of the great advantages of having a fairly decent garage with good lighting when you are under no commercial pressures, id that you can just pause and reflect and then revisit.

Yesterday was a good example.

I fitted all the wheels and sat the car on the ground to check for how much sag there was on the front and rear suspension and found the rears were sitting slightly higher than I’d like and at the same time the right hand rear wheel camber seem to be badly out.

I wasted several minutes trying to undo the rear camber arm to no success and then decided to call it a day.

I thought about things overnight and today decided to remove the bottom preload collar to allow the spring to be further lowered on their perches. These were at the bottom of the travel but serve no purpose but they add another 10mm ish of rear ride preload..

I then also discovered that process that both the rear wheels although bolted up using the impact driver were in fact both slightly skewed, left-hand one marginally the right hand one quite badly.

The Apex Arc-8 wheels I guess, due to the paint finish were a very tight fit on the hubs.

Having taken everything apart and taking the lower lock collars off and screwed everything back down, using a torque wrench on all the bolts up prior to putting the car back on the deck, I was pleasantly surprised to see the sag and ride height had settled down quite nicely.

In addition the camber aspects were all reasonably okay with the exception the front left where a tad less preload is required and because I disturbed the control arm there’s slightly more camber than required so overall a good result.

As a side note an iPhone with an inclinometer app is very accurate for camber…

So static ride heights are all within 4mm of each other…there’s a 50mm difference between no load and static ..which I think is in the right ball park for a ‘sports car’..

The static ride heights split the difference between Ohlins stock and BMW non MSport settings.

In addition my new ‘suspension’ sockets arrived allowing me to torque down the Ohlins top strut nut whilst holding an Allen key to stop the inner rotating..

Decided to get out of the garage whilst the going was good!
 

Attachments

  • IMG_0937.jpeg
    IMG_0937.jpeg
    1.4 MB · Views: 2
  • IMG_0938.jpeg
    IMG_0938.jpeg
    1.8 MB · Views: 1
  • IMG_0939.jpeg
    IMG_0939.jpeg
    1.8 MB · Views: 2
  • IMG_0942.jpeg
    IMG_0942.jpeg
    1.4 MB · Views: 2
  • IMG_0943.jpeg
    IMG_0943.jpeg
    1 MB · Views: 1
One of the great advantages of having a fairly decent garage with good lighting
I've learned that no matter how good your lighting, everything you need to see is always in the dark/ shade on cars.
I have 12 huge LED adjustable-angle floodlights in my garage and I ALWAYS still need to have a headtorch on when doing anything. It really pisses me off.
 
Got to say Peter, you really are committed to that car. Fair play to you! :thumbsup:
 
I've learned that no matter how good your lighting, everything you need to see is always in the dark/ shade on cars.
I have 12 huge LED adjustable-angle floodlights in my garage and I ALWAYS still need to have a headtorch on when doing anything. It really pisses me off.
Your correct..I’m amazed at how often I’m still struggling despite those lights ..and nothing I’ve found has the right balance of light and accessibility …
 
Back
Top Bottom