Stone chips

Hi,
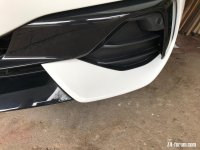
After 2000 miles stone chips starting to pepper the lowest part of the bumper/spoiler
Then at 2300miles a one 1cm across chip appeared at the very lowest point....quite a chunk out.
ChipsAway did a fantastic job; not cheap but looks perfect again.IMG_4836.JPG
 

Attachments

  • IMG_4871.JPG
    IMG_4871.JPG
    148.9 KB · Views: 1,452
Robsterrob said:
Just a bump on this....I am finding I'm getting stone chips on the inside of wheel arches (where the red paint meets the black plastic) and some road rash along the side of the car at the rear of the arches.

The leading edge of the sills on my E89 use to get hit my micro stone chips, so I got some heavy duty grip tape and cut to size to protect them 20190625_144459.jpg
 
Good idea Zed Baron. That doesn’t look out of place and certainly does the job.

I feel your pain G29Z4. What a pain having to have such a chunk in so few miles. Having looked at the front again, the sport and m sport bumpers and spoilers are a real area that will attract chips. They’re almost like a snow plough or cow catcher type design. UK roads are so rubbish and I’ve noticed a real deterioration around here of late in any case.
 
I was getting increasingly frustrated at finding more stone chips in the wheel arches, and having a custom set of guards made was cost prohibitive, however, I had a flash of inspiration, and had a look to see if anything similar was available for a Toyota Supra - and there was!

They needed a slight modification - one fixing hole was in the wrong place at the front, so a simple drill was all that was required, and I had to reduce the height of the spacers on the rear.

I think they look OK.
 

Attachments

  • flap 1.jpg
    flap 1.jpg
    236 KB · Views: 1,330
  • flap 2.jpg
    flap 2.jpg
    235 KB · Views: 1,330
  • flap 3.jpg
    flap 3.jpg
    221 KB · Views: 1,330
Great work Robersterrob! They really look the part and will help no end!
I wonder how many times a search for a Supra alternative will come up trumps for Z4.
 
Robsterrob said:
I was getting increasingly frustrated at finding more stone chips in the wheel arches, and having a custom set of guards made was cost prohibitive, however, I had a flash of inspiration, and had a look to see if anything similar was available for a Toyota Supra - and there was!

They needed a slight modification - one fixing hole was in the wrong place at the front, so a simple drill was all that was required, and I had to reduce the height of the spacers on the rear.

I think they look OK.

Got a link there buddy? Will have to make an investment in these...
 
Quick Google search should bring them up. I see they’re on eBay as well. Not cheap though are they!
 
I've found a UK site thats selling them, they would certainly help stop some of the stone chips that's appearing on mine https://maxpwr.co.uk/collections/exterior/products/zl1addons-supra-19-21-standard-rock-guards-mud-flaps?variant=37532296642756
 
That's the ones....need ever so slight modification (to the flaps, not the car) - you'll need a drill and a hacksaw. Pretty simple though.
 
Robsterrob said:
That's the ones....need ever so slight modification (to the flaps, not the car) - you'll need a drill and a hacksaw. Pretty simple though.

I've ordered a set, there're not cheap but if it sorts out the stone rash that's starting to form on the leading edge of the sills and rear bumper, then it will be more than worth it.
 
When you get it, could you post what you needed to do to them and maybe some pictures on how it affects the look of the car?
 
Swiftly said:
ori said:
When you get it, could you post what you needed to do to them and maybe some pictures on how it affects the look of the car?

Will do :thumbsup:

All angles! ;) I want to make an informed decision. All depends on you! No pressure!
 
Swiftly said:
Robsterrob said:
That's the ones....need ever so slight modification (to the flaps, not the car) - you'll need a drill and a hacksaw. Pretty simple though.

I've ordered a set, there're not cheap but if it sorts out the stone rash that's starting to form on the leading edge of the sills and rear bumper, then it will be more than worth it.

Nick, did you get these and if so how much fettling was required to get them to fit?

Cheers

Andy
 
Argyll Andy said:
Swiftly said:
Robsterrob said:
That's the ones....need ever so slight modification (to the flaps, not the car) - you'll need a drill and a hacksaw. Pretty simple though.

I've ordered a set, there're not cheap but if it sorts out the stone rash that's starting to form on the leading edge of the sills and rear bumper, then it will be more than worth it.

Nick, did you get these and if so how much fettling was required to get them to fit?

Cheers

Andy

Andy, the wheels will need to come off, but the whole process only took me over an hour to complete. The kit contains everything you need. The front stone flaps were the easiest to fit, but you will need a drill as I found the top 2 holes didn’t line up with the pre drilled holes on the flaps. I reused one of the old shorter plastic rivets to temporarily locate the flap in place so that I could mark the new locations for drilling. Removed flap and drilled 2 new holes, then refitted using the new slightly longer plastic rivets which are a perfect fit. Each of the rear stone flaps come supplied with 3 screws and 3 plastic collars which act as spacers. The plastic collars need to be measured and cut to size with a hacksaw, so measure twice and cut once! I will try and take a couple of photos of the rears when I clean the car tomorrow.
20210417_140957.jpg
20210417_120232.jpg
 
Swiftly said:
Argyll Andy said:
Swiftly said:
I've ordered a set, there're not cheap but if it sorts out the stone rash that's starting to form on the leading edge of the sills and rear bumper, then it will be more than worth it.

Nick, did you get these and if so how much fettling was required to get them to fit?

Cheers

Andy

Andy, the wheels will need to come off, but the whole process only took me over an hour to complete. The kit contains everything you need. The front stone flaps were the easiest to fit, but you will need a drill as I found the top 2 holes didn’t line up with the pre drilled holes on the flaps. I reused one of the old shorter plastic rivets to temporarily locate the flap in place so that I could mark the new locations for drilling. Removed flap and drilled 2 new holes, then refitted using the new slightly longer plastic rivets which are a perfect fit. Each of the rear stone flaps come supplied with 3 screws and 3 plastic collars which act as spacers. The plastic collars need to be measured and cut to size with a hacksaw, so measure twice and cut once! I will try and take a couple of photos of the rears when I clean the car tomorrow.
20210417_140957.jpg
20210417_120232.jpg

Cheers Nick, I think I’ll just order a set. Any further pictures appreciated :thumbsup:
 
Back
Top Bottom