You are using an out of date browser. It may not display this or other websites correctly.
You should upgrade or use an alternative browser.
You should upgrade or use an alternative browser.
Luke and his Z - Getting there!
- Thread starter LukeMace
- Start date
Got some CF Badges through finally!
Indicator start...

Prized back blue one with thin screw driver to get under tape
I then cut off the pegs on the badge and the lens and filed both down

Then stuck the new one on with 'Ever Build Mammoth Tape' (this stuff is strong!!)

The rear was simple. Pull off the old... Pop on the new... Simple!

Front - Because it came through at 73mm i had to take the sides down slightly at the back with dremel but sits nicely with mammoth tape again

Picture of the front with the bottom lip plasti dipped and front grills. Not a great pic to be honest!! Car needs a good clean and a polish, but looks great in person! Will clean the car in the next couple of days and get a decent pic up!!

I will also be final fitting the spoiler tomorrow so will update with finished pics of that too!
(and adjusting the left hand headlight to sit properly in the bumper!! )
)
Indicator start...

Prized back blue one with thin screw driver to get under tape
I then cut off the pegs on the badge and the lens and filed both down

Then stuck the new one on with 'Ever Build Mammoth Tape' (this stuff is strong!!)

The rear was simple. Pull off the old... Pop on the new... Simple!

Front - Because it came through at 73mm i had to take the sides down slightly at the back with dremel but sits nicely with mammoth tape again

Picture of the front with the bottom lip plasti dipped and front grills. Not a great pic to be honest!! Car needs a good clean and a polish, but looks great in person! Will clean the car in the next couple of days and get a decent pic up!!

I will also be final fitting the spoiler tomorrow so will update with finished pics of that too!
(and adjusting the left hand headlight to sit properly in the bumper!!
What is happening with you exhaust Luke? I am having mine off this week final tweaks. I will then send you all the bits. But i am thinking of splitting the pipes at the axle and putting in 2 very small silencers :evil:
That would sound sweet Mat!
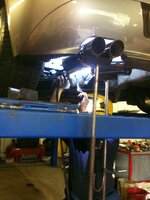
I took delivery of the SS tube a week or so ago so have that all ready to make the new back box.
I made a couple of mock pipes all bent up with mild steel to see if i could get the right shapes etc and get everything tight enough! WORKED A TREAT!! All i need to do now is bend up the SS and get everything together! Things just been so busy the last few weeks.
Looking to do it either this Friday or next. The hanging bits you made for the other side would come in handy still though
You got any more updated pics?
I took delivery of the SS tube a week or so ago so have that all ready to make the new back box.
I made a couple of mock pipes all bent up with mild steel to see if i could get the right shapes etc and get everything tight enough! WORKED A TREAT!! All i need to do now is bend up the SS and get everything together! Things just been so busy the last few weeks.
Looking to do it either this Friday or next.
You got any more updated pics?
Machine monkey said:What is happening with you exhaust Luke? I am having mine off this week final tweaks. I will then send you all the bits. But i am thinking of splitting the pipes at the axle and putting in 2 very small silencers :evil:
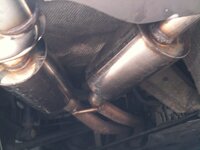
Do your research as I had the below (small) silencers fitted and it gave an awful drone - I swapped them out a few weeks later


Sure thing Luke Like i say i am taking mine off it all needs trimming down a bit. I will be cutting mine taking pictures for you then sending you all you need to do the same to yours. I doubt i will get it done and to you by Friday!
The 2nd box i made for you is a bit tight against the battery box.
Dont suppose you still have them Ranski?? I have just made up a second bypass pipe so i will try that first.
The 2nd box i made for you is a bit tight against the battery box.
Dont suppose you still have them Ranski?? I have just made up a second bypass pipe so i will try that first.
Few more shots of the badges...
Tinted the side repeaters today to tone down the orange

Going to chop them in half tomorrow to make them thinner too
Steering wheel

Wheel caps

Badge work complete! Apart from reducing the thickness of the indicators which I will finish tomorrow!
Didn't have enough time to fit the spoiler so will pop that on too tomorrow
Tinted the side repeaters today to tone down the orange

Going to chop them in half tomorrow to make them thinner too
Steering wheel

Wheel caps

Badge work complete! Apart from reducing the thickness of the indicators which I will finish tomorrow!
Didn't have enough time to fit the spoiler so will pop that on too tomorrow
ben g said:i've been meaning to cut the indicators down for a while now. how did you do it and what did you use to cut them?
being plastic, i can imagine they'd be easy to break
front end shot looks awesome 8)
Makes a big difference I think! It is A Fiddly job!
1) twist off indicator from side of car and take out bulb
2) leave the lens on the white base (gives you something to hold!)
3) mark out how far you want to cut down (masking tape) there are little squares that I judged it by. 3 squares high now
4) cut round with a Multitool (real pain cos the plastic wants to melt constantly!
Once I'd got round it there were a couple of small strands that were holding the top on which I went through with the Multitool again and quickly pulled off before the plastic had a chance to set again!
I have a linisher at work so I popped it on there for a sec to make sure it was all flat
I then used super strong double sided to stick the cap back on to the lens. You could probably use a silicone adhesive but didn't have any to hand :roll:
Took about 20 mins to do both sides and refit. Not too bad!
I could probably stick them on a lathe if needed?
Machine monkey said:I could probably stick them on a lathe if needed?
That would be a lot easier!
You have one Luke!! What where you thinking??
Similar threads
- Replies
- 8
- Views
- 417
- Replies
- 8
- Views
- 2K
- Replies
- 3
- Views
- 381
- Replies
- 10
- Views
- 675


