Front Bumper Removal - DIY by mister_roger

Okay, some photos from my bumper removal. This is the bumper clips before swapping them over, not nice, wide / wobbly panel gaps :

DSCF3666_zpsd499140d.jpg


DSCF3664_zpsb816385c.jpg


As said elsewhere, when removing the bumper it is very important to pull the edge up before pulling out as this helps to unclip the edges on the underside. Here is the state of my clip on the driver side (the passenger side was worse) :

DSCF3668_zps2ee0931b.jpg


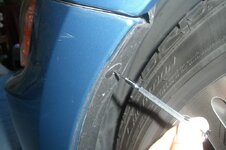
Clearly broken, but in case you didn’t notice (the 'clip' you can see sits behind the wing mounting and stops the arch liner and the arched edge of the bumper moving when it is all together) :

DSCF3669_zpsdaf64e1e.jpg


Getting these out without a proper trim removal tool is a b1tch as there are 3 or 4 feck off big clips that it is impossible to push from the inside without taking the wheels of and getting right inside the front of the arch. Having Eibachs and spacers doesn’t help, :oops: so I had to break them up very gently using a pair of snips to cut through the plastic and a small screw driver wrapped in cloth. When doing this you need to be careful not to bend the metal of the wing out of shape round the clip holes otherwise the new ones won’t sit flush. Here is what was left of the old clips when I was done :

DSCF3672_zps59cada0c.jpg


New clips in, you can see it looks they have changed the design and added some strength by completely surrounding that bolt above the light fitting... It may have been broken on the old one but I didn’t think so when I had a look :
DSCF3670_zpsc76f4f3e.jpg


DSCF3671_zps4d2f103e.jpg


All back together – not perfect (maybe I bent the fitting holes a little...), but much, much better :

DSCF3673_zpsb24b444d.jpg


DSCF3674_zps49cbaaf1.jpg
 
I have a loose front fog light behind the front bumper so this will probably come in very handy.

If the spot is loose, could it be a simple adjustment or should I expect to find something broken?
 
Could just be a missing or loose screw... But before you whip the bumper off have a butchers through the lower access panel in the wheel arch. Either take the wheel off (hassle, but best access) or turn the wheel all the way out on the offending side to get the space you need. Not in - the wheel stays in the way too much.
 
Nice write-up. I had to replace my left/rear bumper retainer clip over the winter (while in storage) and it was also a b1tch to remove, needed to be broken off (literally what it said on TIS) with pliers.
 
Great write up,very helpful. :thumbsup:
I removed my front bumper as my headlight was not in alignment with the wing,only took 1 hour to complete.
 
I tried to have a good look on Sunday at the fog light that was loose in the front bumper. As advised I opened the access panel, but without a ramp I found it nearly impossible to see inside.

Instead I just had a good feel around. The light is firmly within a mount, but the mount itself wasn't hooked in. From the feel of it, there should be a clip onto the top of the bumper but there is nothing there.

Before I take the full bumper off when the weather is a bit better, I suspect I'm going to be missing a few clips an dscrews. Any ideas where to get them from?
 
Afternoon,

I had my front bumper sprayed a while ago and the paintshop damaged a clip removing it.

Being a bit fussy I decided to buy replacements and get the garage to replace them - are the old ones that tricky to get off? To be fair to the garage they've agreed to do it if I supply the part (£28 / side...!) but is it a real 'mare to get the old ones off?

thanks
 
JaEdBa, £28 a side ? I paid £25 incl. vat... Though £3 is hardly a huge difference lol

They are a pain to get off - the ONLY way is to use snips and carefully cut them apart then wiggle the bits out - i believe this is the way described in the BMW TIS too. You can see the results of mine earlier in this thread. Careful not to bend the lip of the wing where it clips in whilst you're doing it otherwise the new one won't fit flush. It is a PITA but with care is not hard.
 
Bing said:
JaEdBa, £28 a side ? I paid £25 incl. vat... Though £3 is hardly a huge difference lol

They are a pain to get off - the ONLY way is to use snips and carefully cut them apart then wiggle the bits out - i believe this is the way described in the BMW TIS too. You can see the results of mine earlier in this thread. Careful not to bend the lip of the wing where it clips in whilst you're doing it otherwise the new one won't fit flush. It is a PITA but with care is not hard.

Looks like you'll be coming round mine when my Aero needs to be fitted
 
Jembo said:
Bing said:
JaEdBa, £28 a side ? I paid £25 incl. vat... Though £3 is hardly a huge difference lol

They are a pain to get off - the ONLY way is to use snips and carefully cut them apart then wiggle the bits out - i believe this is the way described in the BMW TIS too. You can see the results of mine earlier in this thread. Careful not to bend the lip of the wing where it clips in whilst you're doing it otherwise the new one won't fit flush. It is a PITA but with care is not hard.

Looks like you'll be coming round mine when my Aero needs to be fitted

Be happy too :thumbsup:
 
Bing said:
JaEdBa, £28 a side ? I paid £25 incl. vat... Though £3 is hardly a huge difference lol

They are a pain to get off - the ONLY way is to use snips and carefully cut them apart then wiggle the bits out - i believe this is the way described in the BMW TIS too. You can see the results of mine earlier in this thread. Careful not to bend the lip of the wing where it clips in whilst you're doing it otherwise the new one won't fit flush. It is a PITA but with care is not hard.

if you knew where to aim could you drill them out?
 
With the bumper off, and the new ones as a reference... Perhaps, with a very very low speed setting. I'd still snip a load of bits off though. Don't stress though - if I can do it, pretty much anyone could. I am a cack-handed tw@t :lol:
 
Bing said:
JaEdBa, £28 a side ? I paid £25 incl. vat... Though £3 is hardly a huge difference lol

got 2 for £48, told the chap behind the counter that his colleague said I could have a discount. tell you what - they're good value for money....fucking hell, 2 bits of plastic! that's definitely one to keep quiet on the domestic finances front....

i'd do it myself but I suspect it'd be one of those jobs you start and wish you hadn't so i'll let the garage do it - I asked them if the clips were ok when the bumper was off.
 
mister_roger said:
Step 1:

Start by removing the expanding tabs along each fenderwell. These tabs function by having a small plastic rod become inserted down the middle, causing the tab to expand and lock in place. To remove these tabs, take the tiny screwdrive and PUSH the rods all the way in until you hear them fall. Don't worry, you'll be able to recover them when the bumper is removed.
CIMG7688.jpg

Cheers for the instructions - removed my bumper yesterday and they came in really handy. :)

I was a bit caught out though - the expanding tabs mentioned above were not re-usable in my case (or I'm being thick!).

21ozhnk.jpg


The only way I can see that they might be re-used is if you save the plastic pins and push them into the tabs from behind, i.e. inside the bumper. This is difficult to do for some of them and almost impossible for the ones at the top/bottom of the wheel arch.

Got a bit worried because I was short of time and had to get the bumper back on properly, but managed to rig up something with small black tie-wraps:

yhqts.jpg


14dd1ci.jpg


With the above arrangement you can crank up the tension on the tabs to match the OEM items and then snip the excess tie wrap off with a pair of scissors; a little tip for anyone else that gets themselves into a similarly irrecoverable situation! Will get some more tabs on order from Sopers and fit them properly one day.
 
Bing said:
Nice patch up job :thumbsup:

Definitely the wrong ones though.

Aha! Cheers Bing.

So how do the correct ones work when you come to putting everything back together? My bumper's been off before at some point for a respray (previous owner) and maybe it was reassembled with the wrong type of tab.

Sent from my GT-P6810 using Tapatalk 4
 
Nope after the facelift it seems that the expanding tabs are not reusable. Got some reusable ones for £2 from eBay.
 
Well mine's a facelift and it had (has) the push through reusable type. They just have a smooth pin that pushes through the hole and forces the tabs behind to expand. They are only about 50% reusable though - I lost about half the pins the first time I took the bumper off :lol:
 
With the bumper removed, you should see the 4 expanding tab pins that dropped. Save them for use later.
http://i83.photobucket.com/albums/j293/lordroger/bmw%20z4m%20bumper/CIMG7711.jpg[img]


Had my bumper off to fit new hd liters today, what are the two elec connections pics above, one is outside temp I'd say, what's the other ??
 
zagamuffin said:
With the bumper removed, you should see the 4 expanding tab pins that dropped. Save them for use later.
CIMG7711.jpg


Had my bumper off to fit new hd liters today, what are the two elec connections pics above, one is outside temp I'd say, what's the other ??

I can only see one picture - that does look like a temp sensor (part number 61318370747). Did you ever figure this out?
 
Back
Top Bottom