What have you done to your car today?

I'm on fire (slight exaggeration)... did the cabin filter whilst I had my head in the footwell, then re-installed the glove compartment... just need to work out how to clip the "damper" back in place and a quick hoover and I am done.

Bottom Photo - a bit scruffy but that's a photo of the plastic repair to the hinge cylinder.

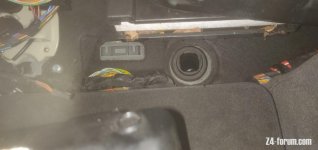
Top Photo - that hole is the engine noise induction tube isn't it? The car came with one sound damper insert thing in a box (the other is allegedly fitted). Presumably the one that came in a box goes in that hole there doesn't it, and the one that's been left in is the much harder to reach one accessed from engine bay?
 

Attachments

  • IMG_20250213_111611.jpg
    IMG_20250213_111611.jpg
    73.7 KB · Views: 774
  • IMG_20250213_120636.jpg
    IMG_20250213_120636.jpg
    72.4 KB · Views: 774
Fred Smith said:
x-driver said:
I can only tell that even an empty glove box doesn't close without slamming. At a brief inspection I didn't notice any visible problem. I'll have to take more time to look at it.
It also doesn't feel sticky.

I've just looked at mine again (on a workbench, not in the car)... there are two rubber grommits that sit there to soften the bang when it closes, and on mine they are pretty chunky, and whilst I don;t need to slam it to close it it does need a reasonable bit of force, ideally directed (on a RHD car) as close as possible to the catch, a touch to the right of the lock. Cutting 1mm or maybe 2mm off od those grommits would make it easier to close. Are those bits of rubber seated properly on yours, or are they sticking out a bit and causing a problem?

Is the latch moving freely?
I'll have a look, thanks :thumbsup:

Last I checked the latch it was just ok.
 
x-driver said:
Last I checked the latch it was just ok.

I have just refitted mine and I seem to have your problem - I don't need to slam it shut, but I do have to push very firmly to get it to close, a "normal" close simply does not do the job.

And despite silicone spray on the damper the glove box drops VERY slowly.
 
Well even I don't really have to SLAM it, but like you said, a very firm push is needed or a light slam to close it. It doesn't feel sticky, it just feels like it doesn't reach the locking position.
 
x-driver said:
Well even I don't really have to SLAM it, but like you said, a very firm push is needed or a light slam to close it. It doesn't feel sticky, it just feels like it doesn't reach the locking position.

Those rubber spacers are a touch too big maybe?
 
When I bought my current one if I hit a big bump in the road the glovebox dropped open.

I loosened the metal loop that the latch engages on and moving it slightly and that solved the problem. :D
 
Finished fitting the double din stereo conversion last night. All working with steering wheel controls, but couldn't get the DAB to work, so still need to work that out. Added a microphone holder and usb on the panel under the climate controls.
PXL_20250214_080212170.jpg
PXL_20250213_193328618.jpg
 
Installed a Brodit/Pro-clip phone mount with a Scosche magnetic Magic mount. Easy install and seems to be very sturdy. It is a little expensive for what it is though.
 

Attachments

  • Pro-clip.jpg
    Pro-clip.jpg
    166.5 KB · Views: 1,126
New wishbones, bushes, drumsticks, plus trailing arm bushes .
New front and rear drums, pads and complete shoe quadrant mechanisms on rear.
Oil service, and gearbox oil change.
Front and rear alignment.

Drives like a completely different car and worth every penny. Looking forward to this year's road trips even more!
 
Couple of upgrades to the Coupe:
Had my steering wheel wrapped with new leather
Spray painted the plastics on the steering wheel myself
New gearknob.

Massive difference in experience when driving, very glad I have done these small changes. Worked out beautiful.
old:
1.jpg
2.jpg
new:
3.jpg
4.jpg
 
TheDan said:
All looks great!

What did you spray the plastics with out of curiosity?

Took the knowledge (and courage) from a post here on this forum.
First sanded it with sanding paper. Then used a plastic primer, couple of layers of black mat paint. (better to apply multiple thin layers I read, and that is also easier given all the curves) And then 2 layers of transparent finisher.
All in all an easy job, took my time (Had the steering wheel send off anyway)
5.jpg
6.jpg
 
Ben_Z4 said:
First sanded it with sanding paper. Then used a plastic primer, couple of layers of black mat paint. (better to apply multiple thin layers I read, and that is also easier given all the curves) And then 2 layers of transparent finisher.
Both repaint and retrim looking great there!
I've got everything in house to do this as well, even have the parts completely sanded and ready, just have been holding off getting this done. I still need to make a little paint booth and to send the wheel off for a retrimming with Royals.
Few questions, parts propped up on skewers with some thumbtack to hold the parts in place? Did you only paint the outward facing faces, or backside as well? How long did the whole operation take?

IMG_4489.jpg
 
ryushe said:
Few questions, parts propped up on skewers with some thumbtack to hold the parts in place? Did you only paint the outward facing faces, or backside as well? How long did the whole operation take?
Those look perfectly sanded!
I only painted the outsides and edges.
I had to improvise a proper location also, couldn't do it outside in the rain and freezing colds. And yes, had some skewers sticked in styrofoam(?) to hold the parts up. This way I could reach each side. (some parts rotated a bit when spray-painting, but nothing bad.
Hardest part was the last lacquer finish, you can't see which part you already got. And it created a paint cloud (don't know the proper phrasing) which wasn't handy inside the house :roll:
I think I took 3 or 4 days and then let it dry for a couple more days before assembling the wheel again.
 
Back
Top Bottom