What did you do to your Z4M today?

RedUn said:
Ok I chose this method Vs trying to bend it which I think is a bit rubbish.

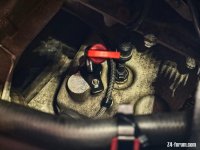
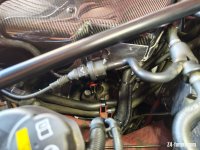
The OEM dipstick uses a fork shaped bracket which is removable which allows you to rotate the dipstick, the CSL one's come with a welded bracket.

The issue is the bracket is 180 degrees out for the Z4M if you want easy access to the dipstick.

Bracket slowly removed and painted, will install with new oem fork part and the job is a good one :thumbsup:

Nothings ever easy eh? :lol:
 
I have the CSL dipstick and never had that issue. Will have a look, maybe PO did this mod?

I liked what you did to repurpose the shutoff valve bracket. Great idea! Mine is just supported by the hose. Will look at what you did for sure.
 
AndyBeech said:
RedUn said:
Ok I chose this method Vs trying to bend it which I think is a bit rubbish.

The OEM dipstick uses a fork shaped bracket which is removable which allows you to rotate the dipstick, the CSL one's come with a welded bracket.

The issue is the bracket is 180 degrees out for the Z4M if you want easy access to the dipstick.

Bracket slowly removed and painted, will install with new oem fork part and the job is a good one :thumbsup:

Nothings ever easy eh? :lol:
Never :rofl:

If you want it OEM+ it's always work but it's done now, perfect access, super easy.

Tip, flip the fork shaped bracket over when fitting it, grabs the dipstick more and stops any movement :thumbsup:

IMG_20250518_110021.jpgIMG_20250518_110014.jpg
 
maupineda said:
I have the CSL dipstick and never had that issue. Will have a look, maybe PO did this mod?

I liked what you did to repurpose the shutoff valve bracket. Great idea! Mine is just supported by the hose. Will look at what you did for sure.
Hmm it must have been modified or else it sits under the engine mount?

Yeah mine was the same but was never happy with it, using the bracket and a rubber mount to the airbox it's well mounted now and looks nice and neat.
 
RedUn said:
AndyBeech said:
RedUn said:
Ok I chose this method Vs trying to bend it which I think is a bit rubbish.

The OEM dipstick uses a fork shaped bracket which is removable which allows you to rotate the dipstick, the CSL one's come with a welded bracket.

The issue is the bracket is 180 degrees out for the Z4M if you want easy access to the dipstick.

Bracket slowly removed and painted, will install with new oem fork part and the job is a good one :thumbsup:

Nothings ever easy eh? :lol:
Never :rofl:

If you want it OEM+ it's always work but it's done now, perfect access, super easy.

Tip, flip the fork shaped bracket over when fitting it, grabs the dipstick more and stops any

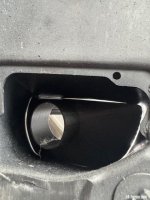
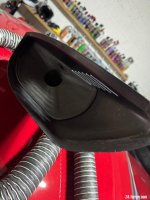
Yup, just done a test fitting this morning to see what part of the snorkel to cut and yup dipstick wrong way round.

Your obviously more handy than me as I’m gonna have to take it somewhere to cut that bracket off, might even get someone to do the cut on the snorkel as I don’t trust myself :lol:
You got a pic of where how the snorkel fits up to the front just so I know my cuts going to be similar?

Cheers for the tip, you got a part number for the fork? Can’t find it on Realoem? Let me guess, it’s £100. :thumbsup:
 
AndyBeech said:
RedUn said:
AndyBeech said:
Nothings ever easy eh? :lol:
Never :rofl:

If you want it OEM+ it's always work but it's done now, perfect access, super easy.

Tip, flip the fork shaped bracket over when fitting it, grabs the dipstick more and stops any

Yup, just done a test fitting this morning to see what part of the snorkel to cut and yup dipstick wrong way round.

Your obviously more handy than me as I’m gonna have to take it somewhere to cut that bracket off, might even get someone to do the cut on the snorkel as I don’t trust myself :lol:
You got a pic of where how the snorkel fits up to the front just so I know my cuts going to be similar?

Cheers for the tip, you got a part number for the fork? Can’t find it on Realoem? Let me guess, it’s £100. :thumbsup:
Fork part number is 11437840407, 8 quid :thumbsup:

Snorkel is easy, will message how to do it, needs a Dremel and a cutting disc.
 
AndyBeech said:
RedUn said:
AndyBeech said:
Nothings ever easy eh? :lol:
Never :rofl:

If you want it OEM+ it's always work but it's done now, perfect access, super easy.

Tip, flip the fork shaped bracket over when fitting it, grabs the dipstick more and stops any

Yup, just done a test fitting this morning to see what part of the snorkel to cut and yup dipstick wrong way round.

Your obviously more handy than me as I’m gonna have to take it somewhere to cut that bracket off, might even get someone to do the cut on the snorkel as I don’t trust myself :lol:
You got a pic of where how the snorkel fits up to the front just so I know my cuts going to be similar?

Cheers for the tip, you got a part number for the fork? Can’t find it on Realoem? Let me guess, it’s £100. :thumbsup:

Andy check my link further back, unless it’s a race box with the full snorkel molded I can 3d print you one to tie into the factory air intake in the front slam panel
 
Replaced the lower, outer rear ball joints both sides, polybush RTAB's and got it aligned.

Much better!
 
Got new rear tyres fitted ready for heading to Scotland next week. I had 255/45s last time but went for 265/40 this time for a bit more protection when parking close to kerbs. :roll:

I went to my go-to fitters, and while they use a torque wrench they only use if after the bolts have been fired in with the wizzy-gun! So when I got home I slackened them off which took much more effort than it should then torqued them to 12Nm.

They popped the centre caps out for me as they were looking tired and I fitted new ones. Checked the pressures and they were at 2.6 Bar so I let them down to 2.4 and will see how that feels.
 
Mr Tidy said:
Got new rear tyres fitted ready for heading to Scotland next week. I had 255/45s last time but went for 265/40 this time for a bit more protection when parking close to kerbs. :roll:

I went to my go-to fitters, and while they use a torque wrench they only use if after the bolts have been fired in with the wizzy-gun! So when I got home I slackened them off which took much more effort than it should then torqued them to 12Nm.

They popped the centre caps out for me as they were looking tired and I fitted new ones. Checked the pressures and they were at 2.6 Bar so I let them down to 2.4 and will see how that feels.

Feel free to drop in for a cuppa on the way up
 
bigwinn said:
Feel free to drop in for a cuppa on the way up

Thanks Stuart, but I'll be going up on the West this time.

But when I buy the trim for the top of my windscreen I'd love to take you up on that - for suitable recompense obviously!
 
Mr Tidy said:
bigwinn said:
Feel free to drop in for a cuppa on the way up

Thanks Stuart, but I'll be going up on the West this time.

But when I buy the trim for the top of my windscreen I'd love to take you up on that - for suitable recompense obviously!

Always welcome here buddy. Safe travels!!
 
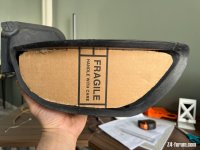
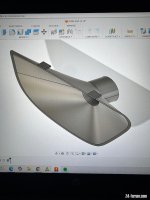
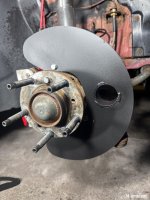
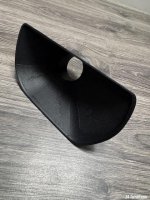
Spent some time today designing brake cooling ducts inserts to fit to the backing plates

Could be some trial and error in the process.
IMG_4436.jpegIMG_4448.jpeg
IMG_4079.jpeg
 
D.Bryce said:
Spent some time today designing brake cooling ducts inserts to fit to the backing plates

Could be some trial and error in the process.
IMG_4436.jpegIMG_4448.jpeg
IMG_4079.jpeg
Nice! Are they feeding from the OEM ducts?
 
Well, not today, but my MC went in for an oil service, brake fluid change and check over - fortunately, came back with a clean bill of health 👍
 

Attachments

  • IMG_3239.jpeg
    IMG_3239.jpeg
    142.9 KB · Views: 564
  • IMG_3250.png
    IMG_3250.png
    668.6 KB · Views: 564
LawrenceW said:
Well, not today, but my MC went in for an oil service, brake fluid change and check over - fortunately, came back with a clean bill of health 👍
Lovely 8)
 
RedUn said:
D.Bryce said:
Spent some time today designing brake cooling ducts inserts to fit to the backing plates

Could be some trial and error in the process.
IMG_4436.jpegIMG_4448.jpeg
IMG_4079.jpeg
Nice! Are they feeding from the OEM ducts?

Yeh, they slide in and are secured with a small screw. Need to cut a hole in the side of the oem duct to route the hose round the inside and along the control arm to the backing plateIMG_4459.jpegIMG_4458.jpegIMG_4467.jpeg
 
Back
Top Bottom