 south yorkshire
Where/how would I download INPA please?
You are using an out of date browser. It may not display this or other websites correctly.
You should upgrade or use an alternative browser.
You should upgrade or use an alternative browser.
Project Restoration Zed- almost done.
- Thread starter paddy wright
- Start date
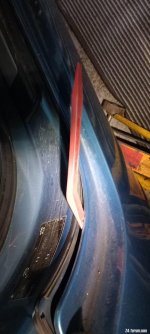
Found the leak in the boot- coming from round the light and into the boot- next on the fox list. For the interior leaks any further ideas- the carpets are wet underneath but the roof drain plugs are clear and the door membranes seem fine. My thoughts are wondering if water could have been let in from rain and just needs to dry out?
 Attleborough, Norfolk
Even if the membranes look perfect it is a common issue for them to lift from the panel. Bottom edge, about six inches back from the front corner, the metal work dips in and the membrane parts from it. Check there just in case.paddy wright said:Found the leak in the boot- coming from round the light and into the boot- next on the fox list. For the interior leaks any further ideas- the carpets are wet underneath but the roof drain plugs are clear and the door membranes seem fine. My thoughts are wondering if water could have been let in from rain and just needs to dry out?
I’ll take a look this week. Hopefully it’s a simple fix, thanks again for helping.enuff_zed said:Even if the membranes look perfect it is a common issue for them to lift from the panel. Bottom edge, about six inches back from the front corner, the metal work dips in and the membrane parts from it. Check there just in case.paddy wright said:Found the leak in the boot- coming from round the light and into the boot- next on the fox list. For the interior leaks any further ideas- the carpets are wet underneath but the roof drain plugs are clear and the door membranes seem fine. My thoughts are wondering if water could have been let in from rain and just needs to dry out?
If it is that then forget trying to seal it with Butyl Tape, it just pulls away again.paddy wright said:I’ll take a look this week. Hopefully it’s a simple fix, thanks again for helping.enuff_zed said:Even if the membranes look perfect it is a common issue for them to lift from the panel. Bottom edge, about six inches back from the front corner, the metal work dips in and the membrane parts from it. Check there just in case.paddy wright said:Found the leak in the boot- coming from round the light and into the boot- next on the fox list. For the interior leaks any further ideas- the carpets are wet underneath but the roof drain plugs are clear and the door membranes seem fine. My thoughts are wondering if water could have been let in from rain and just needs to dry out?
I was recommended and heartily endorse Tec7 black sealant.
bigwinn said:tec-7
seals black holes
Every accountant should have some
pvr said:bigwinn said:tec-7
seals black holes
Every accountant should have some
Speak to my ex wife (if we are talking black holes)
no commentpvr said:If we are talking financial black holes I hope
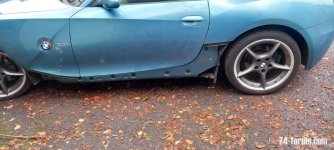
So had time last weekend to have a wee play with project Z. Leak into the boot sorted by resitting the rear light wiring rubber bungs and replacing the third brake light which cracked in the frost. Took door card off and yes- the membrane was a mess so this is next on the list. Sadly also found the front panel is dented so this will also be replaced along with the bumper now. 


Satisfying to save the wee Zed.
Satisfying to save the wee Zed.
I’m going to refit the standard side skirts- any advice on how to do this?
paddy wright said:I’m going to refit the standard side skirts- any advice on how to do this?
Remove the fasteners in the wheel arches, remove the retaining bolts underneath. Remove the fasteners underneath the skirt. The only thing holding them on now are the clips along the upper interior side and the two plastic clips on the rear fender and front arch. Prise these off (take a bit of force) and pull the skirt away from the car.
Fitting is the opposite: first push the skirt home with the male-female fasteners, then align front and rear and reseat in the carriers on the body panels. Tip: put both the male and female part of the fasteners on the skirt, align with the body holes and push. Replace these for new when you do, the old ones often are past their best.
Refit lower fasteners, wheel wells and admire your handiwork

raymond.harper
Senior member
Remove the old ones first! Two threaded 8 mm screws, one in the front wheel arch and the other underneath the sill towards the rear. Then remove about 8 pop rivets under the sill. From the rear pull the sill away towards you, I used a trim separator. Move the instrument along to the front slowly prising the sill awaypaddy wright said:I’m going to refit the standard side skirts- any advice on how to do this?
Attachments

Thanks guys- the Aeros are off and sold to Wassup a few weeks ago.
I will be soon- are you interested?Joez4 said:Hi,
Are you still selling the tail lights?


Side skirts back in place and door membrane temporarily patched until I get a new one.