Since i like reading other peoples threads, i decided to make my own too. Maybe someone will find it interesting, and enjoy reading it as much as i enjoy working on my car.
Last September i bought my first ever BMW/sport car/roadster. Crazy experience to swap your second car from 1.2 petrol Polo to 3.0 Z4 :lol:
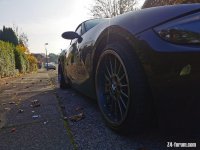
Here is the pic the next day i brought it home:

She came with 19" style 67 alloys that were not to my liking, so i knew straight away i will be investing in new set of wheels, which i eventually did.
Car has 160k on a clock, and i can say after all those months of ownership - its a tank engine and i cant understand why ppl are afraid of high mileage examples. Never let me down and im using it as a daily even during past winter
After a week or two I decided to put the car up for a oil and filter change in recommended garage, and since im based in Birmingham i left her with Marc's Independent BMW ( https://marcsbmw.com ) Great guy, done the solid job and checked my whole suspension per my request as well.
More about the car:
- 3.0 straight six, 2004 manual with sport button
- Electric folding mirrors
- rear parking sensors - from new
- Sat nav
- BT phone prep
- BMW 6disc changer
- auto wipers
- auto dimmable rear mirror
- relocated roof motor (win!)
- angel eyes, xenon clean headlamps
- black leather, electric memory seats
- came with polybushes from previous owner
- new rear springs
Done:
- new wheels
- clear indicators
- service and check after buying
- new front and boot badge
- v brace painted
- new 3rd break light
- diff oil change
- break fluid full flush
- cruise control retrofit
- source and mount wind deflector
- 3 stage paint correction
- ceramic coating
- clean and restore soft top
- deal with right headlight condensation
- new bilstein B4 front shocks fitted, plus new droplinks
- oem wind deflector,and loop covers painted black
To do list:
- interior light change (cheap LED atm)
- caliper clean and paint
- MTEC drilled discs
- window tint
- wheel refurb and respray
- gearbox oil
So, just like mentioned above first upgrade was to change the wheels. I decided to downgrade 19" to 18" for more comfort. And yes, i know its not very popular to put comfort equally to owning a sports car but if u don't have to deal with awful Bham roads daily, please come and see yourself
Went for style 32 i fell in love with. Simple and stylish, apart from colour that will be changed at some point. Here we go:

MASSIVE difference! Driving is possible to enjoy in the city.
was:
255/35 19
225/40 19
changed to:
8J Front ET20
9J Rear ET22
205/40
215/35
More changes to come 8)
Last September i bought my first ever BMW/sport car/roadster. Crazy experience to swap your second car from 1.2 petrol Polo to 3.0 Z4 :lol:
Here is the pic the next day i brought it home:
She came with 19" style 67 alloys that were not to my liking, so i knew straight away i will be investing in new set of wheels, which i eventually did.
Car has 160k on a clock, and i can say after all those months of ownership - its a tank engine and i cant understand why ppl are afraid of high mileage examples. Never let me down and im using it as a daily even during past winter
After a week or two I decided to put the car up for a oil and filter change in recommended garage, and since im based in Birmingham i left her with Marc's Independent BMW ( https://marcsbmw.com ) Great guy, done the solid job and checked my whole suspension per my request as well.
More about the car:
- 3.0 straight six, 2004 manual with sport button
- Electric folding mirrors
- rear parking sensors - from new
- Sat nav
- BT phone prep
- BMW 6disc changer
- auto wipers
- auto dimmable rear mirror
- relocated roof motor (win!)
- angel eyes, xenon clean headlamps
- black leather, electric memory seats
- came with polybushes from previous owner
- new rear springs
Done:
- new wheels
- clear indicators
- service and check after buying
- new front and boot badge
- v brace painted
- new 3rd break light
- diff oil change
- break fluid full flush
- cruise control retrofit
- source and mount wind deflector
- 3 stage paint correction
- ceramic coating
- clean and restore soft top
- deal with right headlight condensation
- new bilstein B4 front shocks fitted, plus new droplinks
- oem wind deflector,and loop covers painted black
To do list:
- interior light change (cheap LED atm)
- caliper clean and paint
- MTEC drilled discs
- window tint
- wheel refurb and respray
- gearbox oil
So, just like mentioned above first upgrade was to change the wheels. I decided to downgrade 19" to 18" for more comfort. And yes, i know its not very popular to put comfort equally to owning a sports car but if u don't have to deal with awful Bham roads daily, please come and see yourself
Went for style 32 i fell in love with. Simple and stylish, apart from colour that will be changed at some point. Here we go:
MASSIVE difference! Driving is possible to enjoy in the city.
was:
255/35 19
225/40 19
changed to:
8J Front ET20
9J Rear ET22
205/40
215/35
More changes to come 8)
 North West Surrey

")


 ! still smiling like a kid when I'm driving it. Cant wait to take it for a proper roadtrip


