My 2006 Z4 Coupe

I ticked off a few little jobs last night.

The trim above the radiator was missing a few fixings, so these were replaced.

IMG_7514.jpeg

IMG_7515.jpeg

Whilst the plastic trim was off, I treated some surface rust with Jenolite. Giving that removing the whole piece looks like a big undertaking, I’ll just tidy it up with some Hammerite in due course.

IMG_7516.jpeg

Next up was replacing the access hatch for the sump plug.

IMG_7517.jpeg

The car was then washed, just in time for today’s forecast downpour. Joy.

IMG_7519.jpeg

IMG_7520.jpeg

I did notice a few more fixings missing in the engine bay, so these have been ordered.

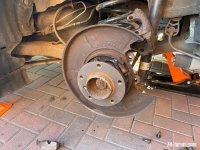
I’m found to change the passenger side wheel bearing because the thread for the disc retaining screw is knackered. Whilst the bearing is off, I’m going to replace the dust shield which is currently held in place with zip ties. After that I can fit my new ATE discs and ceramic pads. The current pads create a lot of dust, so I can’t wait to change them.
 
I’ve ticked off a few more jobs over the last few weeks.

First up was to pop a couple of coats of Hammerite over the rust converter on the front panel. It’s brush applied but looks better than rust in my opinion.

Panel exposed ready to be painted.

IMG_7524.jpeg

Masked up for painting.

IMG_7525.jpeg

Painted

IMG_7526.jpeg

Everything back together

IMG_7529.jpeg

Whilst I was fiddling in the engine, I decided to change the air filter. The old be was pretty grotty.

IMG_7522.jpeg

New one fitted.

IMG_7528.jpeg

I also cleaned out the airbox which was full of crap.
 
Over the weekend just gone, I noticed that the outline of the Z4 badge could still be seen in certain light so after washing the car, the back end was polished again.

IMG_7587.jpeg

IMG_7588.jpeg

IMG_7589.jpeg

Later that night we headed out for a drink since we had a rare child free night and the car looked lovely in my biased opinion.

IMG_7590.jpeg

My engine cover was missing a few of the fixings that old the beauty cover to the frame underneath. Not a big issue but still annoying.

IMG_7592.jpeg

New ones arrived the other day, so we’re suit fitted.

IMG_7593.jpeg
 
I had to pop to ECP to pick up a bearing puller so I can change my passenger side front wheel bearing so bought a micro filter whilst I was there.

Upon removing the old one, I was very glad that I did. Even more detritus fell out after poking around the opening.

IMG_7604.jpeg

IMG_7605.jpeg

Old and new

IMG_7606.jpeg

The old one was a genuine BMW part dated March 2007, so I’m guessing that it hasn’t been changed for a very very long time.

IMG_7607.jpeg
 
Another catch up post…

Last week it was time to sort the front discs and pads and to change the passenger side wheel bearing so the disc retaining screw could actually be used. I had previously noticed that the dust shield was held in place with zip ties, so with the bearing off it seems like a good time to replace that.

Passenger side disassembly started

IMG_7615.jpeg

The offending stripped disc retaining thread. I had tried running a tap through it before but it made no difference.

IMG_7616.jpeg

Cover removed to reveal the 46mm nut.

IMG_7617.jpeg

The nut came off surprisingly easily given the factory torque setting and the bulk of the bearing slid off by hand just leaving the inner race behind.

IMG_7618.jpeg

My bearing puller fitted on perfectly. Watching a few videos on line and making sure it had flat ends ensured it fitted perfectly and it soon had the race off.

IMG_7619.jpeg

IMG_7620.jpeg

The rearmost dust seal was really rusty and basically disintegrated leaving a small piece behind that basically needed breaking off.

IMG_7621.jpeg

The old retaining bolt for the dust shield took some removing, but it was eventually removed.

IMG_7622.jpeg

New dust shield fitted with fixings that I bought from Amazon.

IMG_7623.jpeg

New FAG bearing about to be fitted

IMG_7624.jpeg
 
New bearing fully pressed home following a slight battle getting the rear dust seal fitted. Front cover all popped on, ready for the disc.

IMG_7625.jpeg

I had been expecting the bearing to be a horrible job, but it was actually quite easy. Having bought tools such as the bearing puller made it loads easier obviously.

ATE power discs were fitted with ATE ceramic pads. Passenger side nearly there.

IMG_7626.jpeg

New discs always look nice.

IMG_7627.jpeg

Drivers side was next. The discs and pads were pretty much new but NAPA and they created loads of dust….i had intended to just change fge pads to ceramic ones but I’m a bit of brake snob and like ATE stuff.

IMG_7628.jpeg

Drivers side dust shield has started to rust a bit because there are washer behind the fixings.

IMG_7629.jpeg

Disc and pads fitted with a new wear sensor.

IMG_7630.jpeg

I noticed some odd build up on one of the drivers side pads.

IMG_7631.jpeg

After a brief drive to start the bedding in process, I think there is a bit more bite to the brakes than there was previously. I need to do the rears as well which will see a massive reduction in brake dust.

Callipers will be painted in due course too.
 
A week or so later, I took a doc another nice evening to tackle the rear brakes.

Discs were pretty new but a bit crusty, particularly the drivers side.

IMG_7641.jpeg

Old disc and pad came off easily enough. The hand brake shoes and springs were cleaned up as best I could with a toothbrush and brake cleaner. They’re BMW branded so most likely original.

IMG_7642.jpeg

New ATE disc with ceramic pads fitted. An ATE wear sensor was fitted to the drivers side.

IMG_7644.jpeg

I’ve had a crack at adjusting the handbrake, so hopefully that’ll be a bit better than it was too.

Next jobs are to have the A/C regassed. It’s working ok, but there’s no evidence of it ever being touched, so I figured I might as well.

It’s off to Spires on 5th June for a proper alignment and set up which will hopefully get it driving nicely.
 

Attachments

  • IMG_7643.jpeg
    IMG_7643.jpeg
    209.5 KB · Views: 2,503
Top job.. Nice work.
That corrosion looks like something from a WW2 shipwreck!
Mine are crusty, too, just surface rust but looks a state.
 
Meds said:
Top job.. Nice work.
That corrosion looks like something from a WW2 shipwreck!
Mine are crusty, too, just surface rust but looks a state.

It looks works than it is; when I wire brushed it nothing flaked off. I guess that’s the joy of a seaside car.

I’ll clean it up and treat the underside of the car as best I can this summer. Amazingly all of the bolts that I’ve had to undo have come undone pretty easily.
 
STC_Zed said:
I’ve had a mixed week with the car so far and the bad bit was all my own fault. :headbang:

I’ll get that bit out the way first. I went into the office on Tuesday and parked in the nearest multi storey car park which I’m usually super careful in because the ramps felt awkward in my 335i which had much better visibility. I had a moment where I wasn’t as careful as usual and heard a scraping as I turned left. I assumed that it was my rear wheel and I was very angry with myself all the way home.

I arrived home, checked the wheel and it was fine. I then spotted this…. :headbang: :headbang: :headbang:

IMG-7367.jpg

I’ll get a proper repair sorted in due course, but in the meantime I made it look much better with some effort with a clay bar, fine wet and dry and some touch up paint.

IMG-7368.jpg

The better news is that I’ve been working my way through a few other jobs which success.

Firstly, I plugged in the connector that I’d removed to fit my aux socket so phone calls now work properly in the car. My BlueMusic adapter arrived and was super easy to fit and my phone connected first time. The infotainment at least feels a bit more modern than it did.

I used my wife’s E91 to drop my new wheels off for paint but the new rear tyres hadn’t arrived in time. I managed to squeeze a pair of Asymmetric 6’s in the boot of the Zed.

IMG-7370.jpg

My spacers arrived today so I spent a few minutes chucking them on.

Rear, before.

IMG-7385.jpg

Rear with 15mm spacers

IMG-7384.jpg

Fronts, stock.

IMG-7387.jpg


With 12mm spacers added.

IMG-7386.jpg

All of my suspension parts have arrived now, so I’m hoping to start work tomorrow night and finish Saturday in time for an alignment on Monday.

Hi Sam
Quick question, which spacers did you go for and where from?
Thanks
 
PedroSouth said:
STC_Zed said:
I’ve had a mixed week with the car so far and the bad bit was all my own fault. :headbang:

I’ll get that bit out the way first. I went into the office on Tuesday and parked in the nearest multi storey car park which I’m usually super careful in because the ramps felt awkward in my 335i which had much better visibility. I had a moment where I wasn’t as careful as usual and heard a scraping as I turned left. I assumed that it was my rear wheel and I was very angry with myself all the way home.

I arrived home, checked the wheel and it was fine. I then spotted this…. :headbang: :headbang: :headbang:

IMG-7367.jpg

I’ll get a proper repair sorted in due course, but in the meantime I made it look much better with some effort with a clay bar, fine wet and dry and some touch up paint.

IMG-7368.jpg

The better news is that I’ve been working my way through a few other jobs which success.

Firstly, I plugged in the connector that I’d removed to fit my aux socket so phone calls now work properly in the car. My BlueMusic adapter arrived and was super easy to fit and my phone connected first time. The infotainment at least feels a bit more modern than it did.

I used my wife’s E91 to drop my new wheels off for paint but the new rear tyres hadn’t arrived in time. I managed to squeeze a pair of Asymmetric 6’s in the boot of the Zed.

IMG-7370.jpg

My spacers arrived today so I spent a few minutes chucking them on.

Rear, before.

IMG-7385.jpg

Rear with 15mm spacers

IMG-7384.jpg

Fronts, stock.

IMG-7387.jpg


With 12mm spacers added.

IMG-7386.jpg

All of my suspension parts have arrived now, so I’m hoping to start work tomorrow night and finish Saturday in time for an alignment on Monday.

Hi Sam
Quick question, which spacers did you go for and where from?
Thanks

They’re 12mm front, 15mm rear from M Tec (available via ebay).
 
Catching up on a few bits with my Z4.

The alignment that I had done at a local place was a bit rubbish to be fair and although the car was driving better than it was there was definitely room for improvement. I booked the car in with Spires in Leamington Spa.

First up it was popped on ramps to check the state of bolts / bushes etc.

IMG_7796.jpeg

Once Matt was happy with everything, it was then time for the actual alignment.

IMG_7797.jpeg

IMG_7798.jpeg

The passenger rear wheel was toeing out so was probably a major contributing factor to the car feeling a bit squiffy, particularly in right hand corners. The rear camber has been dialled down a bit and overall it’s massively improved and is much more confidence inspiring to drive now.
 
Next up was sorting the interior trim.

My car came with the gloss back trim which I understand rare and quite desirable but mine was in really bad condition. It looks like it’s got too hot and cracked in various places. I also don’t like the gloss black trim because it’s not a practical finish in my opinion. It shows dust and finger prints to easily as well as minor marks.

My solution was to buy a set of brushed aluminium trim and wrapped in 3M carbon vinyl. The wrapping part was easy but getting the trim off was another matter, especially the centre console trim.

Getting the centre console trim off required an awful lot of the interior to be removed….

IMG_7806.jpeg

IMG_7807.jpeg

With the console out, I was able to gain access to the three million torx screws that hold the trim to the console.

IMG_7808.jpeg

Once reassembled, I think it looks grand.

IMG_7811.jpeg

IMG_7813.jpeg

IMG_7814.jpeg

IMG_7815.jpeg

IMG_7816.jpeg
 
STC_Zed said:
especially the centre console trim.

Certainly is a PITA . Good to see the jobs getting ticked off and the carbon looks great :thumbsup:
 
Back
Top Bottom