Rear wing should arrive tomorrow but will need a custom mounting solution so watch this space.
The big job recently has been rebuilding the diff with LSD unit. I've replaced crownwheel and pinions before but not done a full rebuild with new bearings, shims, etc. BMW don't sell a rebuild kit but I got great service from https://www.bearingkits.co.uk/ with a kit that included all 4 bearings, instructions and preload measurement tool.
Before removing anything I measured the backlash at 0.10mm. More on this later.

Removed the crownwheel from the OEM open diff, degreased the bolts, cleaned the threads and fitted to the LSD unit. Difficult to torque the crownwheel bolts correctly so estimated it by torque angle using my big impact gun.

Removing the old bearing shells from the casing was also tricky. There are two bearing sets for the pinion: small one nearest the propshaft, and a larger one further inside. The small one was easy to drift out but the large one less so. Can't get a drift on the bearing shell perpendicularly - needs to be at an angle. Tried to use my puller from the other side but broke it. Eventually a bigger hammer and modified drift (with a step cut into it) did the job.

The final job before reassembly is to remove the inner bearing races from the pinion itself. There is no way to press them off, and I don't have a bearing splitter. So *very* carefully I cut a groove with a Dremel until I didn't dare go any further. One tap with a hammer and it slid forwards. Happy days!

Reassembly starts with the bearing shell in the casing. I pressed them in straight from the freezer to minimize the strain on the casing. Same for the inner races. Here you can see the frosty ball bearings!

Pressed the pinion into the case using the hydraulic press, which in hindsight was a mistake, but I got lucky and ended up with a pinion depth within 0.1mm of how I had measured it before disassembly. Also forgot to measure the preload before fitting the LSD, but it felt OK when turning by hand. I do find it easy to rush ahead when things are going well.
Fitting the LSD unit into the diff casing was a real PITA. Basically, it's too big - won't fit. The only way is to take it apart and reassemble it back inside the diff casing! That's not too bad, you might think, but it needs to be removed to adjust the shims to set the backlash, and there are 12 bolts that hold the LSD together. The Kaaz LSD came with several shims for this purpose. The shims sit behind the inner bearing races which need to be pulled/pressed back onto the unit every time you change a shim.

After a couple of goes, I had a backlash just within tolerance (0.05mm) and settled for that. Applied engineer's blue to the crownwheel and checked for pinion pattern - pretty good.

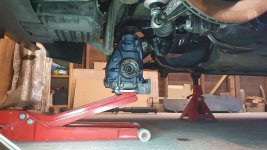
I was all set to fit the oil seals when I noticed that one of the driveshaft bearing circlips was not fully home. Tapped it in with a hammer and immediately noticed that I couldn't hear any backlash any more. That tiny change had pushed the crownwheel right onto the pinion with a perfect mesh. Damn! I was going to have to adjust the shims again. But without any backlash there wasn't any free play, so the circlips wouldn't budge. Very pissed off at this point - the reassembly has taken an entire day. Nothing I can do, so I decided just to complete the reassembly and hope that a little use will settle the bearings into position and it'll be fine. However, chances are that as the diff gets hot it will get very stiff. So I expect I'll be adjusting the shims again soon. But for now I've sealed it up and thrown it back on the car.


")


 hell a garage would be a nice start for me too.
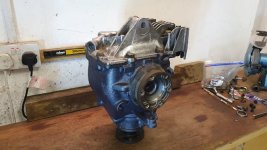


 Woah. Fair play! Perseverance paid off - big respect
