Well yes calibrating your screen is only half the game. Basically it creates a neutral value for your screen that is used as a baseline to profile the printer, buying a colour correct screen usually has a larger gamut and a colour profiler built in which keeps the screen calibrated automatically with changing light and ambiance in the room, instead of manually creating a profile every month.
The other half is calibrating the ink your printer uses, if you use the same system which I do (Getrag Macbeth I dont think they make them now but it was Eye one) It creates a profile for the media your using by using the neutral profile of your monitor. So when you are editing you can proof the colours you select your paper type and your screen will produce a pretty accurate preview, so you can edit to output.
For example if your using Perma Jet or Illford stocks you might have a gloss, semi gloss, oyster matte ect and each one has a different weight from say 200-350gsm each one needs profiling, because each has a specific finish and each one requires a different amount of ink, and each one will render the same colour differently due to its finish.
You can download the profiles from the website for that paper which are made by the manufacturer but they wont perfectly match the profile your screen calibration has set. So worth doing them yourself the difference is only small but if your really anal then its worth it.
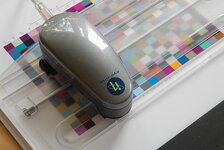
Anyway so you print a colour checker chart off your printer with the settings specified by your paper, then you place the paper in a template and you have a scanner mounted on top which you move like a guillotine across the paper, it scans each colour and then creates a profile which takes into account the ink you use and the paper type. Once you have a profiled screen and each paper type your colour is then in sync and your good to go.
This shows the template and the scanner that goes across the page.
Open up your document in PS, go to View ---> proof set up ---> Custom ---> then click device to simulate (which is your profile for the paper type) select your named profile eg 300GSM Permajet Oyster then click the simulate paper colour and simulate black ink check boxes. That will create the simulation of what it will look like when printed.
Edit the image to your taste.
File ---> Print
In the colour management you need to change the colour handling to Photoshop manages colour, then change the profile to the paper type your using (aka the profile you made)
Then depending on what printers you use you have to change the print colour and paper settings. So you turn off all the printers colour management because your profile has created it for you. Then set up your paper, so usually I would save out a preset for each. You set the paper type in the drop box to what ever your paper instructions tells you (My PermaJet Oyster tells me I have to select Premium semi gloss) This tells the printer how much ink to apply to the media. Then you set the DPI usually the highest 1440. Then print and it should come out as you see.
Just skimmed the surface but gives you an idea of how I set mine up. I make lots of prints for clients and my own personal prints so need to know what I create I can output correctly.
Obviously this is pretty intense, and not for the weekend warrior and it takes a long time to set up. But once done you can use the presets and it takes no time to make perfect prints. But is the best way to create a home lab that will be 99% colour correct. Some of the papers that I use like Illford stocks are £100 for 25 sheets so wasting is costly. But I love printing it was one of my majors at uni, my grandad also was a cold metal printer. I oversee all the printing at the newspaper I work for. We do loads of commercial printing from 50 to 100s thouands as well as fine art prints etc.
The print press we use at the Cumberland News has 8 towers which are a million each, prints our newspaper at 30,000 an hour of broadsheet between 40-60 pages. Its an amazing process. All the pages are simulated first like above then the plates made and then the machine starts chugging and it is quite a spectacle to watch.


