Special Kay
Active member
Thats's a great result, you must be well chuffed 


MKZ4000 said:Excellent results
I was super conscious when refitting. I used Loctite SuperGel to stick them back and they’d been left for a couple of weeks since then. Just had to rescrew together VERY slowly, but they nipped up nicely..smorris_12 said:If it makes you feel better I managed to snap the lugs off the lower piece too! For some reason I thought it just levered off having just unscrewed the button panels. I epoxied them back on but think I over tightened one of them when refitting.
Many thanks. It was so enjoyable and satisfying to refurb, I'm actually considering doing another just for fun :lol:Special Kay said:That's an astonishing result, the before and after pictures really are a credit to your hard work and perseverance, very professional indeed
They're chunky things, for sure. Hopefully when you come to remove the trim, the plastic holds up and you don't get a collection of small shards :lol:pvr said:Very good - I will need to do mine as well. For some reason I don't have a MSW so have just got the flat pieces that look a bit sorry for themselves. The leather is ok. Sure is thick on the 3.0 si though, didn't remember that from my M or 3.0 being that beasty.
inkey$ said:They're chunky things, for sure. Hopefully when you come to remove the trim, the plastic holds up and you don't get a collection of small shards :lol:pvr said:Very good - I will need to do mine as well. For some reason I don't have a MSW so have just got the flat pieces that look a bit sorry for themselves. The leather is ok. Sure is thick on the 3.0 si though, didn't remember that from my M or 3.0 being that beasty.
Excellent workUsel said:inkey$ said:They're chunky things, for sure. Hopefully when you come to remove the trim, the plastic holds up and you don't get a collection of small shards :lol:pvr said:Very good - I will need to do mine as well. For some reason I don't have a MSW so have just got the flat pieces that look a bit sorry for themselves. The leather is ok. Sure is thick on the 3.0 si though, didn't remember that from my M or 3.0 being that beasty.
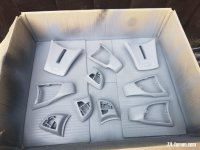
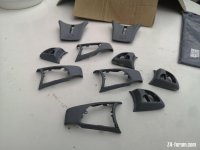
I have some plastics trims to paint so I'm going to follow your guide, so last night I removed the screws.
I heated up both sides with a hair dryer and then ever so slightly tightened, just so they move and then un-did them. Came out without damage
I think AliExpress has patterned regular E85 wheel trims for sale.futureZ4buyer said:That looks great!
Any idea if there are copies of steering wheel sold? I have only found OEM trims which are too expensive for cheap plastic...
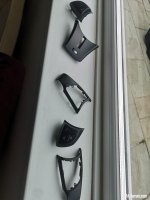
My bottom trim snapped. Maybe I can fix it with super glue?