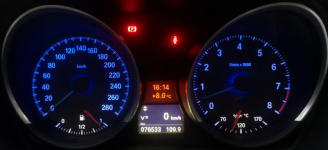
how to - instrument cluster color mod

tintoverano

Active member
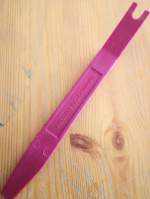
Screenshot 2020-03-22 at 14.12.13.png

  1. what you need
    • torx 10 screwdriver
    • trim tool
    Screenshot 2020-03-21 at 17.04.39.png
    Screenshot 2020-03-22 at 10.29.37.png
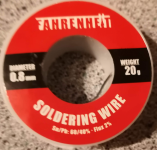
    • soldering wire
    Screenshot 2020-03-22 at 10.27.04.png


    Screenshot 2020-03-22 at 10.25.37.png

    • paint brush, size 4 or 6


    [*]watch this video to get a feeling of the task ahead and see how to remove the cluster from the car
    • don't bother removing the steering wheel, just lower it all the way down
    • go to 2:15 (post editor doesn't like setting starting time)
    [youtube]XE8PN2uVwIc[/youtube]


    [*]how to do it

    remove cluster front and needles
    1. remove the 4 torx 10 screws from the cluster on the back
    2. using the trim tool remove the back cover (easier this way, than using a screwdriver)
      • start on the right side, push the trim tool with the u-shape end into the clip and raise the cover
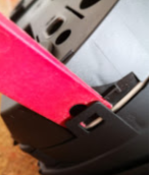
      Screenshot 2020-03-30 at 19.11.13.png
      • repeat clockwise for the lower clips. do the top ones last
    3. IMPORTANT mark the position of the needles
    4. remove the 4 needles on the front using the trim tool as shown in the video (simply put a piece of paper under the tool, no need for taping)
    5. try not turning the needles while lifting upwards, so that their axes stay where they were, when you marked their position

    prepare and paint the needles (so they dry out completely while replacing the LEDs)

    1. using the sanding paper remove the white film from the top and bottom parts of the needles completely
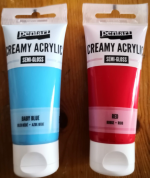
    2. paint only the bottom of the needles: bigger ones blue, smallers ones red
    3. also paint the part where the axis go into and around it, not only the needle part (sorry no pict), this will restrict the glowing effect around the axes
    4. this type of paint covers pretty good, but make sure you don't leave out spots, don't worry if the paint is thick
    5. don't worry about the sides getting paint, we'll remove it once the paint dried out
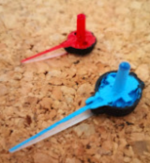
      Screenshot 2020-03-30 at 19.09.28.png

    remove old and solder on new LEDs

    1. further disassemble the cluster as shown in the video, till you get access to the LEDs
    2. IMPORTANTmark the positives of the LEDs
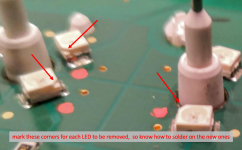
      Screenshot 2020-03-22 at 10.09.09.png
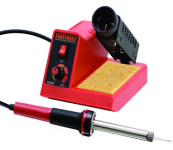
    3. turn on the soldering iron, set the heat knob to upright position (12 o'clock) and wait at least 10 minutes, higher temperatures can damage the LEDs
    4. remove the LEDs, indicated below on the pict, as shown in the video (tip: open the image in a new tab to see it in original size)
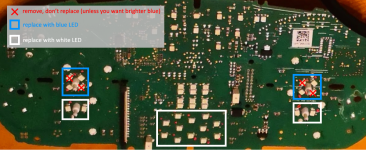
      Screenshot 2020-03-22 at 10.07.22.png
    5. solder on the new LEDs as indicated above on the pict, watch out for the marks you made earlier for the LED positive sides
    6. go to your car and connect the cluster to check that all LEDs lit up as expected

    almost there, hang on 🤣
    1. assemble the cluster, so you can place back the needles
    2. by this time the paint on the needles dried out, better check to make sure
    3. the center part of the needle will have a different color, here's how to address (don't worry it'll look good, zoomed in on the pictures)
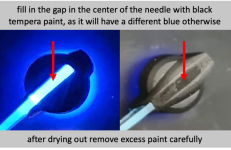
      Screenshot 2020-03-22 at 19.04.51.png
    4. clean the sides of the needles from excess paint, you can use e.g. a carpet cutter to scrape off the paint gently
    5. place the needles back, watch for their positions to match the marks you made earlier

    assemble the cluster, put it back and turn on the ignition :thumbsup:
 
just updated the how to

missed out an important step fixing the issue with the center of the blue needles getting a different color, if this step is not done
 
I have ordered some SMD LED chips in order to do this mod, whilst I am waiting for those to arrive I removed the cluster today to have a look at the impending job. Those LED chips on the PCB are tiny, I guess you need a steady hand with the soldering iron and a magnifying glass 🤣 According to some of these videos the SMD LED chips are 3528 / 1210. Is that the type you used? I managed to clean the central LCD screen whilst I had everything apart. Decided to go for all white LEDs including the central LCD as per the video you posted above, might colour the needles red.
 
Silverstar said:
According to some of these videos the SMD LED chips are 3528 / 1210. Is that the type you used?

you can find out about the LEDs above in the "What you need" section

good luck

(while I'm here, I found photos about painting the needles, adding them for more clarity)
 
In the what you need section it just says 16 white and 4 blue SMD LEDs but it doesn't say which type of SMD e.g. 5050 2835 etc. After watching some more videos on YouTube about this I gather it is the 3825 / 1210 that are used, I imagine that is what you used?
 
tintoverano said:
I think it would

the LEDs are placed differently, other than that it should work

I was afraid of that. For those that are gifted in electrics this may seem simple but I am not :lol:
May need to pop over to the E85 side and ask if anyone could provide any input.

What you've done looks amazing btw. Very impressed!
 
Dr. Zed said:
tintoverano said:
I think it would

the LEDs are placed differently, other than that it should work

I was afraid of that. For those that are gifted in electrics this may seem simple but I am not :lol:
May need to pop over to the E85 side and ask if anyone could provide any input.

take the cluster apart and make a photo of the printed circuit, where the LEDs are, no magic here :)

Dr. Zed said:
What you've done looks amazing btw. Very impressed!

thanks :thumbsup:
 
Sounds relatively simple when you put it like that!
Issue I have then is whether the LEDs you linked will be the correct ones so definitely need to do some more digging into this but I don't like the orange so it needs to go.
 
tintoverano said:
I'm sure the LEDs are the same across models for the E series

I would like to think so mate, although your model is a lot newer than mine. It's not necessarily the model, but rather the year that would make me worried about differences in LEDs. I'll do some more research and see though. Looks like a fun mod with a massive impact on the feel of the car.
 
Sorry to go off post a bit, but I collect my 2.3i next week. I hope the weather improves as I was looking forward to a bit of top down fun.
I was looking into tuning the 2.5l engine and there seems to be two methods. A re-map, which you have had done on your car, and a module plugged into the OBD socket. I have heard the module method can be a bit of a con on a normally aspirated engine but one system has a mobile app to turn the map on or off.
Which in your opinion is the best route? Does a re-map need to be set up on a rolling road and what power/torque gains can you expect?
I am also going to fit the after market Sat Nav/screen kit and have my trim remover tool kit ready :D
 
hi,

I haven't not heard of the module method so far, but it doesn't mean that it is not available :)

the n52b25 engine doesn't give many options: remap, catless downpipes, sport exhaust, air intake/filter

and pretty much that's it, this may give you 20-25 plus bhp

you can also change your differential to a shorter one, to increase torque on the wheels and have better acceleration - the result would depend on the new ratio
 
I just have to say I find it kinda funny all the comments about how tiny they are (dont get me wrong, they ARE...). 1210 parts are 12mm by 10mm. I used to hand solder 0201 components using two soldering irons and a stereoscopic microscope. ;-) 1210 are cake!
 
Back
Top Bottom