You are using an out of date browser. It may not display this or other websites correctly.
You should upgrade or use an alternative browser.
You should upgrade or use an alternative browser.
HOW TO; Convert Angel Eyes to BRIGHT LED's
- Thread starter Ducklakeview
- Start date
Can you tell me on that photo where the bulb (we are replacing) is situated?bobo075 said:Now I understand why it is bluethank's
Spaniarduk
Member
Z4C_er said:Yes, there is a blue filter in the assembly. This was taken from another posting:
https://www.zpost.com/forums/showthread.php?t=724153&page=1
Ha! I nu it!!
Any results to share?nikitashete903 said:A lot more brilliant and no blunders, the Halfords LEDs are not extremity touchy, so work whichever way round. I'll hold up until it's dull and get a few pics..
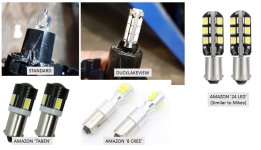
Just looking at this again, and it seems to be the length of the bulb that is a factor. If it goes in far enough, maybe it bypasses the blue filter? The ones featured in the Amazon link are quite short, whilst the ones that Mike used are quite long. Here's a picture to explain. These '8 Cree' ones from eBay look OK, and they don't have any LED output at the end. They're supposed to be 1500 lumen (maybe with 24V):
https://www.ebay.co.uk/itm/BA9S-80W-8-Cree-LED-Car-ERROR-FREE-CANBUS-233-T4W-CAR-SIDE-LIGHT-Interior-BULBS/153293950971?_trkparms=aid%3D555018%26algo%3DPL.SIM%26ao%3D1%26asc%3D20140122125356%26meid%3D0766d69d37ab48cfb00e8a6cba1aa545%26pid%3D100005%26rk%3D1%26rkt%3D12%26sd%3D271255208159%26itm%3D153293950971%26pg%3D2047675&_trksid=p2047675.c100005.m1851
https://www.ebay.co.uk/itm/BA9S-80W-8-Cree-LED-Car-ERROR-FREE-CANBUS-233-T4W-CAR-SIDE-LIGHT-Interior-BULBS/153293950971?_trkparms=aid%3D555018%26algo%3DPL.SIM%26ao%3D1%26asc%3D20140122125356%26meid%3D0766d69d37ab48cfb00e8a6cba1aa545%26pid%3D100005%26rk%3D1%26rkt%3D12%26sd%3D271255208159%26itm%3D153293950971%26pg%3D2047675&_trksid=p2047675.c100005.m1851
Attachments
So, after spending a bit of time dismantling my headlight I discovered the following. I removed the light housing itself by taking out the marked screws and detaching the plug from what I think is some sort of adjustment motor? There is a third fitting under the adjustment motor too, that is the same setup as the two you can see. Once the motor is removed from the headlight, you can get your star spanner under it to detach it also. One of the xenon projector fitments also need to come off as marked by the white arrow. It was a bit fiddly to remove the light housing put it comes out easily enough.

Light housing

You can now clearly see the blue filter and it covers the entire back of the light. You can remove the filter to expose the light fitting itself. This needs a screwdriver (and some care) where marked to open up the clip.


This leaves the back of the fitting itself which can also be easily removed from the headlight.


Main issue with the setup is that the blue filter actually attaches the fitting to the headlight. You could leave the blue filter out, but you would need to devise a way to attach the fitting to the headlight. There is also a detachable ring on the main headlight that can be removed in a similar manner to the dummy light.


I am no expert here, but this would appear to allow you to install LED halos from the back, removing the need to cut the front of the headlight off. You could attach them to all the removed fittings, then reinstall. Appreciate it would be hard to clean it all afterwards, but with these wizzy vacuum cleaner attachments, you could get into the corners without too much trouble https://www.ebay.co.uk/itm/Cleaner-Brush-Vacuum-Dust-Tubes-Attachment-Dust-Remover-Cleaning-Suction-Brush/254049899131?hash=item3b268dd27b&enc=AQADAAADEFjVrDbVsZ8oH%2F8PNHtt9VX4%2Fw7FZcmMuqsX8uaFEduV8%2FDd1fcKU3%2FFEQhuqrjFBkHSyMCcsIApiWH4NBXGpEFUdbtUQ0HNpBfhPrnD3%2FpAsCBlQ5PZu%2F50NR8cwoaozEsOnPtGFDU7OoLACXhb2h5Np3%2BAuaWD6TfUI5%2BHKpkMBKEBh851ziOO7gR5TO5BKxd4KopdkIMknXz3UbHRY53TuA2z7rWIP678fX6TFTxKLYNsSkuRSklaWR6aZeledzq4Ie80rOSnUbUJ9DVWP4dQrE9QvtDs0Be6clh84oj8LZf5HhKXGNB0RSqE%2F0eTcvR0kFrIKUbC4wmYV9bLIkjUiyEKqpeas6vBAzPjR1SkyLbql9mfc56Cq2RAerS2%2BQokQNu5uSFjpGcGDwKfxCPvhEoG1jg9cqZ8iydN4fNtDpXy3VDN2oI%2B8jwVp%2FZ0H%2B2pxvR0cDLEeEST%2BxAzeAKBM1XdHzE5FMw87VTEJ10no4fghnc1qn0NuUJDwkvuRiuAFKnwPZj%2Blvje69Hy0bdOynyXYqYZroEzcD6nsAaY%2Fez1Ma%2FMOUY24DTWbZ%2FoeWVCfiD1RyUvX7KxnT4jjCxCt5nutKw2ZbWun9hy57WdKWsC8EUzztPYXXBnrHkVPjdyd9anxxUfBOFLOq2uEGLRSUdKz3GBDxavm%2BAt0Oh70VXykE%2FCEmTT78OV6QylOGAEGm0TlKJP6PlLadlaY%2FZi237HQL%2F6BVIYNuN9eFwmmRyF4UaYCUmB9EoOolEFY7z%2F%2BA%2Fg6or8%2BbsmbnNh38T9EHdFKPeTh%2BQFrnSkbDgymXp6NsWNPJRrphV7QFZSdep8A9zFaWQFIQVSBPoTwVEFZDChKXbewRhdF8dM5cYeu1pALz1crBvCPZNiZGUm9Te3HMJmuZToa5kzRN0PDIzlGgKFHZbda0nECQk5ArQ1aaFDIbJaQ9Nc%2B4nP5tZEQ2Jbb2a4rWOeK5bSAMzo%2BBe46b4EGx3i1f9L9OQoBbN9q1RyqOfUHHs38m2wQgzfk%2FSZboV15KYNNYeGG7A0YuQ%3D&checksum=254049899131eefd945ec1a34bd1b64e94c5b526d665
Light housing
You can now clearly see the blue filter and it covers the entire back of the light. You can remove the filter to expose the light fitting itself. This needs a screwdriver (and some care) where marked to open up the clip.
This leaves the back of the fitting itself which can also be easily removed from the headlight.
Main issue with the setup is that the blue filter actually attaches the fitting to the headlight. You could leave the blue filter out, but you would need to devise a way to attach the fitting to the headlight. There is also a detachable ring on the main headlight that can be removed in a similar manner to the dummy light.
I am no expert here, but this would appear to allow you to install LED halos from the back, removing the need to cut the front of the headlight off. You could attach them to all the removed fittings, then reinstall. Appreciate it would be hard to clean it all afterwards, but with these wizzy vacuum cleaner attachments, you could get into the corners without too much trouble https://www.ebay.co.uk/itm/Cleaner-Brush-Vacuum-Dust-Tubes-Attachment-Dust-Remover-Cleaning-Suction-Brush/254049899131?hash=item3b268dd27b&enc=AQADAAADEFjVrDbVsZ8oH%2F8PNHtt9VX4%2Fw7FZcmMuqsX8uaFEduV8%2FDd1fcKU3%2FFEQhuqrjFBkHSyMCcsIApiWH4NBXGpEFUdbtUQ0HNpBfhPrnD3%2FpAsCBlQ5PZu%2F50NR8cwoaozEsOnPtGFDU7OoLACXhb2h5Np3%2BAuaWD6TfUI5%2BHKpkMBKEBh851ziOO7gR5TO5BKxd4KopdkIMknXz3UbHRY53TuA2z7rWIP678fX6TFTxKLYNsSkuRSklaWR6aZeledzq4Ie80rOSnUbUJ9DVWP4dQrE9QvtDs0Be6clh84oj8LZf5HhKXGNB0RSqE%2F0eTcvR0kFrIKUbC4wmYV9bLIkjUiyEKqpeas6vBAzPjR1SkyLbql9mfc56Cq2RAerS2%2BQokQNu5uSFjpGcGDwKfxCPvhEoG1jg9cqZ8iydN4fNtDpXy3VDN2oI%2B8jwVp%2FZ0H%2B2pxvR0cDLEeEST%2BxAzeAKBM1XdHzE5FMw87VTEJ10no4fghnc1qn0NuUJDwkvuRiuAFKnwPZj%2Blvje69Hy0bdOynyXYqYZroEzcD6nsAaY%2Fez1Ma%2FMOUY24DTWbZ%2FoeWVCfiD1RyUvX7KxnT4jjCxCt5nutKw2ZbWun9hy57WdKWsC8EUzztPYXXBnrHkVPjdyd9anxxUfBOFLOq2uEGLRSUdKz3GBDxavm%2BAt0Oh70VXykE%2FCEmTT78OV6QylOGAEGm0TlKJP6PlLadlaY%2FZi237HQL%2F6BVIYNuN9eFwmmRyF4UaYCUmB9EoOolEFY7z%2F%2BA%2Fg6or8%2BbsmbnNh38T9EHdFKPeTh%2BQFrnSkbDgymXp6NsWNPJRrphV7QFZSdep8A9zFaWQFIQVSBPoTwVEFZDChKXbewRhdF8dM5cYeu1pALz1crBvCPZNiZGUm9Te3HMJmuZToa5kzRN0PDIzlGgKFHZbda0nECQk5ArQ1aaFDIbJaQ9Nc%2B4nP5tZEQ2Jbb2a4rWOeK5bSAMzo%2BBe46b4EGx3i1f9L9OQoBbN9q1RyqOfUHHs38m2wQgzfk%2FSZboV15KYNNYeGG7A0YuQ%3D&checksum=254049899131eefd945ec1a34bd1b64e94c5b526d665
scarlet-jester said:I am no expert here, but this would appear to allow you to install LED halos from the back, removing the need to cut the front of the headlight off. You could attach them to all the removed fittings, then reinstall. Appreciate it would be hard to clean it all afterwards, but with these wizzy vacuum cleaner attachments, you could get into the corners without too much trouble
Wow, fantastic news. You have just saved a lot of people here a LOT of anxiety and hassle.
:bow:
Could you measure the actual outside diameter of the 2 halo rings please?
Thanks again!
Spaniarduk
Member
[ref]scarlet-jester[/ref], excellent job!
scarlet-jester said:So, after spending a bit of time dismantling my headlight I discovered the following. I removed the light housing itself by taking out the marked screws and detaching the plug from what I think is some sort of adjustment motor? There is a third fitting under the adjustment motor too, that is the same setup as the two you can see. Once the motor is removed from the headlight, you can get your star spanner under it to detach it also. One of the xenon projector fitments also need to come off as marked by the white arrow. It was a bit fiddly to remove the light housing put it comes out easily enough.
0.jpg
Light housing
1.jpg
You can now clearly see the blue filter and it covers the entire back of the light. You can remove the filter to expose the light fitting itself. This needs a screwdriver (and some care) where marked to open up the clip.
2.jpg
3.jpg
This leaves the back of the fitting itself which can also be easily removed from the headlight.
4.jpg
5.jpg
6.jpg
Main issue with the setup is that the blue filter actually attaches the fitting to the headlight. You could leave the blue filter out, but you would need to devise a way to attach the fitting to the headlight. There is also a detachable ring on the main headlight that can be removed in a similar manner to the dummy light.
7.jpg
8.jpg
I am no expert here, but this would appear to allow you to install LED halos from the back, removing the need to cut the front of the headlight off. You could attach them to all the removed fittings, then reinstall. Appreciate it would be hard to clean it all afterwards, but with these wizzy vacuum cleaner attachments, you could get into the corners without too much trouble https://www.ebay.co.uk/itm/Cleaner-Brush-Vacuum-Dust-Tubes-Attachment-Dust-Remover-Cleaning-Suction-Brush/254049899131?hash=item3b268dd27b&enc=AQADAAADEFjVrDbVsZ8oH%2F8PNHtt9VX4%2Fw7FZcmMuqsX8uaFEduV8%2FDd1fcKU3%2FFEQhuqrjFBkHSyMCcsIApiWH4NBXGpEFUdbtUQ0HNpBfhPrnD3%2FpAsCBlQ5PZu%2F50NR8cwoaozEsOnPtGFDU7OoLACXhb2h5Np3%2BAuaWD6TfUI5%2BHKpkMBKEBh851ziOO7gR5TO5BKxd4KopdkIMknXz3UbHRY53TuA2z7rWIP678fX6TFTxKLYNsSkuRSklaWR6aZeledzq4Ie80rOSnUbUJ9DVWP4dQrE9QvtDs0Be6clh84oj8LZf5HhKXGNB0RSqE%2F0eTcvR0kFrIKUbC4wmYV9bLIkjUiyEKqpeas6vBAzPjR1SkyLbql9mfc56Cq2RAerS2%2BQokQNu5uSFjpGcGDwKfxCPvhEoG1jg9cqZ8iydN4fNtDpXy3VDN2oI%2B8jwVp%2FZ0H%2B2pxvR0cDLEeEST%2BxAzeAKBM1XdHzE5FMw87VTEJ10no4fghnc1qn0NuUJDwkvuRiuAFKnwPZj%2Blvje69Hy0bdOynyXYqYZroEzcD6nsAaY%2Fez1Ma%2FMOUY24DTWbZ%2FoeWVCfiD1RyUvX7KxnT4jjCxCt5nutKw2ZbWun9hy57WdKWsC8EUzztPYXXBnrHkVPjdyd9anxxUfBOFLOq2uEGLRSUdKz3GBDxavm%2BAt0Oh70VXykE%2FCEmTT78OV6QylOGAEGm0TlKJP6PlLadlaY%2FZi237HQL%2F6BVIYNuN9eFwmmRyF4UaYCUmB9EoOolEFY7z%2F%2BA%2Fg6or8%2BbsmbnNh38T9EHdFKPeTh%2BQFrnSkbDgymXp6NsWNPJRrphV7QFZSdep8A9zFaWQFIQVSBPoTwVEFZDChKXbewRhdF8dM5cYeu1pALz1crBvCPZNiZGUm9Te3HMJmuZToa5kzRN0PDIzlGgKFHZbda0nECQk5ArQ1aaFDIbJaQ9Nc%2B4nP5tZEQ2Jbb2a4rWOeK5bSAMzo%2BBe46b4EGx3i1f9L9OQoBbN9q1RyqOfUHHs38m2wQgzfk%2FSZboV15KYNNYeGG7A0YuQ%3D&checksum=254049899131eefd945ec1a34bd1b64e94c5b526d665
If that's a spare part you have lying around and you don't need to reassemble everything very soon (within the next week), send it to me, I'll measure it carefully and use photogrammetry to accurately model that in CAD. Then I can change its design for 3D printing and make it available to everyone.
[/quote]
If that's a spair part you have lying around and don't need to reassemble everything very soon (within the next week), send it to me, I'll measure it carefully and use photogrammetry to accurately model that in CAD. Then I can change it's design for 3D printing and make it available to everyone.
[/quote]
Sounds great, but which part are you considering?
[/quote]
The blue filter that seemingly holds the halos in the headlight. But the full assembly would be useful as I can explore some design alternative.
Unfortunately (but fortunate for me ") ) I live in New Zealand so it would be a little impractical to send these parts to the UK. I also only have the two headlights that came with the car! There must be a few on here that have spare headlights, so perhaps they can share the necessary parts? Sorry
) I live in New Zealand so it would be a little impractical to send these parts to the UK. I also only have the two headlights that came with the car! There must be a few on here that have spare headlights, so perhaps they can share the necessary parts? Sorry 
I will post some more pictures when my new bulbs arrive
) I live in New Zealand so it would be a little impractical to send these parts to the UK. I also only have the two headlights that came with the car! There must be a few on here that have spare headlights, so perhaps they can share the necessary parts? Sorry I will post some more pictures when my new bulbs arrive
dhobbs said:So from what I can gather, the angel eye is purely a lense that’s been blanked off bar the outer ring.
Is that correct?
Yes, that's pretty much it!
scarlet-jester said:dhobbs said:So from what I can gather, the angel eye is purely a lense that’s been blanked off bar the outer ring.
Is that correct?
Yes, that's pretty much it!
Howdy! Any update? Did you get your bulbs?
So I got the bulbs in last night as well as spending a while getting it all back on the car. So here are a series of pictures to demonstrate the results.
Full daylight (be it low NZ winter sun)

Early evening light

And tonight after dark

Safe to say, given the advertised lumems for these bulbs, it is all pretty underwhelming. In addition, I have a canbus error on the dash too - I have not tried to clear it so it may or may not be temporary. There is a local guy wrecking a Si in NZ so I am going to see if I can get a single headlight unit and do some experimenting on getting and LED halo in place from the back - will start a separate thread if I manage to get secure the unit
Full daylight (be it low NZ winter sun)
Early evening light
And tonight after dark
Safe to say, given the advertised lumems for these bulbs, it is all pretty underwhelming. In addition, I have a canbus error on the dash too - I have not tried to clear it so it may or may not be temporary. There is a local guy wrecking a Si in NZ so I am going to see if I can get a single headlight unit and do some experimenting on getting and LED halo in place from the back - will start a separate thread if I manage to get secure the unit
Spaniarduk
Member
[ref]scarlet-jester[/ref], i found all led alternatives to be misleading when it came to brightness. I ended up replacing mine with a filamented lightbulb but with twice the power of the BMW original ones. It was a mild improvement. Definitely bigger improvement than with any other led. And with no canbus error. I am now pondering the idea or removing the blue mask and perhaps painting white or chrome the black disk inside the faux reflector to improve light reflection.
Pretty much. To me it looks very similar to the pre-face lift model in that it has a reflective lens as a normal light would and the parts that now cover it over. If you look through my photos you will see all the parts that make it up. Have to say it is not very well done and does not work very well either ....dhobbs said:So from what I can gather, the angel eye is purely a lense that’s been blanked off bar the outer ring.
Is that correct?