2009 Z4 35i Let the DIY and slight cosmetic modding begin.

sachak

Member
So I have made a similar thread on another forum but thought I would share all my modding and fixing of my z4 on this forum too as its a dedicated Z forum.

So 6 months ago I purchased a 2009 Z4 35i sDrive DCT.

Apon first inspection I thought the car was in a decent condition but as time went on I got many many ugly surprises that have cost me a fortune and many many many hours and days and nights of my time have been spent fixing and adjusting and making things look good and bringing the car back to its former OEM glory!

So first ill start with the very first problem I found with the car! The exhaust system sounded like crap to say the least!
The cats were removed and the car had a very raspy sound that I personally don't like at all. However this particular sound was ugly as all hell and here is why.

I will let the pictures speak for themselves. I can quite honestly say that this is some of the worst exhaust and welding workmanship I have ever actually seen to date.
img_2335_1168195614.jpg
img_2336_7469558892.jpg
img_2339_1478917584.jpg
img_2352_622592652.jpg
img_2361_5738818417.jpg

Then here is the fix I have done for now. Its not perfect but its a hell of allot better and sounds allot better!
img_2357_7345168874.jpg
img_2358_3802748704.jpg
img_2360_357592748.jpg

Lined up nicely and no funky things hanging out the bottom of the car
img_2362_8881552424.jpg

Will continue in the next post as the image uploader isn't letting me upload anything else.
 
Next up..Vent tabs. Somehow the previous owner managed to break these vent tabs. I am not sure how one achieves such a thing? Headbutt the dash maybe?

I decided to take my dash apart last night as these missing vent tabs were just starting to annoy me way too much.
img_2678_6855282196.jpg

I forgot to take a pic of me removing these screws from the glove box but I highlighted the screws that need to be removed.
img_2684_8083741366.jpg

img_2679_7046323237.jpg

I then gently pulled the dash trim off trying hard not to break any clips which I managed to do successfully
img_2685_6224845312.jpg

I then removed the two screws holding the vents in and pulled the vents out.
img_2686_2517450973.jpg

Wires Disconnected.
img_2692_8444750406.jpg

bastard screw that fell deep into the dash.
img_2690_4570641038.jpg

Loose screw causing horrible rattle sound.
img_2691_8134126430.jpg

Vents out and ready for stripping.
img_2693_6514802784.jpg

continue into next post
 

Attachments

  • img_2694_2429859037.jpg
    img_2694_2429859037.jpg
    129 KB · Views: 2,839
Removing vent surround.
img_2695_1966644078.jpg
img_2694_2429859037.jpg
img_2696_5640018316.jpg
img_2700_4927118392.jpg

Vents getting a bath!
img_2713_2094217776.jpg

Vent tab fit and repair process started!
img_2704_5193703589.jpg
img_2708_8526874254.jpg
img_2706_3328756843.jpg
img_2712_179270724.jpg

Broke this bit off like a knob goblin by mistake which would have rendered this whole process a fail as the vent slat would hang out and look retarded and the tab would be useless. But I managed to q-bond it back and then plastic weld it.
img_2714_1575334379.jpg

Continue onto next post
 
Looks like a previous amateur was creative with a cheap stickwelder :lol:

Good you sorted that out.
 
Vent Tabs all put in and fixed so that they never break off again!
img_2716_7639561709.jpg

Time to sort out annoying rattles, while this trim is all off!
img_2717_9790278468.jpg
img_2719_1605518045.jpg

:rofl: 
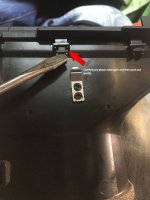
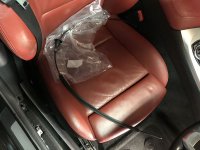
went a bit mad with the foam pads but damn z4's rattle allot! :o
img_2721_4869313491.jpg

Surround re-fitted.
img_2718_4830459058.jpg

Fixing of the Engine start that looks to be previously plastidipped (I HATE THIS PLASTIDIP stuff)
img_2722_2990657724.jpg

and Fixed! using Dupli-Color Vinyl
img_2723_4122694586.jpg


Everything finished and fitted finally at 4am.
What a difference! Starting to look like a BMW again!
And no more rattles from the front of the dash!

img_2724_591003685.jpg
img_2728_3338971179.jpg
img_2729[1]_8892119741.jpg

Next up is remove the back silver trim headrest things behind the seats and foam pad proof those as they also make plastic creaks and rattles. Gotta find a link that shows how that is done.
 
Next up.

Car was sent in yesterday to get all this crap sorted.
Turbos have been removed.

Pic of the turbos.
img_2752_4222611975.jpg

and here you can see the problem!
[youtube]https://www.youtube.com/watch?v=1NCK4xMJC1U&feature=youtu.be[/youtube]

Here is a pic of the down pipes and sub assembly of the car all stripped.
img_2755_1712610325.jpg


Side of the engine, Notice the sump gasket leak and heavy sweating, will have this replaced while its all off.
img_2756_14599584.jpg
img_2754_5554045145.jpg

More leaky sump gasket.
img_2758_4919237545.jpg


So anyways this all went very badly wrong, the mechanic who was supposed to do the waste gate rattle fix ended up messing my turbos up and taking them apart and then proceeded to tell me that the center shaft was worn! Funny the car was working just fine before he got hold of it! So I ended up buying two new turbos for him to fit which he did a very bad job of and caused more harm than anything else.

Those new turbos lasted a whole two weeks and then started sounding like a siren let me show you guys why :)

So this is firstly how he returned my turbos to me that only needed a new bush to sort out the waste gate rattle:

As you can see the turbos are in a trillion parts!
img_2839_8752946532.jpg

before I continue I must also say that my lights were facing the ground and having never owned a car with auto adjustable headlights I had no idea how to fix this. This is what I found:
xenon auto adjuster_8331658346.jpg
I obviously fixed that problem!

new Refurbished turbos from BMW.
img_2859_9977763728.jpg
img_2860_405598911.jpg

so because he was such an awesome mechanic and knew what he was doing he forgot to tighten any of the clamps:
img_3295_4033380197.jpg
They were all loose!

to be continued!
 
This clamp he actually forgot to fit:
img_3458_1376331411.jpg

And then a boost leak from hell that I eventually found was due to him swiping my blow off valve oring which is a flat washer like oring which he replaced with this:
img_3546_5089556807.jpg

He told me it must have happened by itself...Yes the O-Ring escaped and another wrong one magically appeared in its place
img_3547_4956219126.jpg


I then replaced all the vacuum lines because he managed to mess those up too:
old Vacuum lines
img_3544_923233372.jpg

New vacuum lines:
img_3545_7054879926.jpg

Keep in mind this car was perfect in its power delivery and drive-ability before he got hold of it!

Scratches that he and the previous owner caused:
before_8268437408.jpg

Fixed!
img_3334_452326294.jpg
img_3336_839850381.jpg


Oh and my car had this horrible what felt to be a rough idle once the car went down to around 500rpm and it worried the s**t out of me but this is the cause:

He put the exhaust back wrong so the tail pipe was touching the body of the car, fun times. Gotta love this workshop long time:
img_3483_7189866676.jpg

To be continued....Will show why the new turbos blew after an entire two weeks:
 
So I found that my inlet pipe to the rear turbo was not on the turbo properly, I pulled it out and this is what I found, My mechanic told me it had a small crack so he plastic welded it but it most definitely didn't help.

Firstly here is what I ended up doing cause the amount of s**t your arm gets caught on is amazing and painful lol:

img_3920_9830697453.jpg

And this ladies and Gentleman is why the turbos popped!

So he lost the rubber grommets for the inlet pipes and instead of buying new ones and adding it to my bill as they were cheap parts, he decided to find an old rubber hose and cut some rubber grommets out of that hose and use those, however they were too thick and caused the pipe to crack. So he decided to take the pipe out and "Plastic weld it" and it just cracked again. The pipe was hanging off the turbos and the turbo must have sucked something into it and caused damage!
img_3923_8889520131.jpg
img_3925_1198779568.jpg


Anyways I got another set of turbos via BMW via the warranty and they fitted these things properly, I bought new inlet pipes and took all the mods off the car and converted it 100% to stock other than the downpipes.
The car drives beautifully now and has been for a couple months now!

to be continued with other fixes and mods:
 
I finally got my new Bonnet latch cable from BMW and decided that tonight was the night to fit it:

The problem:
img_3694[1]_8402819409.jpg
img_3728_7124392422.jpg

Stripping begins:
img_3729_404078559.jpg

The new cable, the latch mechanism is in a bag on the other seat.
img_3731_3813903406.jpg

Pulled it through the firewall, Filthy down there too.
img_3734_2087413482.jpg

Latched in and connected:
img_3733_3114081099.jpg

After a good cleanup:
img_3738_182781470.jpg

New Latch mechanism in place and cable connected:
img_3739_8885189080.jpg

All back together and working 100%
img_3756_8731068321.jpg
 

Attachments

  • img_3731_3813903406.jpg
    img_3731_3813903406.jpg
    167.4 KB · Views: 2,819
Next update, rubbers restore:

This is what the rubbers and plastics looked like before hand:
untitled-1_1198548246.jpg

This is after many hours of using a rubber treatment and a paint brush and then buffing with a microfiber towel left it looking like:
img_3751_7523151203.jpg


Pic of a nice clean looking interior, still proud of my nice fixed vent tabs.
img_3757_3463958003.jpg


Anyways so this happened and it was like xmas
img_3932_5237024822.jpg

The previous owner did a single turbo conversion on the car for a short time and so this is some of the damage that happened and why I needed the new washer fluid bottle!
img_3938_5655607301.jpg
img_3947[1]_5685965218.jpg

AAAAAAnd my expansion tank has been relocated too! to the correct side! As you can see the new washer fluid bottle is in and looking MUCH better
img_3944_7691208971.jpg

I decided to do a bit of Autosol polishing of pipes that are now visible due to expansion tank relocation.

Here is a before and after, it actually looks allot better in the metal:
autosol_2088566590.jpg
 
Wow, gets worse and worse.
That has been some amateur previously working on your car.
Good to see you sort things out professionally with the right parts instead of some bodge farmers wiring and stuff :thumbsup:
Unbelievable to see al this on such a relatively young sportscar.
 
Next up was the angel Eye halos. Although the yellow/brown didn't look too bad on this car it was time for a proper upgrade:

Here is what it looked like before we begin:
img_3824_1412804690.jpg

So after trying many different LED setups and always having the same kak result of the inner ring being lit up and the outer ring hardly getting any light I decided to go another route altogether, something everyone told me was impossible due to the fact that the halo's dim when the lights low beam xenons switch on.

So I decided to try Carly Coder out and stopped my halos from dimming when the main low beam xenons come on so that I could do my mod.

It worked, now the voltage doesn't drop so a xenon can't throw and error or start flickering!

So let us begin:

Here is the purchase that I made:
img_3953_1445776615.jpg

I needed this to be a stealth install, I don't like seeing messy wires that don't belong under a bonnet, especially not under this bonnet with the amount of blood sweat and tears I have had in trying to get it perfect which has been a hell of allot of work thus far.

So I decided to get the wires in from under the headlight, which would have been easy had it not been for this little surprise lurking in the dark!

This little s**t of a screw is underneath the damn headlight so pulling the headlights out is next to impossible, I could probably get a ratchet in there but the space is so small to get your hand in there from behind the headlight that getting that screw back on will be impossible unless I had a camera and a screen with forceps :rofl: so year F#@k that s**t!
img_3954_1064739120.jpg

So the dremel came out to play and I made a small hole in the bottom of the headlight by going through the top, its hard to explain lol here is a pic:
img_3960[1]_4856481621.jpg

This allowed me to bring stuff in:
img_3963_3541479022.jpg

Then I could put the bulbs wires back through the hole and underneath the headlight but it was a pita of a job to do this as the spaces are so small.
img_3962_3973325411.jpg

Installation done, no wires anywhere to be seen:
img_3969[1]_7200493062.jpg

Now I was worried that heat may be an issue, so I plugged my car on charge and ran this setup for over an hour with halogen halo bulb on the one side and xenon on the other side and felt temps around the area and watched carefully to see if any melting was happening or burning and it turns out that the halogen side was a bit hotter than the xenon side by touch, I would like to get a laser heat temp gun to make sure im not going mad, but as far as I have read, a xenon bulb is very hot at its core, but radiates less heat as you move further away from it where as a halogen is like a little heater.

anyways here is the result of a xenon powered angel eye:

That is Sugan standing on the left, the owner of Violet electronics who helped me get an 8000k H8 xenon bulb for me today I am the one crouching taking the photo lol:

They are so bright I am able to drive without my headlights on and just using my angel eyes
img_3951_6530629112.jpg

The camera struggles to take pics of it and kinda makes the one look a little green.
img_3975_3888301481.jpg

You have to see them in person to appreciate the true beauty of them, its nothing like the LED kits that you put in here, its on a whole new level, best visual mod I have done so far.
I might build little fans into the bottom of the headlights just as a preventative measure to make sure they don't run too hot on a really hot day, this will be done when I pull the front bumper off to put the Mspot bumper on.

I am going to drive around like this and monitor them and check for any signs of over heating but so far so good, and it looks super cool when you unlock the car with the remote as I also used Carly Coder to make my headlights switch on as well and not just the angel eyes.

I also made my mirrors fold up with the remote now when locking the car :D and made it so that I can open and close the roof while driving but as long as I am doing no more than 30kph, this has changed my life lol.

Anyways she is almost there.
 
small updates. Some cosmetic stuff.

Second round of painting the tires with a better quality paint to see if it lasts this time. Trying this out to see how it looks, might take it off but its just a new look im trying.

img_4418_7495376551.jpg
img_4416_5644650598.jpg
img_4414_4255609759.jpg
img_4410_1548804878.jpg
img_4409_1423106025.jpg

So I have been running the xenon bulbs in my halo's for a while now and no burning has taken place, everything seems to be working fine.
img_4419_4540838459.jpg

I would like to get my headlights polished at some point to try and get them as perfect as possible, Will then VPS them or something to protect them from any future stone chips.
img_4395_6080568833.jpg

I also then did some polishing of the hubs while I had the rims off to paint the lettering and cleaned up a bit behind the wheel.
Before:
img_4402_4010719279.jpg

After:
img_4406_5797503064.jpg
 
Looks stunning - great work and very clear and informative pictures :thumbsup: can't believe how many botched jobs you've uncovered on such a young car :o
 
A small visual update, changed the tips and painted the calipers this weekend.

So this is the reason for me wanting to change the tips, was really bugging me.
img_4449_472698737.jpg

so here are the new tips, received from CF Accessories, was really nice dealing with these guys.
I am not 100% sure of these tips as to weather they suit my car or not, However they are growing on me.
img_4575_245399805.jpg
img_4572_4397098049.jpg
img_4574_4319392908.jpg

Then I decided to fit my new rear pads as my car won't stop complaining about them even though there is still a s**t load of meat left of them. I do not like how these newer BMW's want you to change pads long before they are properly worn.
I decided to spray the calipers red while I was at it, this took me hours as I prepared the surfaces properly to be sprayed, also took the rear calipers apart so as to not spray the pads themselves or the retainer clips etc as I prefer it when the colours are broken up a bit.

img_4545_4538506255.jpg
img_4544_7184989284.jpg
img_4552_3850741568.jpg

img_4554_8933013360.jpg
img_4557_8152104318.jpg
img_4568_9044806985.jpg
 
Oki Doki,

So Quite a big update....I have been busy with this thing lately.

So first up I started removing old ugly plastidip from grills and mirrors cause it was bubbling and peeling and just really made the car look tatty.
I want these things to be black, but I will rather have them sprayed in gloss black to suite the rest of the car. I don't like the sheen that plastidip gives.

Here you can see the state it was in. I HATE PLASTIDIP!
img_4866_2632832797.jpg
why i hate plastidip_7372252023.jpg
mirror plastidip removal_1354243624.jpg

Kitty cat chilling on me while I'm trying to peel plastidip!
kitty chilling while im removing plastidip_1622447781.jpg

all gone!
So it turned out that peeling the stuff off was a waste of time, if the plastidip is too thin in certain places its next to impossible to get it off so I tried a few things and the thing that eventually worked like a charm was engine cleaner, I painted it on with a brush and waited a minute and then used the same paint brush to just wipe it off gently it basically just melts the plastidip instantly.
plastidip all gone_7608432304.jpg

Next up I needed to sort this problem out on my charge pipe so that I could fit the HKS BOV to my car, so I sent the aluminum base to a metal shop called Glutek and they fabricated the same part for me out of stainless steel so that I could then send it to TMSS to get welded on nicely.

Alloy on right Stainless steel with O-Ring correctly seated on left!
img_4736_1151597071.jpg
img_4738_5997377559.jpg

Welden on by TMSS

img_4771_2602802230.jpg
img_4772_4683789163.jpg

Getting ready for fitment:
img_4774_5479543642.jpg
 
Back
Top Bottom