My mirrors are black, car is silver. I just popped off the covers, got some plastic primer, gloss black spray and superfine wet and dry from Halfords. Popped off the covers and sprayed them up. They look great alongside the black A frame pillars and with my gloss black front grilles (again DIY painted).sachak said:mcbutler said:You have put a great deal of effort into this post and it is of interest to all no matter what model in so far as the dash work etc is concerned. Many thanks for that.
Not meaning to be critical but I think you should have got rid of the car a lot earlier on, took the loss which considering the time, effort and cash you have invested would have been a lot more economical, then gone and found a decent car.
More worryingly in pic img_2686_2517450973.jpg I noted you have 'take my breath away' from Top Gun playing on your iDrive
Lets hope (and pray) you are finally there.
I did try get rid of the car at one stage but the mechanic working on it had my car for almost 2 months so another z4 that I wanted to try trade mine on was gone by the time I got my car back and besides my turbos then went two weeks later! was a stuff up from hell.
haha I like that song! I was born in the 80's dammit!its strange how I used to hate all that music when I was a kid and my parents used to play it and now I enjoy some of it lol.
Im getting there slowly with this car its starting to become a very clean example of a E89 Z4, few more things here and there.
I would like to colour code the mirror covers to the same black as my car. Not sure what BMW were thinking when they decided that they should make them silver on a black car but whatever.
You are using an out of date browser. It may not display this or other websites correctly.
You should upgrade or use an alternative browser.
You should upgrade or use an alternative browser.
2009 Z4 35i Let the DIY and slight cosmetic modding begin.
- Thread starter sachak
- Start date
My mirrors are black, car is silver. I just popped off the covers, got some plastic primer, gloss black spray and superfine wet and dry from Halfords. Popped off the covers and sprayed them up. They look great alongside the black A frame pillars and with my gloss black front grilles (again DIY painted).
[/quote]
Cool sounds like a plan although I will be sending the car in for a paint correction and detail and maybe a ceramic coat, while they doing that they are going to spray my kidney grills gloss black and colour code my mirrors to the car and spray the Msport bumper and fit it for me.
I don't trust my spray work to come out looking professional enough.
Full marks to you for doing all that stuff ... presumably you wouldn't have bought it if you'd realised how bad it was. 'Caveat Emptor' springs to mind! I think I'd have traded it in for something else, double quick time! ... anything in exchange would have done! ... :|
So these last few weeks have been very interesting and frustrating.
Ever since I got my car back from BMW it had this strange coolant leak, I always thought it was just the radiator as my radiator had a small leak...Well as you all know I changed that recently.
While changing the radiator while I was under the car I saw coolant leaking from a pipe above the downpipes out the turbo. Well BMW recently replaced the turbos so it was something they needed to deal with.
I took the car to BMW two weeks ago and it turned into a horror story as usual. They stuffed up and wont take responsibility and tried to make me replace 5 pipes at 8k and then 10k labour plus 2.5k assesment fee so 20.5k in total.
Anyways not going to go into it all as its a long story but I took the car away from them and refused to pay a cent and took the car to someone I trust and he sorted the car out for me. Turned out to be a damn Oring that BMW pinched while fitting the coolant pipe to the back turbo. R60 part!!
BMW Lied about allot of stuff and I have opened a case against them via BMW SA. Tired of these people trying to take me and other people for a ride.
They even lied about changing my oil when they replaced my turbos. It turned out that they only topped it up!
Anyways here is the part they screwed up causing the leak.

Anyways onto more pleasant awesome stuff that makes me happy
So here is the charge pipe before spray and prepped for spraying. I don't like bling under my bonnet!

Primer applied....Rust-Oleum:

Then sprayed with textured Rust-Oleum paint, looking awesome!

A friend of mine who is also one of our local BMW community mechanics who specializes in the N54 platform fitted my bigger intercooler and this charge pipe for me after fixing the coolant leak! I haven't taken pics of the charge pipe in the car yet but damn this HKS BOV sounds so flipping awesome! (Yes this is no the UK where there is a "chav" problem ) so BOV's are not frowned upon
So after finding out that BMW didn't actually change my oil like they told me I decided I definitely need to change out my oil ASAP so I am doing a deep flush.
I first put 1 Liter of ATF fluid in the engine and drove to my trusty car wash where I get to use the lift. This lift is getting well used by me. Regular chassis cleaning sessions, finding the old mechanic's stuff ups! and now an oil change!
![IMG_6015[1].jpg](https://z4-forum.com/data/attachments/21/21126-65c7d819f64b9e4f6eed673cd1cdfb7b.jpg?hash=7JicZ-r3N0 "IMG_6015[1].jpg")
So I drained the oil and this is the mess that came out! No metal filings or anything. Just damn dirty oil. But lets be honest...When does clean oil ever come out of a car when its due for an oil change. I guess this looks worse cause it messed all up the sides of the container. Yes I made a mess. I tried to catch the sump plug while holding the bucket next to where the oil was going to pour out and the oil was so hot that it came gushing out at quite a speed and burnt the crap out of my hands Luckily I was wearing gloves so had to rip them off with my teeth (haha sounds like a line from faithless Insomnia :lol: ) cause they started burning on another level of pain. How I didn't drop the bucket was a miracle.
![IMG_6017[1].jpg](https://z4-forum.com/data/attachments/21/21127-724f83b37b464baec168bb801d25693c.jpg?hash=RfgUug87Y3 "IMG_6017[1].jpg")
I bought two bottles of this stuff for now. so I filled up with this stuff which is apparently pretty good oil, at the end of this week I will drain this from my car and fill up with the second bottle and another 1.5L and replace the oil filter and drive with that till the end of the month.
I will then drain that and then put Motul or mobil 1 0w-40 or liqui moly, still researching for now.

So I was working overtime this weekend and while taking a break decided to take some pics of the car after the oil change and wash that followed.
You guys keep going on about what bad shape the car was in etc I dunno so much, Hard work paid off in the end I reckon and I enjoyed working on the car mostly, there were some bad times where I'm sure I shed a tear or two lol but check the state she is in now.
Looking new inside and out.


Ever since I got my car back from BMW it had this strange coolant leak, I always thought it was just the radiator as my radiator had a small leak...Well as you all know I changed that recently.
While changing the radiator while I was under the car I saw coolant leaking from a pipe above the downpipes out the turbo. Well BMW recently replaced the turbos so it was something they needed to deal with.
I took the car to BMW two weeks ago and it turned into a horror story as usual. They stuffed up and wont take responsibility and tried to make me replace 5 pipes at 8k and then 10k labour plus 2.5k assesment fee so 20.5k in total.
Anyways not going to go into it all as its a long story but I took the car away from them and refused to pay a cent and took the car to someone I trust and he sorted the car out for me. Turned out to be a damn Oring that BMW pinched while fitting the coolant pipe to the back turbo. R60 part!!
BMW Lied about allot of stuff and I have opened a case against them via BMW SA. Tired of these people trying to take me and other people for a ride.
They even lied about changing my oil when they replaced my turbos. It turned out that they only topped it up!
Anyways here is the part they screwed up causing the leak.
Anyways onto more pleasant awesome stuff that makes me happy
So here is the charge pipe before spray and prepped for spraying. I don't like bling under my bonnet!
Primer applied....Rust-Oleum:
Then sprayed with textured Rust-Oleum paint, looking awesome!
A friend of mine who is also one of our local BMW community mechanics who specializes in the N54 platform fitted my bigger intercooler and this charge pipe for me after fixing the coolant leak! I haven't taken pics of the charge pipe in the car yet but damn this HKS BOV sounds so flipping awesome! (Yes this is no the UK where there is a "chav" problem ) so BOV's are not frowned upon
So after finding out that BMW didn't actually change my oil like they told me I decided I definitely need to change out my oil ASAP so I am doing a deep flush.
I first put 1 Liter of ATF fluid in the engine and drove to my trusty car wash where I get to use the lift. This lift is getting well used by me. Regular chassis cleaning sessions, finding the old mechanic's stuff ups! and now an oil change!
So I drained the oil and this is the mess that came out! No metal filings or anything. Just damn dirty oil. But lets be honest...When does clean oil ever come out of a car when its due for an oil change.
I guess this looks worse cause it messed all up the sides of the container. Yes I made a mess. I tried to catch the sump plug while holding the bucket next to where the oil was going to pour out and the oil was so hot that it came gushing out at quite a speed and burnt the crap out of my hands Luckily I was wearing gloves so had to rip them off with my teeth (haha sounds like a line from faithless Insomnia :lol: ) cause they started burning on another level of pain. How I didn't drop the bucket was a miracle. I bought two bottles of this stuff for now. so I filled up with this stuff which is apparently pretty good oil, at the end of this week I will drain this from my car and fill up with the second bottle and another 1.5L and replace the oil filter and drive with that till the end of the month.
I will then drain that and then put Motul or mobil 1 0w-40 or liqui moly, still researching for now.
So I was working overtime this weekend and while taking a break decided to take some pics of the car after the oil change and wash that followed.
You guys keep going on about what bad shape the car was in etc I dunno so much, Hard work paid off in the end I reckon and I enjoyed working on the car mostly, there were some bad times where I'm sure I shed a tear or two lol but check the state she is in now.
Looking new inside and out.
I think we need a sub forum in your honour
You sir have the patience of a saint
Glad to see the car is in better health, I think I would have probably set fire to it on Bmw's car park
You sir have the patience of a saint
Glad to see the car is in better health, I think I would have probably set fire to it on Bmw's car park
Amazing work! I feel sorry for you in those dark moments of self doubt and worry with that ribbon cable! Great photos too! ")
Thanks guys for the kind words I will definitely keep posting.
So I changed oil again a week ago and this is what the new oil looks like. Goes to show how much old oil is still sloshing around the engine after an oil change.
It looks really dirty however if you dip a screwdriver in it and pull it out, it looks pretty clean. So if your car had a dip stick you would think the oil is clean after an oil change....Trust me its not. You need to do a few oil changes if you want the oil to be nice and clean like it comes out the bottle. I am doing Oil change number 3 this weekend and will post pics of what that looks like.

So This car no longer has run flats as the previous owner took them off and replaced them with normal tires which I agree with as I don't like the harsh drive you get from run flats. However not having a spare wheel or a tire repair kit was freaking me out so I bought this.
I feel allot better now knowing that I hopefully wont be stranded if I get a puncture somewhere.
![IMG_6225[1].jpg](https://z4-forum.com/data/attachments/21/21421-adf0fbc11ae1d52781a2e352f87dad86.jpg?hash=1DrINTybJW "IMG_6225[1].jpg")
![IMG_6226[1].jpg](https://z4-forum.com/data/attachments/21/21422-efab06b696450f15f472367f451ad705.jpg?hash=w9i05OAZKt "IMG_6226[1].jpg")
Anyways that's it for now.
I will definitely keep posting.So I changed oil again a week ago and this is what the new oil looks like. Goes to show how much old oil is still sloshing around the engine after an oil change.
It looks really dirty however if you dip a screwdriver in it and pull it out, it looks pretty clean. So if your car had a dip stick you would think the oil is clean after an oil change....Trust me its not. You need to do a few oil changes if you want the oil to be nice and clean like it comes out the bottle. I am doing Oil change number 3 this weekend and will post pics of what that looks like.
So This car no longer has run flats as the previous owner took them off and replaced them with normal tires which I agree with as I don't like the harsh drive you get from run flats. However not having a spare wheel or a tire repair kit was freaking me out so I bought this.
I feel allot better now knowing that I hopefully wont be stranded if I get a puncture somewhere.
Anyways that's it for now.
Some things have been happening on the car as of late.
Firstly I wanted a more permanent solution to the MHD monitoring app so I bought this little nifty cable.

I then started stripping panels off to start running this from the obd II port up to the vent where I can have the otg cable stick out right where the phone mounts.
Here was the procedure:
Screws to be removed:

screws out for under dash panel:

Next up bonnet lever removal so that I can remove this entire panel:

Panels all removed:

Panels that were taken ou, some funky cotton stuff that bmw puts in there:

OBD II extender cable connected and ready to route up to the vent:

Need to remove this panel:

Very easily removed by hand:

Panel off and light switch plug needs to be unplugged, Just pull the grey lever back and it comes right out.

Like so:

K-DCan Cable connected and coiled ready to pack into some small nifty space:

Air Vent removed and hole made using a dremel:

OTG cable pulled through and sealed nicely with 1 sided foam.

Cable where it needs to be:

Air vent put back and cable installed the way I want it.

All put back together and the outcome is a nice clean install, no more ugly K-DCan cable hanging all over the footwell and almost breaking the OBD II port cover each time you get in and out of the car.

Firstly I wanted a more permanent solution to the MHD monitoring app so I bought this little nifty cable.
I then started stripping panels off to start running this from the obd II port up to the vent where I can have the otg cable stick out right where the phone mounts.
Here was the procedure:
Screws to be removed:
screws out for under dash panel:
Next up bonnet lever removal so that I can remove this entire panel:
Panels all removed:
Panels that were taken ou, some funky cotton stuff that bmw puts in there:
OBD II extender cable connected and ready to route up to the vent:
Need to remove this panel:
Very easily removed by hand:
Panel off and light switch plug needs to be unplugged, Just pull the grey lever back and it comes right out.
Like so:
K-DCan Cable connected and coiled ready to pack into some small nifty space:
Air Vent removed and hole made using a dremel:
OTG cable pulled through and sealed nicely with 1 sided foam.
Cable where it needs to be:
Air vent put back and cable installed the way I want it.
All put back together and the outcome is a nice clean install, no more ugly K-DCan cable hanging all over the footwell and almost breaking the OBD II port cover each time you get in and out of the car.
Right next challenge:
While my car was at BMW two or three weeks ago dealing with the oring they damaged, they managed to break my coolant reservoir sensor, or at least that's what I thought they did so I went out and bought a new sensor and it still didn't work so last night I decided to find the problem after the OBD II port install.
It turned out that in all there awesomeness they managed to break the wire.
so here was my process of fixing it all.
Firstly due to the expansion tank being relocated to the other side of the car when I originally got the car the cable was extended and here it was:

Due to it being cable tied to the damn oil lines like an idiot the fekking plastic conduit protecting the wires started perishing.

So I removed all of this and found where bmw managed to break the wire:
I removed all the insulation tape and found one of these wires ripped.

Not much space to work here but I managed to cut off the bad ends and resolder them, it didn't look to great here of a soldering job but when I connected the wires I fixed that

New plug! stripping the ends and getting ready for nice neat soldering and heat shrink wrap.

Had to remove the expansion tank to have space to get to where the wires were broken.

Soldered and insulated and then further insulated with a large heat shrink wrap:

The old plug in all its glory :thumbsdown:

Everything was put back together and the system bled and new coolant added and low and behold I no longer get a low coolant warning smile bounce Aaaaand the engine bay looks that much neater again as I don't have funky conduit wrapped around my main oil lines.
Alright so back to the deep oil flush:
So I bought another 12L of shell helix ultra, I have decided to stay with this oil due to it having good ratings all round and since I will be changing the oil quite regularly going with an oil that costs a grand a bottle almost is pointless, but lets see how this goes after a few months.
So I am not sure what the story is here but the results of 4 oil changes in the space of 4 weeks has somewhat annoyed me as I kept thinking the next change is going to be clean as how it comes out the bottle only to drain dirty oil each time.
So here goes:
I went and bought a liter of diesel to add to the oil to flush the system as allot of forums and vids I have watched have suggested this to help remove as much gunk from the engine as possible. Here is what the oil looked like. This is one week old oil!


I then filled the car up with 6.5L fresh shell helix ultra 5w-40 and went for a drive for around an hour or so and then drained that:
Looks black still!

But look at the screwdriver, so this is how it would look on a dipstick if our cars had one:
Notice how clean that look on the screwdriver but what the actual oil looks like:

I changed oil filters all 4 times!
I then filled up the 4th batch of oil and will now stick with this for the next 3000 - 4000km and then change again and I will stick to those intervals. I have an issue with dirty oil...I am OCD with oil. I think the oil is now very much clean as the oil draining out the car on the 3rd drain looked quite transparent as it was pouring unlike the last 3 times.
Car is feeling smoother and smoother after these changes.
Here is a nice comparison side by side, notice the sides of the container:

While my car was at BMW two or three weeks ago dealing with the oring they damaged, they managed to break my coolant reservoir sensor, or at least that's what I thought they did so I went out and bought a new sensor and it still didn't work so last night I decided to find the problem after the OBD II port install.
It turned out that in all there awesomeness they managed to break the wire.
so here was my process of fixing it all.
Firstly due to the expansion tank being relocated to the other side of the car when I originally got the car the cable was extended and here it was:
Due to it being cable tied to the damn oil lines like an idiot the fekking plastic conduit protecting the wires started perishing.
So I removed all of this and found where bmw managed to break the wire:
I removed all the insulation tape and found one of these wires ripped.
Not much space to work here but I managed to cut off the bad ends and resolder them, it didn't look to great here of a soldering job but when I connected the wires I fixed that
New plug! stripping the ends and getting ready for nice neat soldering and heat shrink wrap.
Had to remove the expansion tank to have space to get to where the wires were broken.
Soldered and insulated and then further insulated with a large heat shrink wrap:
The old plug in all its glory :thumbsdown:
Everything was put back together and the system bled and new coolant added and low and behold I no longer get a low coolant warning smile bounce Aaaaand the engine bay looks that much neater again as I don't have funky conduit wrapped around my main oil lines.
Alright so back to the deep oil flush:
So I bought another 12L of shell helix ultra, I have decided to stay with this oil due to it having good ratings all round and since I will be changing the oil quite regularly going with an oil that costs a grand a bottle almost is pointless, but lets see how this goes after a few months.
So I am not sure what the story is here but the results of 4 oil changes in the space of 4 weeks has somewhat annoyed me as I kept thinking the next change is going to be clean as how it comes out the bottle only to drain dirty oil each time.
So here goes:
I went and bought a liter of diesel to add to the oil to flush the system as allot of forums and vids I have watched have suggested this to help remove as much gunk from the engine as possible. Here is what the oil looked like. This is one week old oil!
I then filled the car up with 6.5L fresh shell helix ultra 5w-40 and went for a drive for around an hour or so and then drained that:
Looks black still!
But look at the screwdriver, so this is how it would look on a dipstick if our cars had one:
Notice how clean that look on the screwdriver but what the actual oil looks like:
I changed oil filters all 4 times!
I then filled up the 4th batch of oil and will now stick with this for the next 3000 - 4000km and then change again and I will stick to those intervals. I have an issue with dirty oil...I am OCD with oil. I think the oil is now very much clean as the oil draining out the car on the 3rd drain looked quite transparent as it was pouring unlike the last 3 times.
Car is feeling smoother and smoother after these changes.
Here is a nice comparison side by side, notice the sides of the container:
So Progress doesn't seem to stop
I decided to open the oil filter housing to see how the new oil is looking and I am very pleased with the results. The 4 oil changes definitely made a difference.
As I took the oil filter out I noticed golden drops of oil dripping off. This made me smile and here is a bit of oil I pulled out with a syringe to show you guys. I will probably change the oil out one more time at the end of Jan just to make sure its super clean, Its hyper OCD I know, All I know is that turbos will last longer and sludge wont be part of my cars vocabulary while in my care ever.

I then decided that my Alternator was looking crappy so I decided to attack it with my Dremel, I went through 3 wire polishing tips, but it looks much better. I also polished the oil filter housing a bit more as you can see.
![img_6418[1]_1687973388.jpg](https://z4-forum.com/data/attachments/185/185534-ac2b481bc0394ea59cc14298f31c7a33.jpg?hash=AeuR2-jiyV "img_6418[1]_1687973388.jpg")
On another note I wasn't completely happy with the one panel that I sprayed as I used pratly putty steel as a filler but you could see it through the paint as a smoother texture. So I removed it and sanded the scratches out and resprayed the panel.
Sanding down for paint prep.
![img_6408[1]_7882952922.jpg](https://z4-forum.com/data/attachments/185/185535-696be8b915a29cbda9c07024bcb7b4a4.jpg?hash=L_8fyGzx3I "img_6408[1]_7882952922.jpg")
And here is the final result. I am much happier with this result. The photo isn't the best. Lighting was a bit crap:
![img_6419[1]_9730342477.jpg](https://z4-forum.com/data/attachments/185/185536-fc084a99c1ce4ad7dd2e158b01ded906.jpg?hash=SBcdkDYy_j "img_6419[1]_9730342477.jpg")
I decided to open the oil filter housing to see how the new oil is looking and I am very pleased with the results. The 4 oil changes definitely made a difference.
As I took the oil filter out I noticed golden drops of oil dripping off. This made me smile and here is a bit of oil I pulled out with a syringe to show you guys. I will probably change the oil out one more time at the end of Jan just to make sure its super clean, Its hyper OCD I know, All I know is that turbos will last longer and sludge wont be part of my cars vocabulary while in my care ever.
I then decided that my Alternator was looking crappy so I decided to attack it with my Dremel, I went through 3 wire polishing tips, but it looks much better. I also polished the oil filter housing a bit more as you can see.
On another note I wasn't completely happy with the one panel that I sprayed as I used pratly putty steel as a filler but you could see it through the paint as a smoother texture. So I removed it and sanded the scratches out and resprayed the panel.
Sanding down for paint prep.
And here is the final result. I am much happier with this result. The photo isn't the best. Lighting was a bit crap:
So yesterday I had the unfortunate luck of the charge pipe blowing off from the throttle body inlet.
It appears the clamps were not on very nicely, they were too close to each other so it was clamping the charge pipe nicely but the second clamp was only just biting on the very edge of the throttle inlet.
anyways I managed to get home, car drives surprisingly well with no charge pipe smile bounce I feathered the throttle though but it drove fine.
Anyways while trying to put the charge pipe back on at home I found that the blow off valve was completely loose. To the point of almost falling off! I hate the way this HKS BOV uses a circlip and not a proper clamp like every other BOV out there in the world! makes it a mission to take off and put on.
anyways I pulled the entire charge pipe out the car and decided to respray it and also sprayed the BOV while I was at it just because I love the look of this black textured paint so much!
This stuff is brilliant and it holds up very well! It only came off where the charge pipe got scraped against metal parts during fitment. Otherwise it doesn't flake or peel.


Clamps fitted correctly now with good spacing, silicon coupling pushed all the way over the throttle body and clamped.
I am actually going to get some black silicone couplings as I hate this blue s**t in my car! for now it will have to do!

fitted nicely and new vacuum line fitted too.


Now incase I ever run into this problem again and im on a long drive out somewhere I have put this nice little toolkit together for myself with everything I would need to remove and refit every part including the circlips pliers.
got the bag with some liqui Moly my dad bought for his Subaru forrester.
It is lined at the bottom with valcro strips so it sits in my boot nice and snug with my tire repair kit.


It appears the clamps were not on very nicely, they were too close to each other so it was clamping the charge pipe nicely but the second clamp was only just biting on the very edge of the throttle inlet.
anyways I managed to get home, car drives surprisingly well with no charge pipe smile bounce I feathered the throttle though but it drove fine.
Anyways while trying to put the charge pipe back on at home I found that the blow off valve was completely loose. To the point of almost falling off! I hate the way this HKS BOV uses a circlip and not a proper clamp like every other BOV out there in the world! makes it a mission to take off and put on.
anyways I pulled the entire charge pipe out the car and decided to respray it and also sprayed the BOV while I was at it just because I love the look of this black textured paint so much!
This stuff is brilliant and it holds up very well! It only came off where the charge pipe got scraped against metal parts during fitment. Otherwise it doesn't flake or peel.
Clamps fitted correctly now with good spacing, silicon coupling pushed all the way over the throttle body and clamped.
I am actually going to get some black silicone couplings as I hate this blue s**t in my car! for now it will have to do!
fitted nicely and new vacuum line fitted too.
Now incase I ever run into this problem again and im on a long drive out somewhere I have put this nice little toolkit together for myself with everything I would need to remove and refit every part including the circlips pliers.
got the bag with some liqui Moly my dad bought for his Subaru forrester.
It is lined at the bottom with valcro strips so it sits in my boot nice and snug with my tire repair kit.
So haven't posted any updates in a while here. So here is a big update. I have been very busy with the car lately.
First up I changed spark plugs. I found that one of the spark plugs was completely loose so there has been blow-by for a while it seems and a undetectable boost leak from that cylinder as its un-metered air.
so here you can see number 4 is black from carbon build up from the blow-by.


can see it here on the coil too.

other than that all the plugs were burning the correct colour.

The new plugs.

Added copper paste and torqued them all correctly according to spec.

Next up, I found that I had a dead vacuum solenoid, everytime I opened up I would get an over boost error and engine light would come on. Justin was kind enough to give me his old set to try out and if it worked out he was willing to give them to me. So I installed them and the over boost error went away but I was presented with another issue where car stopped making power and wouldn't meet boost target at all. I didn't know this was going on for a while till the one day I ran a log after checking everything else and found that the one solenoid was completely dead.

Replaced that and car now hits boost target on point and even a little over sometimes Car feels stronger than ever now.
Next up is a big one, I wanted to get this done for a while, my cars exhaust always sounded crap to me, like 2 3 cylinder bikes next to each other reving with a choo choo after the rev haha. So I did some research and checked out the design of a miltek full stainless steel system and took my car to get this replicated, the key to a good exhaust note on these cars is getting your exhaust gases to mix at some point in the system.


I also managed to find a stock pair of downpipes to fit as I wanted my exhaust as close to stock setup as possible which is what the miltek system tries to achieve however in stainless steel with mandrel bends. I also wanted to see if this would sort my high fuel consumption situation out as the o2 sensors have now stopped freaking out.

Here is the resulting sound:
[youtube]https://www.youtube.com/watch?v=pwQmEnHHLGc[/youtube]
Next update: This is something I have wanted to do since I got the car.
Upgraded angel eyes, I did the whole xenon setup to power the rings before however the two rings were always different colours due to the inner ring not being a proper external perspex ring like the outer ring. So it was time...
Lights removed, I tried to open them myself as I have opened many lights, but BMW decided to give me the middle finger when designing the Z4 and decided to use a glue called Permaseal to seal these headlights so opening them up the conventional way using a heatgun and oven wasn't happening.
I sent the lights off the Violet electronics and they opened the lights for me and returned them to me the dame day.

I ordered this Butyl glue which is the standard glue bmw uses in most other models. "Z4 always has to be different!!!" I used this to reseal the headlights for easy opening next time.

lights opened.


The center ring I spoke about.


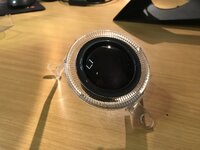
The replacement halos!!! :smilebounce:

Outer ring, if only the smaller inner ring was the same!


And its out!


Mechenisim for lighting inner and outer ring, outer rin is lit by light bouncing off a little mirror inside this and the inner ring is lit from the light shining out like a torch giving a bottom of a beer bottle lighting effect.

Blacking out the chrome bits using high heat spray paint.

inner ring almost ready for spraying, I plasti-dipped this as its very smooth and wont be taking any heat.
Many many hours later and one light is done, allot of dremeling was required!


new setup next to old!

First test.

Indicator test.

Nice neat wiring!

Hazy dirty lens

good as new! This made a monumental difference in light output and aesthetics!

old next to new for comparison once closed.

fitted to the car.

closer to what the colour actually looks like. They are pure white!

indicator test
[youtube]https://www.youtube.com/watch?v=ihnSK_2p9P0[/youtube]
more test
[youtube]https://www.youtube.com/watch?v=-jsBC4tMEzI[/youtube]
some day time pics


Hope you guys like.
First up I changed spark plugs. I found that one of the spark plugs was completely loose so there has been blow-by for a while it seems and a undetectable boost leak from that cylinder as its un-metered air.
so here you can see number 4 is black from carbon build up from the blow-by.
can see it here on the coil too.
other than that all the plugs were burning the correct colour.
The new plugs.
Added copper paste and torqued them all correctly according to spec.
Next up, I found that I had a dead vacuum solenoid, everytime I opened up I would get an over boost error and engine light would come on. Justin was kind enough to give me his old set to try out and if it worked out he was willing to give them to me. So I installed them and the over boost error went away but I was presented with another issue where car stopped making power and wouldn't meet boost target at all. I didn't know this was going on for a while till the one day I ran a log after checking everything else and found that the one solenoid was completely dead.
Replaced that and car now hits boost target on point and even a little over sometimes
Car feels stronger than ever now.Next up is a big one, I wanted to get this done for a while, my cars exhaust always sounded crap to me, like 2 3 cylinder bikes next to each other reving with a choo choo after the rev haha. So I did some research and checked out the design of a miltek full stainless steel system and took my car to get this replicated, the key to a good exhaust note on these cars is getting your exhaust gases to mix at some point in the system.
I also managed to find a stock pair of downpipes to fit as I wanted my exhaust as close to stock setup as possible which is what the miltek system tries to achieve however in stainless steel with mandrel bends. I also wanted to see if this would sort my high fuel consumption situation out as the o2 sensors have now stopped freaking out.
Here is the resulting sound:
[youtube]https://www.youtube.com/watch?v=pwQmEnHHLGc[/youtube]
Next update: This is something I have wanted to do since I got the car.
Upgraded angel eyes, I did the whole xenon setup to power the rings before however the two rings were always different colours due to the inner ring not being a proper external perspex ring like the outer ring. So it was time...
Lights removed, I tried to open them myself as I have opened many lights, but BMW decided to give me the middle finger when designing the Z4 and decided to use a glue called Permaseal to seal these headlights so opening them up the conventional way using a heatgun and oven wasn't happening.
I sent the lights off the Violet electronics and they opened the lights for me and returned them to me the dame day.
I ordered this Butyl glue which is the standard glue bmw uses in most other models. "Z4 always has to be different!!!" I used this to reseal the headlights for easy opening next time.
lights opened.
The center ring I spoke about.
The replacement halos!!! :smilebounce:
Outer ring, if only the smaller inner ring was the same!
And its out!
Mechenisim for lighting inner and outer ring, outer rin is lit by light bouncing off a little mirror inside this and the inner ring is lit from the light shining out like a torch giving a bottom of a beer bottle lighting effect.
Blacking out the chrome bits using high heat spray paint.
inner ring almost ready for spraying, I plasti-dipped this as its very smooth and wont be taking any heat.
Many many hours later and one light is done, allot of dremeling was required!
new setup next to old!
First test.
Indicator test.
Nice neat wiring!
Hazy dirty lens
good as new! This made a monumental difference in light output and aesthetics!
old next to new for comparison once closed.
fitted to the car.
closer to what the colour actually looks like. They are pure white!
indicator test
[youtube]https://www.youtube.com/watch?v=ihnSK_2p9P0[/youtube]
more test
[youtube]https://www.youtube.com/watch?v=-jsBC4tMEzI[/youtube]
some day time pics
Hope you guys like.