My headlight issue has cropped up again now in dark nights so revisiting this again and first trying to define what actual headlamps I have and then the simplest way to upgrade them.
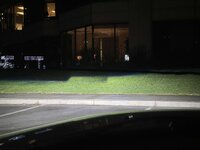
I consider my lights poor visually at night.
I’ve read lots on here but never being 100% sure.
Firstly I have the balancing dial to adjust in the car.
On the outside of lens is stamped D25 H7
Everything seems to point to halogen but different vin decoders say I have factory xenon’s and another says halogen so left confused.
I also have headlights washers which can indicate xenon’s.
I have a 07 e86 coupe
As said really want to upgrade these lights and looking easiest way by kit or if entire light replacement.
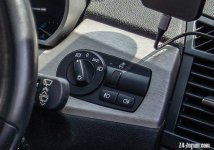
Lets see a photo of your light switches.
Single adjuster is Xenon; double adjuster is halogen. Washers in bumper can be halogen too so no sign you have Xenon for sure.
EDIT: you should also have Xenon warning labels on top of the lights to indicate high voltage too.
If you have halogen units, then bulb upgrades area good option. H7 Osram Night Breaker's/Philips Diamond Vision's are an improvement on OEM I think. Or you could go for an HID conversion kit although I've no personal experience.
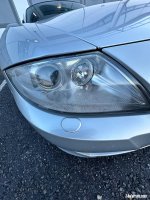
On the facelift lights it’s dead-easy actually; if you have two projectors in the housing it’s a bi-xenon (the inner is a dummy). If you’ve got a projector and a reflector (as per your pic) it’s always halogen.
The lens will always denote both D2S and H7. That’s to do with the type-approval: the outer lens and projector are both xenon-approved and suitable for halogens. The pre-FL xenon’s used the post-FL halogen headlight design as xenon headlights (with the exception of the white hockey sticks on the FL and silver internals as opposed to the amber and black pre-FL)
Just seems lots of obstacles in install and options in doing it but think only changing halogen bulbs not good enough and if having to remove bumper to get to headlights to change bulbs I’m now thinking the HID kit seems way forward
I just replaced the projector in my car using the following parts, but be warned this will produce a high beam error on startup unless you split the high beam connection to keep/add a high beam bulb, or just turn on the high beam for 3 seconds. I will modify this later after I verify the parts.
Parts:
Hella e55 to g5 bracket
https://lightwerkz.net/products/hella-e55-to-g5-brackets?_pos=2&_sid=5c069d8ce&_ss=r
G5 pattern LED projector
https://lightwerkz.net/collections/led-projectors/products/bi-led-nhk-v-lhd
Anti flicker/error harness for the low beam
https://lightwerkz.net/collections/wiring-harness-canbus/products/pwm-harness-2stroke-anti-flicker-module-9006
H7 Male connectors
https://www.amazon.com/YSY-H7-Male-Connector-Headlights/dp/B09ZQK7NNM/ref=sr_1_8?keywords=h7%2Bmale%2Bconnector&qid=1699903918&sr=8-8&th=1
M4 hex nuts and 0.5mm washers
https://www.amazon.com/iExcell-Metric-Stainless-Washers-Assortment/dp/B09BQ4LGS9/ref=sr_1_1_sspa?crid=3479T46BKJMVF&keywords=m4+iexcell&qid=1699902333&sprefix=m4+iexcell%2Caps%2C143&sr=8-1-spons&sp_csd=d2lkZ2V0TmFtZT1zcF9hdGY&psc=1
Heavy duty velcro or double sided mounting tape
https://www.amazon.com/VELCRO-Brand-Industrial-Conditions-Professional/dp/B002YH1CCC/ref=sr_1_3?crid=3NSKBWIRBF1CH&keywords=outdoor+velcro&qid=1699904446&sprefix=outdoor+velcro%2Caps%2C143&sr=8-3
Solder seals or any method of wire connection
9mm thin walled deep socket or some sort of crow foot wrench
7mm thin walled deep socket or some sort of crow foot wrench
Projector Side:
If you order the parts from lightwerkz they will be able to attach some of the plugs for you. IE H11 on the low beam projector side so you can connect to a H11 pwm harness and have a converter for the headlight side. Otherwise you will need to solder H7 male connections to the projector.
Projector Install:
You will need to remove the bumper and headlights for the projector install.
Remove the original projector, 7mm socket for the nut and 9mm socket for the hanger bolt. Half of the hanger bolts came off just with the nut torque.
Fully screw down a hex nut on the M4 side of the new hanger bolts, measure both sides of the bolt.
You need to add washers or nuts so that you only have 4 or 5mm of M4 thread for clearance for the bracket and washers on the self tapping side to clear the headlight adjustment parts. I ended up using 6 washers for 3mm on the self tapping portion and 2 nuts and washers for the M4 portion.
Screw in the loaded hanger bolt
Install the big bracket first, then bolt it down with m4 nuts.
Install the smaller bracket with the shorter flat head hex bolt that was provided with the brackets so that the thread posts are level with each other.
Install the projector with the larger bolts provided with the bracket
Tape in the PWM harness
Connect and tuck wires appropriately.
This was done with trial and error so there is probably a lot of things that would be much better in the process, and my instructions are terrible. Any tips appreciated.
I just replaced the projector in my car using the following parts, but be warned this will produce a high beam error on startup unless you split the high beam connection to keep/add a high beam bulb, or just turn on the high beam for 3 seconds. I will modify this later after I verify the parts.
Parts:
Hella e55 to g5 bracket
https://lightwerkz.net/products/hella-e55-to-g5-brackets?_pos=2&_sid=5c069d8ce&_ss=r
G5 pattern LED projector
https://lightwerkz.net/collections/led-projectors/products/bi-led-nhk-v-lhd
Anti flicker/error harness for the low beam
https://lightwerkz.net/collections/wiring-harness-canbus/products/pwm-harness-2stroke-anti-flicker-module-9006
H7 Male connectors
https://www.amazon.com/YSY-H7-Male-Connector-Headlights/dp/B09ZQK7NNM/ref=sr_1_8?keywords=h7%2Bmale%2Bconnector&qid=1699903918&sr=8-8&th=1
M4 hanger bolts 30mm (I need to verify this, I had three different sized hanger bolts)
https://www.amazon.com/dp/B0C8NM928S?ref=ppx_yo2ov_dt_b_product_details&th=1
M4 hex nuts and 0.5mm washers
https://www.amazon.com/iExcell-Metric-Stainless-Washers-Assortment/dp/B09BQ4LGS9/ref=sr_1_1_sspa?crid=3479T46BKJMVF&keywords=m4+iexcell&qid=1699902333&sprefix=m4+iexcell%2Caps%2C143&sr=8-1-spons&sp_csd=d2lkZ2V0TmFtZT1zcF9hdGY&psc=1
Heavy duty velcro or double sided mounting tape
https://www.amazon.com/VELCRO-Brand-Industrial-Conditions-Professional/dp/B002YH1CCC/ref=sr_1_3?crid=3NSKBWIRBF1CH&keywords=outdoor+velcro&qid=1699904446&sprefix=outdoor+velcro%2Caps%2C143&sr=8-3
Solder seals or any method of wire connection
9mm thin walled deep socket or some sort of crow foot wrench
7mm thin walled deep socket or some sort of crow foot wrench
Projector Side:
If you order the parts from lightwerkz they will be able to attach some of the plugs for you. IE H11 on the low beam projector side so you can connect to a H11 pwm harness and have a converter for the headlight side. Otherwise you will need to solder H7 male connections to the projector.
Projector Install:
You will need to remove the bumper and headlights for the projector install.
Remove the original projector using the 7mm and 9mm sockets
Fully screw down a hex nut onto the hanger bolts, measure both sides of the screw.
You need to add washers or nuts so that you only have 4 or 5mm of M4 thread for clearance for the bracket and washers on the self tapping side to clear the headlight adjustment parts. I ended up using 6 washers for 3mm on the self tapping portion and 2 nuts and washers for the M4 portion.
Screw in the loaded hanger bolt
Install the big bracket first, then bolt it down with m4 nuts.
Install the smaller bracket with the shorter flat head hex bolt that was provided with the brackets so that the thread posts are level with each other.
Install the projector with the larger bolts provided with the bracket
Tape in the PWM harness
Connect and tuck wires appropriately.
This was done with trial and error so there is probably a lot of things that would be much better in the process, and my instructions are terrible. Any tips appreciated.
Since it is mounting an entire projector unit what you buy is pretty much what you get for the light output. As for the actual product, if you are willing to deal fixing the focus/alignment distance or soldering short wires (I just cut the old fan wires off and soldered the new one on the remaining wire), I do suggest replacing the crappy fan on there with one of those mag lev 40mm fans. I used a 28mm depth one vs the stock 20mm which required supplying my own M3 bolts.
I will get internal pics this weekend when I take the headlights out to install an LED high beam in the original reflector. I bought used headlights for this, both with great clear cover conditions but one had a broken tab and the other cover is not fully glued and leaked rain water into the cover.




 I’d like to see a pic of the internals when you can!