You are using an out of date browser. It may not display this or other websites correctly.
You should upgrade or use an alternative browser.
You should upgrade or use an alternative browser.
What have you done to your car today?
- Thread starter Buckz
- Start date
- Featured
 Devon
Devon


Gebbly said:I made my first tiny tweak to personalise eMily my new Z4M. Made a paper template of the boot then fitted a cut to fit boot liner.
bootLiner.jpg
Looks good, nice protection!

F10 M5 illuminated, weighted, shorter throw shifter knob and boot installed. Illumination matches perfectly with original dash lighting IMO. Difficult to photograph new shifter knob illumination. Need to test out shifting next. Looks like I still need to do some adjusting on it.
Attachments

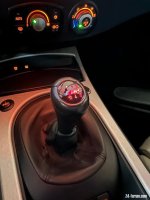
3gGT01 said:F10 M5 illuminated, weighted, shorter throw shifter knob and boot installed. Illumination matches perfectly with original dash lighting IMO. Difficult to photograph new shifter knob illumination. Need to test out shifting next. Looks like I still need to do some adjusting on it.
That's a massive improvement.
I really must get around to fitting mine. Did you just remove the gaiter from the F10 surround and fit it around the Z4 surround?
Mr Tidy said:3gGT01 said:F10 M5 illuminated, weighted, shorter throw shifter knob and boot installed. Illumination matches perfectly with original dash lighting IMO. Difficult to photograph new shifter knob illumination. Need to test out shifting next. Looks like I still need to do some adjusting on it.
That's a massive improvement.
I really must get around to fitting mine. Did you just remove the gaiter from the F10 surround and fit it around the Z4 surround?
Long answer to your question:
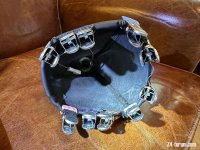
I worked a small screwdriver around the new F10 boot and frame. Actually I only removed a couple of staples because the leather would easily pull right over/through the staples cleanly. Plus I didn't want to damage the new boot leather surface accidentally trying to get under the staples. The hardest part is probably removing the old boot from the old frame. I ended up using an exacto knife to remove the old boot from the frame. I used a spring hook to run it around the inside lip where the leather attaches to the top edge of the frame to help separate it from the frame. I could probably reuse my old boot on the old frame, but pretty much figure it will be ruined when you remove it from the old frame.
I tried to just stick the new boot over the old frame, but it was sliding around and no way to hold it in place to mount it on the console. So I used a bunch of those spring loaded food clips to get the leather boot equalized on the frame (same overhang around the bottom edge of the boot/frame). I had some of that 3M Auto Black Super Weatherstrip Adhesive P/N 03602. That gave me some working time instead of some sort of superglue.
Make sure you end up cutting the leather flush with the bottom edge of the frame. Just like the original it was flush cut or shorter on the bottom of the frame. If not, it will not lay down flush into the console opening. I also cut the leather away/around from the 4 protruded frame clips that attach it to the console.
Mr. Tidy, let me know if you have any further questions that I can help you with.

Attachments
Mr Tidy said:
Was the carbon trim an option or an add-on? If an add-on, where did you get it?
3gGT01 said:Mr Tidy wrote: ↑Mon Nov 25, 2024 12:12 am
Was the carbon trim an option or an add-on? If an add-on, where did you get it?
The Carbon trim was standard in the UK, other trims had to be chosen as an option so I've no idea why you'd choose wood or brushed aluminium, but it seems people did!
Mr Tidy said:3gGT01 said:Mr Tidy wrote: ↑Mon Nov 25, 2024 12:12 am
Was the carbon trim an option or an add-on? If an add-on, where did you get it?
The Carbon trim was standard in the UK, other trims had to be chosen as an option so I've no idea why you'd choose wood or brushed aluminium, but it seems people did!
That's interesting! Mine came with the wood and the previous owner put the brushed aluminum in, but that carbon fiber trim looks fantastic!
BTW, Took the M for a ride! Big difference in shifting. Much better, quicker, easier shifts. Good mod!
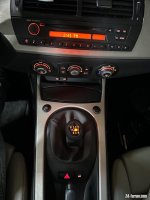
Retrofitted Cruise Control (thanks to M1TCH for the stalk), topped the oil up and took the broken driver's side cupholder out.
Cruise works fine, although I ended up flashing main beam rather than engaging cruise the first couple of times I tried it. Oops. (Seem to remember having the same issue on my E87 previously as well. :roll: )
Cup holder printed repair appears to have failed, the arm has a bend in it. Suspect the heater has taken it to the point PLA has become pliable, should've printed it in ABS but I only have bright blue not black. The screw has snapped off the carrier as well it looks like, so I'll probably just order a third party replacement - the 2.5i has aftermarket ones and they mostly look/function okay.

x-driver said:Washed the car clean, winter set on and parked for this season.
IMG_20241130_141831.jpg
Looks great!
Glad I can drive mine in the winter here though.
x-driver said:Well I could drive it all year long but I've chosen not to. There is too much salt on the roads here and I don't need another rusty BMW :roll:
Luckily they don’t salt our roads, but with the climate changes and colder weather for longer periods, who knows!

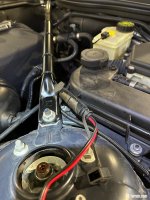
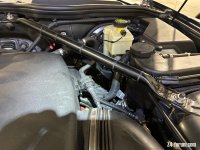
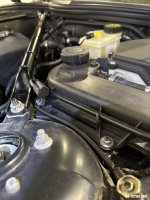
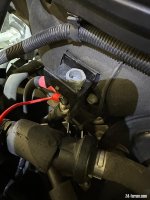
As a habit I always put the M on a 2amp Noco charger. Decided to install a semi permanent outlet with a builtin dust cover. Trying NOT to make it look like an eye sore!