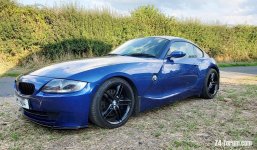
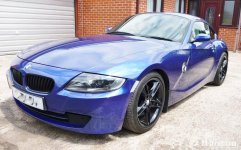
What have you done to your car today?

enuff_zed said:
FunkyGBrown said:
Not quite managed to put it back on yet but spent the morning between meetings fixing the skid plate that came off in some high winds.
I see you found the tape then?
That should work fine. :thumbsup:

Got it from Aldi of all places, that middle aisle never ceases to amaze. :driving:
 
poortomsacold said:
20230413_160138.jpg20230413_160144.jpg
poortomsacold said:
So today I removed the boot lid, bumper and both rear wings. Also treated the underside to a coating of Lanoguard. Tomorrow I start the rebuild, rust free panels and a bumper with no scuffs. Busy weekend! IMG-20230408-WA0005.jpeg

So with the rain finally stopping today I managed to get the rear wheels back on, front wheels off and Lanoguard applied, boot lid back on and aerial fitted. Hugely pleased to have the rusty panels off and replaced and a scuff free bumper!
Great job, how did you find the lanoguard?
 
Replaced the brake light back to red and replaced a couple of tired M badges. Gave a little clean. Took some very bad pictures as they seem blurred. Then went on a very pleasant little drive. All is good.
front-1.jpgother side-1.jpgrear-1.jpgside-1.jpg
 
paddy wright said:
poortomsacold said:
20230413_160138.jpg20230413_160144.jpg
poortomsacold said:
So today I removed the boot lid, bumper and both rear wings. Also treated the underside to a coating of Lanoguard. Tomorrow I start the rebuild, rust free panels and a bumper with no scuffs. Busy weekend! IMG-20230408-WA0005.jpeg

So with the rain finally stopping today I managed to get the rear wheels back on, front wheels off and Lanoguard applied, boot lid back on and aerial fitted. Hugely pleased to have the rusty panels off and replaced and a scuff free bumper!
Great job, how did you find the lanoguard?

Thanks. It’s something of a labour of love this one!

Lanoguard was excellent. Super easy to apply and really does get into the hard to get to places. Looks better than dry surface rust but still dries fairly clear so you can see what’s going on underneath.

Only downside is the smell - a little whiffy but apparently that could last for a week or two. Nothing too hideous but my wife certainly noticed it!
 
poortomsacold said:
poortomsacold said:
So today I removed the boot lid, bumper and both rear wings. Also treated the underside to a coating of Lanoguard. Tomorrow I start the rebuild, rust free panels and a bumper with no scuffs. Busy weekend! IMG-20230408-WA0005.jpeg

So today was rebuild day 1. Rear panels fitted, bumper on and inner wheel arch protector things back on. Just the boot lid and wheels to go. Already looking so much better.
I hear stories of foxes eating through electrical cables after Lanoguard has been applied.
 
raymond.harper said:
poortomsacold said:
poortomsacold said:
So today I removed the boot lid, bumper and both rear wings. Also treated the underside to a coating of Lanoguard. Tomorrow I start the rebuild, rust free panels and a bumper with no scuffs. Busy weekend! IMG-20230408-WA0005.jpeg

So today was rebuild day 1. Rear panels fitted, bumper on and inner wheel arch protector things back on. Just the boot lid and wheels to go. Already looking so much better.
I hear stories of foxes eating through electrical cables after Lanoguard has been applied.

The only time I ever saw a fox on my road was during the first lockdown. But will report back if my car brings them back!
 
Front hubs and bearings replaced with new. Infinitely easier job than the rears I did a few weeks ago!! Only took 2 hours for both sides including getting out and putting away all the tools! :D :D :D
 
Superglued a replacement headlight washer cap on and pulled out Fuse 40!
The lugs on the jet has broken off so no obvious way of reattaching the cap and keeping things functioning.
 
Couple of quick satisfying jobs, replaced third break light and faulty headlight balast and rear cover.
 

Attachments

  • 20230415_162550.jpg
    20230415_162550.jpg
    121.2 KB · Views: 957
  • 20230415_165326.jpg
    20230415_165326.jpg
    131.1 KB · Views: 957
  • 20230415_165235.jpg
    20230415_165235.jpg
    132.1 KB · Views: 957
I guess it's not uncommon but it feels like a big job at first: started my valve cover replacement. In the end it is relatively straightforward, seems like more room than the E90 tutorials I followed. Replacing the eccentric shaft sensor was a pitta, no room to put tools on the screws :lol:

So sensor is replaced. I cleaned up and reversed the direction of the oil cap seal in an attempt to reuse it.
All I have left for tomorrow is cleaning the gasket surfaces, some dust that got on the intake cam while lifting the old cover and putting everything back together with the new cover :driving:

IMG_20230415_160556.jpg
IMG_20230415_165648.jpg
 
I too did my cam cover gasket. Its been on the to do list for some time now. But I don't have the pleasure of a garage and so have been waiting for the weather to improve.
Did the spark plugs while I was at it. Looks like the originals were still in there!! Can you believe it?!
Must admit I was quote stressed about messing up the plugs. Reaf all kinds of horror stories about rounded/broken plugs! :o
As you can see, the coils are a mess! I have replaced two now. So four to go! If anybody has unused ones laying around and want to sell. Pls pm me :thumbsup:

Another thing I noticed was some light scratches in a random pattern on the far right camshaft lobe. I tried to take a pic but they are quite fine and don't show up. Any ideas?
Also, why the front of the engine is that colour??

The zed is fixed but my back is now broken!! :rofl:
 

Attachments

  • 20230416_134309.jpg
    20230416_134309.jpg
    231.8 KB · Views: 852
  • 20230416_145414.jpg
    20230416_145414.jpg
    270.8 KB · Views: 852
Removed my temporary wheels and replaced with a set of style 641M M3 winter wheels, still got winter tyres on but aiming to replace with a set of Continentals. My favourite wheels on the car so far :)

IMG_0737.jpeg
 
Paint marched those terrible amber reflectors on front bumper (not sure if this US only)

Before and after:
 

Attachments

  • 2C0A6A08-D132-4D26-AF12-4DF20E19D692.jpeg
    2C0A6A08-D132-4D26-AF12-4DF20E19D692.jpeg
    47.4 KB · Views: 762
  • FB5A3A49-F0CD-4A57-9BFC-719E547CD46E.jpeg
    FB5A3A49-F0CD-4A57-9BFC-719E547CD46E.jpeg
    46.5 KB · Views: 762
Dubbedown said:
(not sure if this US only)

In the UK we have the clear reflectors higher up but did mine also :thumbsup:
 

Attachments

  • 20220827_180219.jpg
    20220827_180219.jpg
    280.5 KB · Views: 751
  • P1110210.JPG
    P1110210.JPG
    168.6 KB · Views: 751
Pulled the drivers door trim off and started to make the new chequer plate panel to lighten the load for when it is finally track ready.
main door trim.jpg
chequer plate trim.jpg
 
E85 Dye soft top, one coat suspect it needs another coat.
E86 Remove front calipers and disks to secure back plates and clean up calipers.
Gave both a good clean.
 

Attachments

  • 20230418_133740_resized.jpg
    20230418_133740_resized.jpg
    210.7 KB · Views: 637
Back
Top Bottom