co11ingsworth
Member
Hi guys,
This is going to be a fairly obvious guide no doubt, but I thought I should add something marginally meaningful to the forum and I wanted to bask in the slight glory of my ingenuity.
Basically, like what I gather a fair few have experienced, a few months back I changed my headlamp bulb only for my headlight unit to mist up a few days later. Took the cover off and saw the extent of the "misting" - there was enough in there to float a boat on! But then being a lazy bugger I left it until yesterday. My Zed was rocking the cataracts look for a while:
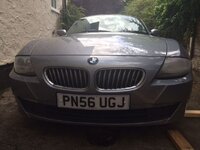
Step 1: Decided this would be easier if I took the wheel off rather than fight with less space all afternoon. Obviously removed both covers too at this point too.
Step 2: Having checked that there is still an ocean on there, I fetched an old piece of towel and taped it to a stick as per below. After a few minutes of jabbing and wringing I got bored of that.
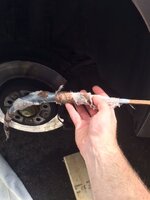
Step 3: Remembered we had some syringes somewhere from the dog's medicine a few months back. Only 5ml capacity, but possibly less tedious than a wet rag. Pulled a length of insulation off a piece of wire, taped that to the end and then assembly that on to another stick. This is the simple ingenuity (read: bodging) I'm pleased with. Worked surprisingly well.
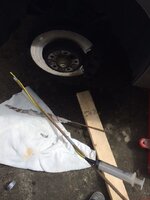
Step 4: So after at least 7 full syringes and many more part-fulls, the unit was all but empty of pooled water. Cant really account for how much water was removed by the towel, but I'd say there was a good 100ml sloshing around in there for four months! Reinstated the towel-on-a-stick to front line duties to mop up the remaining small puddles.
Step 5: Next came the tricky part. Asking my Mum to borrow her hair dryer to use on my car... Not only because this caused confusion, but also because then "it will get oily". Once received, this part soon became dull and boring, just standing by my car waving a hair dryer across the outside and inside of the unit.
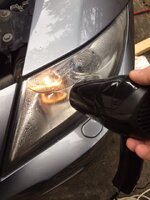
Taking inspiration from previous posts regarding this, I originally put the headlights on for extra heating, but later turned these off and removed the bulbs so that the hairdryer heat could go directly to the inside of the lens.
Step 6: What felt like an eternity later and the motoring equivalent of watching a pot boil, (more like 20-30 minutes at most for those wondering), the last few drops eventually cleared. Kept going for a few more minutes for good measure, then decided "that'll do Pig". Went to replace the bulbs when I saw the culprit for the leak source. Damage to the dipped-beam bulb wires indicated that I'd replaced the cover with the wires looping across the seal!
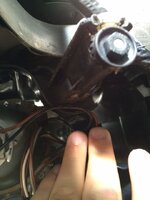
A facepalm and an application of electrical tape later, I'd dealt with that from happening again. Replaced both covers, refitted the wheel and slowly lowered the car down off a 35 year old rather leaky jack.
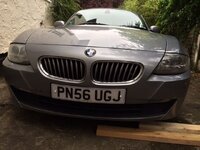
Looking much better now, in fact the other unit now looks a bit poo in comparison. Still, much better than it was. Took full advantage of not paying the water bill at my parent's house and gave it a half-arsed wash. Tentatively sprayed the headlamp at first, no signs of ingress, gave it a good wetting and all was still good! All in all, less than an hour's effort cleared up months of laziness. I think the before and after speaks for itself:
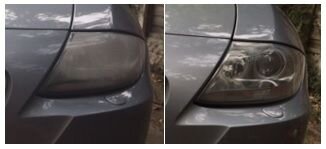
Thanks for reading, I hope that this is of some use to someone in the future and goes some way to providing my gratitude payment for the much more useful advice I will likely seek from here at some point soon.
This is going to be a fairly obvious guide no doubt, but I thought I should add something marginally meaningful to the forum and I wanted to bask in the slight glory of my ingenuity.
Basically, like what I gather a fair few have experienced, a few months back I changed my headlamp bulb only for my headlight unit to mist up a few days later. Took the cover off and saw the extent of the "misting" - there was enough in there to float a boat on! But then being a lazy bugger I left it until yesterday. My Zed was rocking the cataracts look for a while:

Step 1: Decided this would be easier if I took the wheel off rather than fight with less space all afternoon. Obviously removed both covers too at this point too.
Step 2: Having checked that there is still an ocean on there, I fetched an old piece of towel and taped it to a stick as per below. After a few minutes of jabbing and wringing I got bored of that.

Step 3: Remembered we had some syringes somewhere from the dog's medicine a few months back. Only 5ml capacity, but possibly less tedious than a wet rag. Pulled a length of insulation off a piece of wire, taped that to the end and then assembly that on to another stick. This is the simple ingenuity (read: bodging) I'm pleased with. Worked surprisingly well.

Step 4: So after at least 7 full syringes and many more part-fulls, the unit was all but empty of pooled water. Cant really account for how much water was removed by the towel, but I'd say there was a good 100ml sloshing around in there for four months! Reinstated the towel-on-a-stick to front line duties to mop up the remaining small puddles.
Step 5: Next came the tricky part. Asking my Mum to borrow her hair dryer to use on my car... Not only because this caused confusion, but also because then "it will get oily". Once received, this part soon became dull and boring, just standing by my car waving a hair dryer across the outside and inside of the unit.

Taking inspiration from previous posts regarding this, I originally put the headlights on for extra heating, but later turned these off and removed the bulbs so that the hairdryer heat could go directly to the inside of the lens.
Step 6: What felt like an eternity later and the motoring equivalent of watching a pot boil, (more like 20-30 minutes at most for those wondering), the last few drops eventually cleared. Kept going for a few more minutes for good measure, then decided "that'll do Pig". Went to replace the bulbs when I saw the culprit for the leak source. Damage to the dipped-beam bulb wires indicated that I'd replaced the cover with the wires looping across the seal!

A facepalm and an application of electrical tape later, I'd dealt with that from happening again. Replaced both covers, refitted the wheel and slowly lowered the car down off a 35 year old rather leaky jack.

Looking much better now, in fact the other unit now looks a bit poo in comparison. Still, much better than it was. Took full advantage of not paying the water bill at my parent's house and gave it a half-arsed wash. Tentatively sprayed the headlamp at first, no signs of ingress, gave it a good wetting and all was still good! All in all, less than an hour's effort cleared up months of laziness. I think the before and after speaks for itself:

Thanks for reading, I hope that this is of some use to someone in the future and goes some way to providing my gratitude payment for the much more useful advice I will likely seek from here at some point soon.