Swapping manual for electic seat bases - I'm stuck...

Thanks CJ - thought it was a bad idea!

A11y do you know what size torx to use on the large bolt that holds the base to the back? I was in Halfords earlier and saw they sell different metric sizes and also individual sizes :? thought it best not to buy without knowing.

No hurry, I think this will have to wait now til the weather calms down :x
 
Dreamer said:
Thanks CJ - thought it was a bad idea!

A11y do you know what size torx to use on the large bolt that holds the base to the back? I was in Halfords earlier and saw they sell different metric sizes and also individual sizes :? thought it best not to buy without knowing.

No hurry, I think this will have to wait now til the weather calms down :x
I was stupidly looking at the wrong bolt when I sized up the torx bit - just make sure it's the silver torx bolt (you might have to pull up the edge of the back cushion to see it) and it needs a TX40 bit. Halfords sell these individually for around £3 IIRC. I found two of those bolts on mine required a LOT of torque to loosen them off initially.

I bought a TX55 thinking it was a darker-coloured torx bolt (located lower down towards the seat base but still on the back) that I needed to undo, but luckily already had a TX40 bit in a tool set.

Good luck :)
 
Good info a11y :)

Heres some pics of my new seats. Feel free to photoshop arrows or circles on them if you can to give me any pointers :)
Basically any more help you can be before i screw it up would be handy :roll:

Im guessing you mean the silver rather than black bolt in this pic?
DSC_0025-1.jpg


Heres the bottom of the seat, any sugestions of the individual bits im looking at would be useful!!
DSC_0026-1.jpg


Heres one of the side
DSC_0027.jpg


What are those yellow canister things?
 
Yellow always relates to the airbag circuit so the canister are seatbelt pretensioner and the plug is a composite one that incldes the airbag circuit (passenger occupancy sensor or whatever they want to cal it)

The 3 black wires zip tied together are the heated seat pad wires. These need unthreading. Take care to remember the routing. The yellow connector block comes to pieces like lego to allow components to be added and removed.

Last picture shows the seat pan on the bottom (smooth black painted curved bit.) That comes out as one complete unit with iirc just 2 torx near the front. Don't undo others on the chassis.
 
Dreamer, yep silver bolt rather than the black one!

Just what cj10jeeper says really.

Removing the silver torx bolts (one either side) allows removal of the seat backs.

To remove the seat squabs you'll find one torx bolt from the side towards the front of each base. You'll need to remove the plastic cover where the adjustment levers/buttons are to get to the front one - the covers are on snap-fit clips which are a PITA, plus one small torx bolt accessed from the rear of the seat. There's also 2 torx bolts either side of the seat accessible from the rear which hold the seat squab on (i.e. 6 torx bolts in total for each seat squab/base).

Wiring's easy to figure out. You'll find the passenger side has an extra box thingy with a wire into it on the underside of the seat base. This is the weight/occupancy sensor for the passenger seat. It's just a case of changing all the wiring over that you need to.

Ally :)
 
You're right a11y - I forgot about that trim panel that runs around the front of the seat.
Are you sure there are 6 torx holding the base in? I def only undid 2 and uncatched it from its hooks at the rear.

still I'm getting old and it was a good while back that I converted mine :)
 
cj10jeeper said:
still I'm getting old and it was a good while back that I converted mine :)
:rofl:

I'm as bad as you. I certainly undid 4 bolts on the rear of the squab/base but perhaps I might've been able to remove them without doing that. I didn't look at it from that angle, but IIRC these are attached to crossbars running the width of the seat. There easy ones to leave in then remove later if required though. And you're correct about unlatching the bases from hooks around 2/3 of the way back on the bases - plus what you told me about remembering to refit the little green bits of plastic on the hooks to stop squeaking afterwards!
 
I remember when I first inverted the electric seat and thought 'wtf how many bolts and torx are there in here?'
Truth is most of them hold the frame together and once you take a good look it's all just a logical jigsaw.

I'm currently replumbing and building a bathroom and it makes these seats look like a walk in the park... :)
 
Yep, it's quite confusing under there but as you say, most of them hold the fram together. I just looked at it and traced along where the parts met and figured it out for myself in the end.

I'm now investigating whether my "spare" Z4 seats - black leather, non-sport, manual - will fit onto the bases in my VW T5 van. That could prove complicated! I believe the runner width is the same, so could be do-able...
 
REALLY - thanks very much so far guys :thumbsup: . Only thing holding me back now is the weather, im a bit worried about leaving the roof down the whole time im doing this so a moment of madness will have to spur me into action or its after christmas.
 
a11y said:
Yep, it's quite confusing under there but as you say, most of them hold the fram together. I just looked at it and traced along where the parts met and figured it out for myself in the end.

I'm now investigating whether my "spare" Z4 seats - black leather, non-sport, manual - will fit onto the bases in my VW T5 van. That could prove complicated! I believe the runner width is the same, so could be do-able...

Well in a bizare twist I sold my old seats (standard, rebuilt on manual frames, black leather) to a guy for a VW camper van project. He asked me for runner dimensions then drove 200 miles from Devon to collect them. He was well pleased :)
 
OK stuck already :D

The backs are of no problem. the wiring is all disconnected and the side cowling with all the height etc adjustment is of.

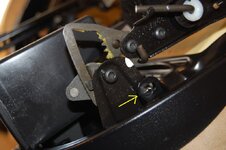
Im trying to get the swabs of the base, now i've undone two bolts at the front sides where the black plastic wraps around the front of the seat and its just not moving. Are these the right ones?

Picture with arrow pointing to illustrate, the seat base is upside down in case it looks confusing...
DSC_0039b.jpg
 
That's VERY useful to know, thanks :)

I'm doing the same thing and with the same seats (standard, manual, black leather). Our van's a long-term camper project and one of the things to do is change the standard 2-seat passenger bench to a single seat (and later add swivel mechanisms). VW seats go for silly money secondhand so I'm as well trying my Z4 seats before thinking of selling them. All I (hopefully!) still need is a single passenger seat base.
 
Dreamer - wrong bolts :D

You need to put that one back in and remove the one to the left/above of that in your photo. Once removed, there's a lip on the tab of metal which the bolt goes through - you might need to create some space by prising it apart from the base part. Easier to do that describe!
 
I think so but it's almost impossible to tell from photos and upside down at that. as a11y says these trims are also clipped in, so trace around inside until you find those points.
 
Its of! A11y you were right it was the bolt just up and left a bit in the pic. They had to be prised aside a bit to let a locating rod
free.
I also had to undo the 4 bolts at the back and then it just lifted of.
 
Gents, this thread is exactly what I'm looking for. Couldn't find it for love nor money on thursday but stumbled across it when looking up a totally different query.......Hopefully ill be following all helpful tips today for a base swap! :thumbsup:
Thanks cj and a11y so far for info youve given so far,but with these photos i should find it a bit easier.
 
LOL I completely forgot this thread existed otherwise I'd have directed you to it! Seems I had the same problems as you... :oops:
 
Back
Top Bottom