In fact, previous owners generally have no idea about these signs of wear and tear on the roof unless prior repairs have been carried out.PO timed that well. I’m pretty comfortable in my belief that he didn’t know it was a problem because he demonstrated that the top worked even before I asked.
You are using an out of date browser. It may not display this or other websites correctly.
You should upgrade or use an alternative browser.
You should upgrade or use an alternative browser.
[SOLVED] 2012 SDrive35IS Roof Issues A68D
- Thread starter Justjeff1972
- Start date
 Nebraska
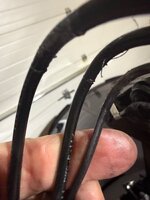
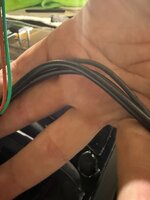
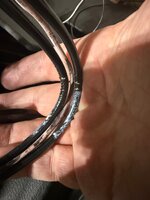
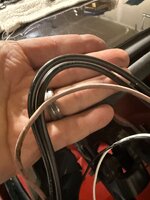
Right side is a bit worse for wear. Outer sheathing is cracked on both. Left has some wrinkles but can’t see the inner braiding. Serviceable I’d say…. I don’t think they look as bad as the photos you posted of yours. What did you tape them with and do you think it helped? If this repair works, I’ll probably have to do the harness or at least have a hydraulic shop rebuild the hoses down the road. Not sure there would be a value in putting in another factory harness if it is made with the same materials. Probably better to fix what fails.What about your 2x2 hydraulic hoses in the upper bows? Please provide pictures as well.
Attachments
It was a nice couple. Both seemed genuinely happy that the car was going to someone that would appreciate and drive it. I picked it up at their home. Bad move if you are knowingly dumping a problem car on someone. They recently had the trans cover done. When I went to the shop, they were genuinely surprised I had a leak because they said the car was in great shape when they serviced the transmission. He went back in the notes and all they had was it needed new rear tires, which I identified on my inspection, the Emergency call system was faulted (programmed the e-call out and the fault went away) and the brakes needed to be flushed. The car makes me smile every time I drive it. This is the price we pay I guess.In fact, previous owners generally have no idea about these signs of wear and tear on the roof unless prior repairs have been carried out.
Better now than surprisingly later.First two weeks of ownership have been fun.
Look at it positively:
now you know the exact status of your car's roof and, with reasonable work, you won't have any problems on this topic anymore.
Just check the other bullet points as well:
")
 E89 Collection of the 9 typical age-related defects in the roof environment
Salmon relays are already on the way and I checked the trunk and there is no indication of leakage. I’ll continue to check it periodically. The rest…guess I’ll deal with that as it comes. I ride a KTM motorcycle too so I’m very clearly a glutton for punishment. Thank you for sharing your experience. This has been a whirlwind learning expedition over the last two weeks.
You are welcome.Thank you for sharing your experience.

I'd soften the sharp edges/lips with a tiny side cutter, i.e Knipex:

Then I'd stiffen the weakened cut(s) with a "self-fusing emergency repair tape / insulating tape 10m/19mm sealing tape" [hope this translation is correct].
Wrap the hydraulic line 25mm from the left and right of the cut, ending asymmetrically with the thickest point at the cut. This directs all bending forces away from the weakened cut.
Not too thick, as the available space behind the roof shell is very restricted.
Finally finish it with a soft Tesa fabric tape to prevent the two hydraulic lines from welding together.


TESA 51608 KFZ Gewebeband Textilband Baumwolle Isolierband Klebeband Vlies
Last edited:
1” silicone self fusing tape is what comes up from Amazon here. 19mm would be closer to 3/4” but there are no 3/4” options. The Tess tape looks similar to the cloth harness tape I have so that should be good.
For the side cut pliers, are you saying to cut away the bulged/bunched hose sheath? And then, if I understand your meaning with the emergency tape, I’ll wrap from both ends of the bend, meeting in the middle. Anyone ever wrap a thin piece of spring steel with the hydraulic lines? Just a thought. Not even sure where I’d find something like that or if there would be room in the loom.
For the side cut pliers, are you saying to cut away the bulged/bunched hose sheath? And then, if I understand your meaning with the emergency tape, I’ll wrap from both ends of the bend, meeting in the middle. Anyone ever wrap a thin piece of spring steel with the hydraulic lines? Just a thought. Not even sure where I’d find something like that or if there would be room in the loom.
Attachments
Not sure about the consistency of a silicone tape.
Have a look at ebay, that is one of mine:

Cutting means carefully softening the sharp edges, not more:
.jpg")
Have a look at ebay, that is one of mine:
SCAPA 2501 SELF AMALGAMATING TAPE (25mm x 10m) | eBay
SCAPA 2501 SELF AMALGAMATING TAPE (25mm x 10m). Condition is "New". Dispatched with Royal Mail 2nd Class.
www.ebay.com
Cutting means carefully softening the sharp edges, not more:
Looks like a distinction without a difference between the two tapes. One is EPR (rubber) and the other is silicone based. Silicone will stay more flexible in cold temps… and it is what I can get here.Not sure about the consistency of a silicone tape.
Have a look at ebay, that is one of mine:
SCAPA 2501 SELF AMALGAMATING TAPE (25mm x 10m) | eBay
SCAPA 2501 SELF AMALGAMATING TAPE (25mm x 10m). Condition is "New". Dispatched with Royal Mail 2nd Class.www.ebay.com
Cutting means carefully softening the sharp edges, not more:
View attachment 286528
Regarding the cuts, that’s exactly what I’d envisioned. Thanks for the clarification.
Never heard of it. But that should have been placed around the hoses at the plant and not 15 years later.Anyone ever wrap a thin piece of spring steel with the hydraulic lines? Just a thought. Not even sure where I’d find something like that or if there would be room in the loom.

The hoses are mostly already cracked and on the verge of bursting. All we can do now is trying to stabilize them for the next few years.
Don't forget: this upper bow has a diameter of only 25 mm, or one inch! That's far too small to last forever.
Last edited:
All... I have a fully functional convertible top (for now?). The last of the materials I needed finally made it late Monday and I put everything back together last night. I ran new, more flexible, wires from just above the trunk lid up to around where the microswitch connector is, on both sides, replacing all six wires.
Materials:
- New roof bolts (Factory bolts have a thread locker on them. It looks blue but holds like red! Manual says you can re-Loctite and reuse but I'd already purchased the package of bolts and shims. Cost was about $45)
- Zip ties (lots of zip ties)
- 22-24 ga control wire in various colors (I ordered the package of 28 qty 10' 22 ga wires from Amazon)
- Cloth harness tape
- Self sealing tape (All I could find in the states was silicone tape... It worked fine)
- Solder and shrink wrap or solder-seal butt connectors and shrink wrap. ( I had 24-26 ga solder-seal connectors. When heated, they heat shrink onto the wire and there is a bit of solder that melts and joins the wires. I shrink wrapped the connectors to protect them. If your soldering skills are better than mine, solder would be just fine... use what you got.)
- Blankets or towels to protect the roof section
- Silicone spray to lubricate the defroster connectors prior to removing, (I also sprayed the inside of the heat shrink to help get the wire through)
- Heat shrink tubing (I used 1/8" and some misc 5/32") I heat shrink wrapped the new wires vice using cloth tape for additional protection and just ease of installation. I had to do this in two pieces for each wire pair because the wire was so flexible... it was like pushing a noodle through a hose. If you use tubing that is a bit larger, you can probably do it in a single section but make sure you choose a size that will shrink up enough.
The lessons learned in my post above still apply. Some additional items...
- The manual says to remove the center bracket off the roof prior to re-installing. Your mileage may vary but I found this to be unnecessary after doing it. There is way more play in that slot than there is in the roof brackets.
- I used 3.85 mm 3d printed gauges to properly space the roof along the seam with the front roof. Also probably unnecessary. I'll caliper the opening later but it seems pretty tight. Spec is 4mm +0.8/-1.
- When I re-attached the roof and tightened everything down, with the same number of shims as were in before, the driver's side of the rear roof section was a bit low. I put in a second shim and that fixed it. The bolt kit comes with more shims than you will ever need!
- I probably left too much spare wire at the splices. There is not a lot of room between the shell and hydraulic arms. If you leave extra wire, it will be a tight fit. I made it work but if I ever have to do this again, I'll try to minimize excess wire.
- Following RobbiZ4's recommendation, I wrapped the hydraulic lines in the middle bow (where most of the work stress occurs due to bending around the back of the hydraulic arm). Before wrapping, I snipped the sharp edges of the hose insulation and then wrapped from both ends of the bow with silicone tape, meeting in the middle. Once wrapped in self-sealing silicone tape, I put a layer of cloth harness tape on the lines to prevent the lines from sticking to each other.
- You will probably need help to re-install the roof. It's not especially heavy but, without the shell on, there are just too many degrees of freedom between the roof and arms. Extra hands are priceless. My neighbor came over and it took us about 30 mins or so.
- All said and done, its probably 1-2 solid days of work if you take your time. I started Friday night and finished the following Tuesday but I also waited a few days for the side cutting pliers to snip the sharp edges of the hoses and for the heat shrink and silicone tape. If yo plan better than me, you can finish in a day or day and a half easily.
I tested opening and closing before installing the roof to ensure the fault did not return and everything worked great. Tested again with the roof installed and ran it a few times from open to close. So far so good. I'll update if any faults return or if I have other issues but I'm going to mark this as done.
Special "Thank You" to RobbiZ4. His advice and expertise were priceless. He was also amazingly responsive to my questions and very encouraging. His help definitely made the job easier. Robbi... next time we're across the pond (or if you make it to Nebraska) I owe you a beer!
 Scottish Borders
Great write up...well done..A+ for perseverance...All... I have a fully functional convertible top (for now?). The last of the materials I needed finally made it late Monday and I put everything back together last night. I ran new, more flexible, wires from just above the trunk lid up to around where the microswitch connector is, on both sides, replacing all six wires.
Materials:
- New roof bolts (Factory bolts have a thread locker on them. It looks blue but holds like red! Manual says you can re-Loctite and reuse but I'd already purchased the package of bolts and shims. Cost was about $45)
- Zip ties (lots of zip ties)
- 22-24 ga control wire in various colors (I ordered the package of 28 qty 10' 22 ga wires from Amazon)
- Cloth harness tape
- Self sealing tape (All I could find in the states was silicone tape... It worked fine)
- Solder and shrink wrap or solder-seal butt connectors and shrink wrap. ( I had 24-26 ga solder-seal connectors. When heated, they heat shrink onto the wire and there is a bit of solder that melts and joins the wires. I shrink wrapped the connectors to protect them. If your soldering skills are better than mine, solder would be just fine... use what you got.)
- Blankets or towels to protect the roof section
- Silicone spray to lubricate the defroster connectors prior to removing, (I also sprayed the inside of the heat shrink to help get the wire through)
- Heat shrink tubing (I used 1/8" and some misc 5/32") I heat shrink wrapped the new wires vice using cloth tape for additional protection and just ease of installation. I had to do this in two pieces for each wire pair because the wire was so flexible... it was like pushing a noodle through a hose. If you use tubing that is a bit larger, you can probably do it in a single section but make sure you choose a size that will shrink up enough.
The lessons learned in my post above still apply. Some additional items...
- The manual says to remove the center bracket off the roof prior to re-installing. Your mileage may vary but I found this to be unnecessary after doing it. There is way more play in that slot than there is in the roof brackets.
- I used 3.85 mm 3d printed gauges to properly space the roof along the seam with the front roof. Also probably unnecessary. I'll caliper the opening later but it seems pretty tight. Spec is 4mm +0.8/-1.
- When I re-attached the roof and tightened everything down, with the same number of shims as were in before, the driver's side of the rear roof section was a bit low. I put in a second shim and that fixed it. The bolt kit comes with more shims than you will ever need!
- I probably left too much spare wire at the splices. There is not a lot of room between the shell and hydraulic arms. If you leave extra wire, it will be a tight fit. I made it work but if I ever have to do this again, I'll try to minimize excess wire.
- Following RobbiZ4's recommendation, I wrapped the hydraulic lines in the middle bow (where most of the work stress occurs due to bending around the back of the hydraulic arm). Before wrapping, I snipped the sharp edges of the hose insulation and then wrapped from both ends of the bow with silicone tape, meeting in the middle. Once wrapped in self-sealing silicone tape, I put a layer of cloth harness tape on the lines to prevent the lines from sticking to each other.
- You will probably need help to re-install the roof. It's not especially heavy but, without the shell on, there are just too many degrees of freedom between the roof and arms. Extra hands are priceless. My neighbor came over and it took us about 30 mins or so.
- All said and done, its probably 1-2 solid days of work if you take your time. I started Friday night and finished the following Tuesday but I also waited a few days for the side cutting pliers to snip the sharp edges of the hoses and for the heat shrink and silicone tape. If yo plan better than me, you can finish in a day or day and a half easily.
I tested opening and closing before installing the roof to ensure the fault did not return and everything worked great. Tested again with the roof installed and ran it a few times from open to close. So far so good. I'll update if any faults return or if I have other issues but I'm going to mark this as done.
Special "Thank You" to RobbiZ4. His advice and expertise were priceless. He was also amazingly responsive to my questions and very encouraging. His help definitely made the job easier. Robbi... next time we're across the pond (or if you make it to Nebraska) I owe you a beer!
Just trying to do my part to pay it forward with the community. Hopefully this will enhance the body of knowledge and save RobbiZ4 from having to answer so many Noob questionsGreat write up...well done..A+ for perseverance...

We have so many folks who tap us for info and we never hear back ...appreciated!Just trying to do my part to pay it forward with the community. Hopefully this will enhance the body of knowledge and save RobbiZ4 from having to answer so many Noob questions
 Attleborough, Norfolk
Exactly! So many times I search an issue, find all the advice but never see the conclusion, so don't know if it worked.We have so many folks who tap us for info and we never hear back ...appreciated!
It's also gratifying for the person who helps you through it all, to hear it's sorted due to their efforts. Pretty sure @RobbiZ4 would give up helping if no-one ever fed back their appreciation.
With E89 roof problems likely to be a factor for all of us in due course are there people in the U.K. who can do the sort of work that Robbi and Jeff can do or are we on our own?. I know for a fact that this sort of work is beyond me. Even though it’s only chafed wires the amount of work needed to take it apart and put it back again safely is too much for me to take on myself.
Don"t worry!...and save RobbiZ4 from having to answer so many Noob questions
My intention is that these age-related problems are resolved properly and not just patched up. I am happy to support that.
Nevertheless, it is a challenge for all of you, as there are more than 1000 small steps to overcome.
There are a couple of threads where folks mentioned a shop in the UK that does this sort of work. I don't remember off the top of my head what the name was but I'm sure someone will chime in. I imagine that an independent shop could/would do it if they have any experience with the convertible top. I'm an Engineer... not a mechanic. Generally I'm trusted to supervise other people doing technical work. If you have tools, patience, and a place to work, I'd imagine most people with a modicum of mechanical ability could execute this repair. If you take it to the dealer, their solution will be to replace the entire harness, from what I've read, at a cost of $7000-8000. Compared to that, $100 in various materials and about 8-10 hours of my time seemed worth it.With E89 roof problems likely to be a factor for all of us in due course are there people in the U.K. who can do the sort of work that Robbi and Jeff can do or are we on our own?. I know for a fact that this sort of work is beyond me. Even though it’s only chafed wires the amount of work needed to take it apart and put it back again safely is too much for me to take on myself.
And whilst it's a very big country, you may have just become the E89 roof expert over there.There are a couple of threads where folks mentioned a shop in the UK that does this sort of work. I don't remember off the top of my head what the name was but I'm sure someone will chime in. I imagine that an independent shop could/would do it if they have any experience with the convertible top. I'm an Engineer... not a mechanic. Generally I'm trusted to supervise other people doing technical work. If you have tools, patience, and a place to work, I'd imagine most people with a modicum of mechanical ability could execute this repair. If you take it to the dealer, their solution will be to replace the entire harness, from what I've read, at a cost of $7000-8000. Compared to that, $100 in various materials and about 8-10 hours of my time seemed worth it.
Expert may be a strong word... Journeyman Apprentice at best. That healthy fear that most people have of breaking their own stuff... I don't have that... at least not to any large amount. I did a valve adjustment on my Concours 1400 a while back. Since then, most tasks have seemed reasonable. The Concours is a 16 valve, shim under bucket design. Requires removal of the cams... I'll try most things if it is less complicated than that.And whilst it's a very big country, you may have just become the E89 roof expert over there.