Roadster interior strip out & carbon fibre replacement

Ladderman

Member
 County Durham
It's always been my intention at some point to reduce the weight to improve performance. I still want the car to pass an MOT, so things like airbags will have to stay. I also want to save the heater, but i'll be removing the air con.

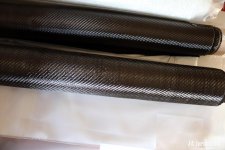
I plan to use carbon fibre extensively, this will involve making moulds of original parts, skinning certain parts & also designing custom parts.

I will be shortly investing all the equipment & materials needed to make moulds & composite parts. Where ever possible will be using a DVP vacuum pump & resin infusion process, this is one of the best ways to get an excellent finish. Ultimately Prepreg is what I'd like to do, but the largest cost would be the curing oven & at this moment in time I'll have to much initial outlay.

If this project goes successfully I plan to make & sell high quality parts a lot cheaper than what other online companies are charging.

I will start by making aesthetic items such as interior trim, wing mirror covers & any other item on request . Then hopefully move on to weight saving parts such body panels, door cards, brake backing plates.

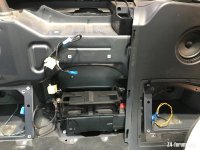
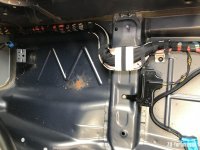
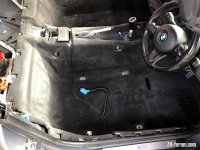
Over the past few days I've managed to remove most of the cab & boot interior. I also removed the roof because the roof motor was screaming every time I used it. As you'll see by the photos the reservoir had almost run dry.

I have to say "its a pain in the backside" stripping out the interior of a Z4. My body has been in all shapes, especially removing the hood. A few times I lost my rag. The worst was trying to get the bolts out of the roof U bar that are located in the boot.

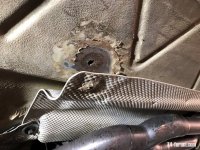
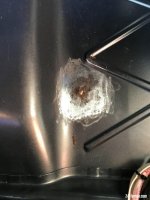
One thing I did discover was a small patch of rust in the driverside footwell. The course was one of the screws that hold the exhaust heat protection cover. They are spot wielded to the under body & that one must have failed.

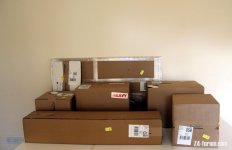
Here are a few pictures of the strip down.
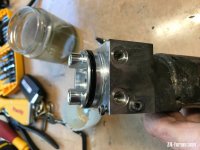
A few handy toolsIMG_1973.jpg

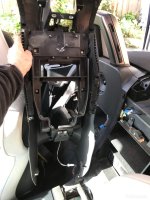
Started on the front dash firstIMG_1981.jpgIMG_1982.jpgIMG_2003.jpg
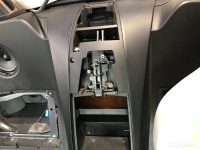
Then moved on to centerIMG_2018.jpgIMG_2026.jpg

Had a bit of chew behind the seats
 

Attachments

  • IMG_2090.jpg
    IMG_2090.jpg
    156.4 KB · Views: 4,405
  • IMG_2051.jpg
    IMG_2051.jpg
    149.3 KB · Views: 4,405
  • IMG_2040.jpg
    IMG_2040.jpg
    126.2 KB · Views: 4,405
Next was roll bar covers then into the bootIMG_2073.jpgIMG_2078.jpg

Time to tackle the hood. Not easy to remove by myself

The red arrows are were the main bolts are the hold the hood. There is plenty of this to do before you get to that stageIMG_2121(Edited).jpgIMG_2139.jpgIMG_2134.jpg
As you can see there is next to no oil this the res. So Iv'e stripped it down for a recondition.IMG_2154.jpg
 

Attachments

  • IMG_2163.jpg
    IMG_2163.jpg
    129.4 KB · Views: 4,418
  • IMG_2170.jpg
    IMG_2170.jpg
    138.4 KB · Views: 4,418
So after I removed those ridiculously heavy seats & carpet. I uncovered a small circle of rust in the driver side foot well. This surprised me cos I've been under the car many times & never noticed any rust. When I looked underneath it was hidden by the exhaust aluminium heat protector. The rust had been coursed by a spot wield that had failed on one of the retaining bolts for the cover. I've cleaned round the area to see the full extent & will have this professionally repaired over the winter.

I now have a large number of trim pieces that will be used as plugs to make fiberglass moulds for the carbon fiber parts.

It's took me about a month to understand all the processes involved from the start to the finished product.

I have just placed a substantial order for all the equipment & materials needed to produce top quality moulds & carbon fiber parts.

This will involve using materials such as.
210g 2x2 twill 3K Carbon Fibre.
IN2 Epoxy Infusion Resin
I will be using the Vacuum bag & Resin infusion process, which guarantees 100% resin infusion with the Carbon Fibre. This helps avoid cosmetic imperfections

My order should arrive shorty & I hope to begin testing & making sample parts as soon as possible.

Watch this space :)
 

Attachments

  • IMG_2236.jpg
    IMG_2236.jpg
    240.1 KB · Views: 4,393
  • IMG_2234.jpg
    IMG_2234.jpg
    174.6 KB · Views: 4,393
  • IMG_2221.jpg
    IMG_2221.jpg
    177 KB · Views: 4,393
  • IMG_2198.jpg
    IMG_2198.jpg
    187.7 KB · Views: 4,393
I’ll be really interested to see what quality you can get. One of the problems with 15 year old BMW plastic is that it’s really brittle and the clips break off easily. Perhaps CF can solve this?
 
I've watched a few of the easy composite videos on you tube using the infusion method, look forward to see what you do
 
Interesting stuff.

Now if you could work your way up to producing Aero skirts, you'd really be on to a winner!

Personally, I could do with some coupe rear wings, so if you could crack on with those as your next project that would be grand :lol:

Looking forward to seeing how this progresses :thumbsup:
 
Thanks for your quick reply’s.

I intend offering different options such as cover parts, full replacement carbon fibre parts & a trim Skinning service.

If this becomes successful I will move on to making Carbon Fibre panels & other weight saving parts.
 
Very interesting project :thumbsup:
What model of E85 do you have? Are you planning to track the car?
 
This should be a good one to watch. Looking forward to seeing your Zed back together and glistening with CF. :)
 
kis said:
Very interesting project :thumbsup:
What model of E85 do you have? Are you planning to track the car?
Hi Kis. It’s a 2006 3.0si. So far I’ve done a number of performances upgrades with the intention is to turn it into a track day car, but also keep it street legal cos I live on the outskirts of County Durham & in the summer I love having a blast out around weardale & the Lake District.
I had already planned to do some weight reduction this winter & that’s when I came up with the idea to make my own Carbon Fibre parts. The more I researched the manufacturing process the more I thought it would be a great idea to make parts for other forum members cheaper than they would pay from mainstream suppliers. My intention is to make top quality parts & any profit I make will go back into the business, cos ultimately Prepeg out of Autoclave is the way forward. But to do this I will have spend about £2,000 on a curing oven. It’s just cost me short of £1,500 for the equipment & materials to make moulds & Resin Infusion parts.

My order will arrive on Monday & I hope to start as soon as possible making copies of the interior trim. I will be posting regular updates including step by step photos. I’m open to any ideas or suggestions from forum members & if anyone has been looking for weight saving parts I am happy to work with them on the design & construction.
 
Sounds great! As these (cars) get older there are lots of little pieces that could do with being made stronger... and if they’re lighter as well? You’re onto a winner 8)

Best of luck with the project? Venture? Lol :) will be keeping track of your progress, like a lot of others :thumbsup:
 
Great work Ladderman, i find stuff like this is really interesting. Will be keepin up with this excellent project/venture. :thumbsup:
 
Just thought I'd let you guys see my first order & how many different items I need to get started.
 

Attachments

  • page 3.png
    page 3.png
    98.7 KB · Views: 1,303
  • page 2.png
    page 2.png
    173.1 KB · Views: 1,303
  • page 1.png
    page 1.png
    151.2 KB · Views: 1,303
My order arrived today. Checked off & everything there :D

I think it will be the weekend before I get a chance to get started. Because I'm busy for the rest of the week

First job will be to decide which parts to do first. Then start by making the moulds.
 

Attachments

  • IMG_1529.JPG
    IMG_1529.JPG
    135.5 KB · Views: 1,271
  • IMG_1525.JPG
    IMG_1525.JPG
    91.8 KB · Views: 1,271
  • IMG_1520.JPG
    IMG_1520.JPG
    66.9 KB · Views: 1,271
Interesting project. Reminded me of my last weekend car, a Lotus Esprit Turbo. When new the aircon was an expensive add on but had stopped working a long time ago. Must admit I can never understand why anyone with a sportscar would want aircon in the first place unless you live in a very hot climate. I set about stripping the whole lot out and weighed how much I had removed. It came to over 14kgs, a substantial amount for an already light car. Be interesting to know how much weight the various components you strip out.
 
Mike6 said:
Interesting project. Reminded me of my last weekend car, a Lotus Esprit Turbo. When new the aircon was an expensive add on but had stopped working a long time ago. Must admit I can never understand why anyone with a sportscar would want aircon in the first place unless you live in a very hot climate. I set about stripping the whole lot out and weighed how much I had removed. It came to over 14kgs, a substantial amount for an already light car. Be interesting to know how much weight the various components you strip out.
So far it’s coming in at about 93kg. This consists of 10kg for the sound system, 26kg for all the interior & boot trim + carpet. The seats are a whopping 28.5 each, so I’m led to believe.
I still have a lot to remove such as door cards, full dash & use Carbon Fibre replacement. I plan to try & design a Carbon Fibre cover that would replace the void left by the hood removal
Most of the unsprung & engine bay weight reduction will be done after the winter is over.

My main focus now is on mastering Carbon Fibre part manufacturing, cos the options are limitless & i find absolutely fascinating.
 
Back
Top Bottom