Montego Blue E86 is Long Gone - Z4MC 2025 Summer Prep

lucasxdiniz said:
wondering if anything is going to be modified in this process.

You already have a history for modding so I would bet on Yes :)
 
A whole lot more preparation since last weekend. And loads more to come...

At the weekend I started cleaning the dirt from the subframe in preparation to treat the surface rust. Cleaning the baked on diff oil was much harder than I had assumed - it had to be scrapped off and only then I was able to clean the remaining residue with engine degreaser and brake cleaner.

20240211_134818.jpg
20240211_163510.jpg

I had a custom tool machined to press the front differential mount bush out of the sub-frame. Look at how knackered it was:

20240215_185515.jpg
20240215_185804.jpg

Unfortunately I screw up the installation and will need to order a new bush. Lesson learnt, just because the old bush was pressed out very easily, doesn't mean I don't need to freeze this bush to -18°C and to use a bit of heat to expand the bore on the subframe.

More masking and sand-blasting:

20240214_124524.jpg
20240215_125031.jpg

All bolts catalogued and sorted to help me make a decision on zinc plating or replacing the fixings. Some of these cannot easily be replaced as you can't get the right sizes/specs if not from BMW, but at £15/bolt and needing about 12 of them would make this decision easy towards zinc plating. However, I don't know if I trust zinc platers to do the right heat treatment to avoid hydrogen embrittlement of the 10.9 bolts. May just suck it up and buy new fasteners (not from BMW) for what I can, and run rusty axle bolts.

20240213_194230.jpg

There's a list of the bolts here. The grades were read from the bolts taken from the car. Given the clear indication of zinc flake, I know they are OE. But some of the bolts that are 8.8 marked are listed as 10.9 on RealOEM, so not sure what's going on there.

https://1drv.ms/x/s!AoAAw4ET48j5hJJAspouqdw6wO6Hrw?e=IXwR1n
 
Since I removed the gearbox mount brackets, it would be rude to not clean it up properly:
Cc3W6Gp.jpg
OBnnuUx.jpg

I also treated all surface rust with Iron Phosphate and painted it with POR15.

VlMPVTW.jpg
B0FfCNu.jpg
KzMvwca.jpg

As usual I failed to take pictures of the process, but I spent a whole weekend running a wire wheel attachment over the subframe to get all the surface rust I could off and then treating it with iron phosphate + zinc solution. I also decided to remove the rear camber arms so I could paint into the subframe, however, the eccentric bolt could not be removed from the bushing, so I ended up using a 8lb mini sledge hammer to get it free, which knackered the bushes (as expected). So bushes, arms and tools on order... yay.

I only took pictures of the subframe when the paint was wet, so it looks awful. When I'm back under the car I will take photos with everything nicely cured.

XnvHH7c.jpg
a75uDK9.jpg
uIL8iO0.jpg


I've bought new fasters for pretty much everything I removed so far - not from BMW mind. BZP is no where as good as a coating as the Zinc flake on the OE bolts, but BZP is definitely better than the surface rust on most of the bolts already. I'm not replacing the torx bolts (£150+), so I chose to treat and paint their heads just so it's less of an eye sore. The shank and threads are absolutely fine, and so is the serration.

sBrWazu.jpg
 
I know the feeling of this.

Had a rattling exhaust clip, which then led me to a potential leaky diff seal, which led to a 4.1fd, which led to full polybush subframe and arms 😬 it’s a slippery slope.IMG_0305.jpegIMG_0318.jpeg1057C687-CE76-4612-91B7-FAD6A9745D45.jpegIMG_0646.jpegafee8713-a854-44b9-aa38-b579ae67f91c.jpeg
 
D.Bryce said:
I know the feeling of this.

I definitely approve! Wish I had the space to do the sub-frame properly! One day...

I could not resist the ultimate scope creep:
 

Attachments

  • 20240305_143217.jpg
    20240305_143217.jpg
    269.7 KB · Views: 928
My diff is now fully built and just waiting to go in the car. Even though I was keen to do the final build myself, it was cheaper to pay Heasman Differentials than to buy a shim set, so it was a no-brainer really. He took about an hour and a half to do the final assembly while chatting to me - very efficient with the right tools to do everything.

KXKroQs.jpg
0QkxmrF.jpg

The two main things that are holding me back is the shifter assembly as I split the boot that goes over the shifter arm and the sub-frame bush is yet to be pressed in (awaiting on V2 of the tool I had made to be ready). But while I wait for these things, I've been making everything I can as nice as I possible. Water bead blasted the shifter arm and sent the ARB to be powder coated (very hard to remove the original coating - it would not be sand blasted!).

sLA7flr.jpg
Zc7QT8W.jpg
sjesrPL.jpg

And all the clean and new bits waiting for me:
Gx2HAdT.jpg
 
All looking very nice . Surprised about the powdercoating on the ARB . Are you aiming for a Concours look for showing or just for your own enjoyment/satisfaction.
 
1536Z4 said:
All looking very nice . Surprised about the powdercoating on the ARB . Are you aiming for a Concours look for showing or just for your own enjoyment/satisfaction.

I'll never achieve a Concours look as I actually drive the thing! Just for my own satisfaction and to preserve the car as considering how I felt about the 3.0si, the Z4M is a great candidate for a forever car.
 
Very productive weekend progressing the 'winter project'.

Managed to press the front diff bush in with the new tool (photo taken before I gave the sub-frame a second coat of paint):
20240314_183756.jpg

Before putting the diff in, I made sure to press new Meyle bushes where the camber arms go and fitted the Powerflex adjustable arms, being very careful to load the suspension to the right height prior to torqueing everything up.

20240315_200543.jpg

Now fitting the diff in... Because of the space and awkwardness of it all, I ended up getting a friend to give me a hand and ditched the jack and put the diff on my chest and guided it up from below. Putting it roughly in place wasn't too bad, but a 40kg lump of metal on my chest did hurt a bit. However, holding it in position to align the M14 x 1.5 bolt, which is notorious for stripping the threads in the diff, was far more cumbersome. But got it all done and managed to get all the bolts in and torqued everything up to spec!

20240316_235804.jpg
20240316_221329.jpg

Now that the main task is out of the way, I could start some smaller tidy up jobs like getting the exhaust ready to be mounted back in the car, which involved angle grinding one of the bushes off and giving it a good clean.

20240317_165131.jpg
20240317_172331.jpg
Tomorrow I should get the oval shifter bushes that I still don't have (tried a few different ones before giving in and paying the astronomical BMW prices). Then shifter rebuild will be ready and driveshaft can go in (which has had a good clean and new moly-grease in the CV).
 
I've been too busy to keep up with posting stuff or to even just browse the forum and learn about our cars via other people's issues, so here's a catch up:

Once I received the shifter bushes, I was able to assemble the assembly and it looked great. For anyone who is looking into rebuilding their shifter, go for OE parts and don't waste time with aftermarket, powerflex, etc. For some reason they all have play that the OE bush does not. I tried many oval bushes as I found it hard to swallow how much BMW wanted for them (~£40 each, I think).

0HnylX7.jpg

The only piece I ended up sending for powder coating was the rear anti-roll bar as the brushed-on finish of POR15 wouldn't be great for the bushes. I was charged £40 for the powder coating - unsure if this was good or bad considering I removed the old coating myself. What a nightmare it was to fit it without scratching anything! Here's the full assembly looking great:

ZC7uNOS.jpg

Once the shifter assembly was in, I was able to assemble the driveshaft. I didn't take any photos, but that got cleaned up and new lithium greased packed into the CV. I have just realised I didn't even take photo of the gearbox AV mount bracket installed in its full glory. Heat shield was put in with new sheet metal nuts and the very clean exhaust put in place, then braces etc. I also checked that the Powerflex arms were easily accessible on an alignment ramp. To my relief they are as long as you remove the NACA duct for the diff fins:

CW21fVY.jpg

At that point, I had a Z4M was that ready to be driven. Initially the plan was to to keep it in the garage until I completed some preventative maintenance, and waited the next tax month (as £70 for a week is a bit of a joke) but I couldn't resist and dropped the car from the stands and took it out for a quick drive (in Mexico of course). Well, I was pretty blown away by how much more alive the car felt with the shorter ratio. The way the revs climb is just dreamy. I expected it to feel more engaging to drive, but I didn't quite appreciate how noticeable the extra torque under acceleration would be, which highlighted something I had already suspected - my low end was weak. It almost felt like a turbo was kicking in between 2.5-2.8k and after that the car absolutely pushed you into the seat. I had planned to do the VANOS rebuild within that month anyway, so I gave the garage a good clean while the car was on the drive so no dirt, dust, etc, would be floating around while I worked on the engine. I'll get back to the VANOS rebuild in the next post.

As I was rebuilding the VANOS, the BC Coilovers I ordered a few weeks ago finally arrived, so I wrapped up the VANOS work went for a quick drive to make sure I didn't screw anything up on the engine (and thus having to return the BCs). As soon as I got back, I put the car on the jack stands and got to fitting the coilovers. I didn't take any photos of the new suspension, but it finally allowed me to show the rear looking pretty fresh:

kjJ6jkR.jpg
BYkH9PA.jpg
xrNv5vA.jpg
BYkH9PA.jpg
BMxMXFv.jpg

About my new BC Coilovers: I went for a 'custom' spec with rubber mounts at the front instead of the pillow ball bearing and 8kg front/10kg rear springs. Basically I took my experience from the non-M E86 which had 7/8kg springs and pillow ball bearing and thought:

  • The front spring felt perfectly suited, but the S54 is heavier so 8kg should be sufficient to offset that
  • The rear spring felt good but the rear would bottom out on high speed dips (such as Harry's Garage road in Burford). I told a friend to go with 7/10kg for his non-M based on my experience, and that cured the bottoming out problem, and felt just as pleasant to drive, so I went with 10kg.
  • The adjustable camber plates look amazing, but it's not needed to achieve the camber (-1.5deg to -2deg) I tend to run on the front and the clunking in low-speed can be annoying if you are like me - i.e you know exactly where the noise is and why it is there, but you keep checking to make sure it's not worn or broken, etc.

I very much liked the ride on stock dampers and Eibach springs. Handling was quite capable, fitment was perfect, and relatively comfortable. So I was afraid that the car would be a stiff mess and I would ruin the ride quality because I went against BC's 5/7kg recommended springs. But god was I pleased with my choices - there is no compromise with my new set up. As a first guess for a good all around damping setting, I went 12 clicks (from soft) all around. I did my typical hoon roads today for a direct comparison:

  • Comfort is improved
  • No extra noise from the suspension in normal use, rough tarmac, etc, where you'd normally get clunking with pillow ball mounts. Although if you hit a pot hole or something extra harsh, there is more discernible noise from the rear. But no one aims for pot holes, do they.
  • A clear improvement in road holding, especially at the rear
  • Quick steering inputs that I previously used to break the balance of the car and get the rear to come around now just make the car follow the inputs and rotate - very responsive.

Here's the fitment - I kept to the same as the Eibachs as I thought that had the perfect balance:
sS5q5YI.jpg

70uaDVu.jpg
 
Now back to the VANOS. When I drove a friend's Z4M back to back with mine, I had a slight impression his car was more responsive or faster than mine - at the time I put it down to the intake he has or just perception of speed with very different exhaust volumes. I always thought that the S54 was characteristically weaker down low to not compromise the top end (ie relatively high lift cams to breath at 8k). Rebuilding the VANOS was always on my list, but I had no real rush to do it as I had inspected the exhaust hub tabs during the last service and it passed all the ISTA tests.

I had far too much time over winter to read about bolts coming loose, guides breaking etc, so I got pretty neurotic and decided to do a lot of preventative maintenance before summer when I know the car will be seeing a lot of high RPM. I ended up ordering all the bits I thought sensible from Hack Engineering just for ease of getting everything from one place - worth while for the sake of £20-30 one would save by going with various sellers for all the individual bits. What I ordered:


When I received my order from HE and saw that their 'upgraded' sprocket bolts were A2-70, that did not feel right to me. In short, do not use that, go with 8.8 as spec'ed by BMW. More on my thread on M3cutters.

Here's where my VANOS unit sat for a week as I did some work on the engine itself and got the oil pump disk re-drilled:
Lbku7EU.jpg

I got the oil pump drilled by someone at work. Which meant I had to CMM the part and CAD it up, so feel free to use this if you want to go via someone other than Hack Engineering and their £100+ fee:
YkdJ2jB.png

Here's the before and after of the re-drilled oil pump disk:
[youtube]UaYhD7sb4m4[/youtube]

It wouldn't be me if I didn't polish it up and improved it a tad. Test piece:
G5veoJi.jpg

Cleaned up unit:
VeTHgV9.jpg

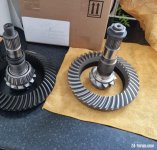
Exhaust sprocket removed to give me access to the chain tensioner guide. It doesn't matter how confident I feel, messing around with timing chain of an engine that costs £6k to rebuild is quite stressful:
aNuwlee.jpg

Old vs new. Probably wouldn't last much longer before the end snapped:
siAB4aq.jpg

The 'VANOS guide' was not bad at all. Just polished a tad. You see some horrific wear pattern in some cars (ie two deep grooves almost), but I guess my chain didn't feel or look like it had any noticeable stretch, it looked/felt exactly the same as the new chain Mr Vanos fitted to this E46 M3 CSL at 4:30s
9DuukV1.jpg

My cam bolts were all tight and consistent, thankfully. But I installed new bolts with Loctite 243 and torqued them to 12Nm.
nCRrGoo.jpg

YFpNbId.jpg

yyRS0fO.jpg

What really made me nervous about this job is getting the timing correct. You can't mess it up massively, but you can have it slightly out and have to take it all apart to correct it. The sequence which you have to pre-load the hubs made me quite nervous as I wasn't sure I would be able to torque the bolts once the VANOS unit was in place. Although I have good feel for tightening bolts, when I'm dealing with engine internals, I would feel very neurotic about doing them by feel alone. Thankfully I used one of these extenders with my torque wrench and it worked really well. Also tested it with the torque tester at work and I was getting 14N/m +/- 3% consistently.

9oj1pjo.jpg

UurGNmn.jpg

As I turned the engine over, I kept checking timing both with the bridge you're supposed to work with and the timing check tool. Timing was bang on every time and I was a happy man.

According to the label on the Beisan seals, it takes about 200 miles for them to bed in properly and full performance to be achieved. But as soon as I drove out of the garage I noticed an improvement. I rev my car up to 3k until it reaches 90deg oil temp and only ever part throttle, but could notice the pick up was much smoother and responsive. When it was warm, night and day different to the low end. Turns out the S54 is super linear and that dip around 2.5k is gone. I noticed that driveability improved, too. No more oddities with the throttle response at very low speeds like the mild kangaroo hoping with sport button on or the eventual non-existent throttle response for a split second (don't know how to explain, would sometimes happen after rolling into a round about).

All the work done at 98875 miles.

For anyone wanting to know more about this DIY, feel free to contact me. I'm happy to help, and give Z4M specific advice, especially on the timing side. It's two much to write, so it would have to be a call once you're at least familiar with the steps after having read/watched a guide or two.
 
Super job. Great write up with lots of detail.

In the future I would be up for doing the Vanos rebuild myself (not yet though as car only on 50,500 miles and feel’s muscular low down in the rev range).
 
Fantastic work you’ve done on this and well done on the vanos-that’s something I don’t fancy getting involved with given the consequences of getting it wrong.
 
On the day after I posted the above and celebrated everything going smoothly, an issue probably caused by my own doing (+ a bit of bad luck) popped up. I filled up the car on Saturday after making sure the VANOS work was successful and then hooned it a fair bit on Sunday; Monday I walked into the garage and found it stank of petrol. After a lot of looking around, I found the fuel filter housing (in-tank) had a hairline crack and fuel was coming out. Not enough to drip on the floor, but enough that you could smell it. I put it down that it was probably due to me leaving the tank low during winter and disturbing the opposite side by cleaning it.

The problem is now that I cannot get a new part. BMW has no stock, and has discontinued the part so no new stock will be available. The companies that claimed to have stock, actually cancel the order when they realise there's no BMW stock. The only new part I can find in Europe is in Barcelona and collection only. I was willing to fly out there to pick it up, but the bastard never got back to me. For now I've had to give in and buy a used part from Quarry Motors.

While this absolute waste of time has been happening in the background, I thought I'd tidy up one of the last eye sore areas on the engine bay to make me feel better.

The area around the thermostat housing had corroded bolts and generally looked crap with the polished VANOS, so I ordered brand new BMW bolts (BZP would look too shiny in that area, so I paid the OE premium for the right finish and durability), all the o-rings for the thermostat, coolant and high temperature paint for the engine hook bracket.

Here's a before that shows the general condition:
ukTsFut.jpg

This pic shows the full assembly but the TPS already has the new bolts installed here:
PWN1vZI.jpg

Thermostat housing before and after:
LF7Dv9O.jpg
7Bt6R0F.jpg

And a couple of shots of the whole area now that it's looking better:
JPpjtZE.jpg
4l9aCLW.jpg

I'm trying very hard to leave the engine bay alone as that's what I envisage I'll be tackling next winter, but that area really annoyed me. I think I'll just give the alternator a good clean and leave the rest of it alone until I refurb the throttle bodies amongst other things during winter 24/25.
 
Back
Top Bottom