You are using an out of date browser. It may not display this or other websites correctly.
You should upgrade or use an alternative browser.
You should upgrade or use an alternative browser.
Luke and his Z - Getting there!
- Thread starter LukeMace
- Start date
Thanks Jonny!
Its great to e able to make things from scratch, but if you don't h e tools necessary its nie impossible I guess without paying someone to do it.
Yeah, facelift lights are on 'the list'! Will have a good browse next week! Will definitely try breakers. £141 is a pretty good price!
Its great to e able to make things from scratch, but if you don't h e tools necessary its nie impossible I guess without paying someone to do it.
Yeah, facelift lights are on 'the list'! Will have a good browse next week! Will definitely try breakers. £141 is a pretty good price!
RJS-Z4 said:Blimey! Good work Luke, my only question, why remove all the wadding? Surely that's going to be just as loud as having no box there at all???
Thanks!
Yeah you would of thought so, but it doesn't! I guess because the air has chance to disperse before it is released, the nasty LOUD noise disappears and you are left with a real nice note! I will pop up sound clips tomorrow to what the difference is between them
Thanks mate!
It was one of those feelings once it was done, my brother and I stepped back once last bolts were in place and were surprised how well it came out!! :lol:
Measure twice then once more for good luck, then go to cut, measure again to triple check, then cut! Worked a treat! Angles all worked first time, lengths etc. one of those jobs that fell into place without too much hassle thankfully!
RJS-Z4 said:Would there be anything to stop you "Teeing" out of the side of the right hand original pipe, and going to two more? So you could have standard sound effectively?
I'm sure that could be done.
Only thing is that you would probably see the additional pipe coming from the right hand tip and it would be for aesthetic purposes only really. But, I guess if the pipe was painted black you wouldn't notice it unless you were lying down on the floor, or you were being ran over by your Z!
Mate truly stunning i know how much hard work it is. But it worth it. You are right having all the correct tools makes a difference.
I am planing to cut down my drivers side back box this weekend and finally get it all aligned and fully finished. Did all the other bits work ok? Did you use the brackets? If you did use them use thread lock and make sure they are really tight mine came lose. But i had the bumper on and couldn't get to them properly.
I tried to take my bumper off and struggled. I got the bolts underneath. And the ones in the wheel arch. But it wouldn't budge. I did get a bit scared i must admit so i didn't give it a pull in case i had not undone it all!!
Top job buddy 100% agree that making kits would be a PITA.
Could posably help out with that.
Machine monkey said:Could posably help out with that.
Really? Would be ace if you could!
Beetlegav - These ones were made by MachineMonkey. Drop him a PM and he'll sort you with what you want! The pictures look good but they look fantastic in the flesh!!
Jonny - thanks for the contact mate! Much appreciated. I'll drop them a call next week and see what they say!
Mr Monkey - I ended up changing the right hand side quite a bit. I took a solid pipe from the back box with a slight down bend towards where the new tips now sit. A) it meant the back box did the majority of the supporting B) it ended up being easier to alight too without the flexi.
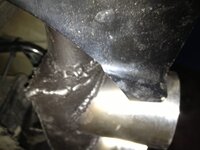
The round tube you made that housed the right hand tips I ended up cutting in half, length way and making a half circle box (if that makes sence!? Just taken a crappy pic to show you)
That made tons more room to fit everything in nicely. The right hand support is still to go in place (hence the slight alignment needed on the right) but its all held now as is from the back box which made the install a lot simpler!
If you wanna pop up again mate, we can whop the rear bumper off and get it all lined up!
Another lesson learnt was to not attack this job on your own! Too many things to hold / measure / cut / weld at once to do it!!
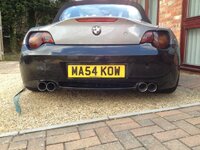
Rear view from today...

Booked in for spray next Tuesday so bumper will be done and rear spoiler fitted also!
Will get sound clips up in a sec
Jonny - thanks for the contact mate! Much appreciated. I'll drop them a call next week and see what they say!
Mr Monkey - I ended up changing the right hand side quite a bit. I took a solid pipe from the back box with a slight down bend towards where the new tips now sit. A) it meant the back box did the majority of the supporting B) it ended up being easier to alight too without the flexi.
The round tube you made that housed the right hand tips I ended up cutting in half, length way and making a half circle box (if that makes sence!? Just taken a crappy pic to show you)

That made tons more room to fit everything in nicely. The right hand support is still to go in place (hence the slight alignment needed on the right) but its all held now as is from the back box which made the install a lot simpler!
If you wanna pop up again mate, we can whop the rear bumper off and get it all lined up!
Another lesson learnt was to not attack this job on your own! Too many things to hold / measure / cut / weld at once to do it!!
Rear view from today...

Booked in for spray next Tuesday so bumper will be done and rear spoiler fitted also!
Will get sound clips up in a sec
Before starting to dismantle exhaust
http://www.youtube.com/watch?v=HIDmiQXhsA8
No exhaust (similar to how straight through would sound) - gorgeous low rumble but a little OTT for me
http://www.youtube.com/watch?v=XYrGQRk0lAk
After the excitement of getting everything all in place and stepping back to see it, I didn't get an after sound!!! I will take a vid tomorrow of what it sound like an pop it up!
http://www.youtube.com/watch?v=HIDmiQXhsA8
No exhaust (similar to how straight through would sound) - gorgeous low rumble but a little OTT for me
http://www.youtube.com/watch?v=XYrGQRk0lAk
After the excitement of getting everything all in place and stepping back to see it, I didn't get an after sound!!!
 I will take a vid tomorrow of what it sound like an pop it up!
 Interesting how you have done that  I am going to stick with what I have just trim it own a lot.
Looks really good bet you can't wit to get it painted now. You do realise you going to need the ///M front bumper now!!!
Looks really good bet you can't wit to get it painted now. You do realise you going to need the ///M front bumper now!!!
:lol: no need to fuel the fire even more mate!! Soon as anything cheap comes up I may be tempted! For the time being I'm bidding on a Cupra R front splitter which should liven the front up a little and keep further purchases at bay for a while!!Machine monkey said:You do realise you going to need the ///M front bumper now!!!
Thank again for making the tips and various bits for this mate! They really do look good! Much appreciated
aquazi said:... Credit for doing this yourself too!
Thanks!
Similar threads
- Replies
- 8
- Views
- 417
- Replies
- 8
- Views
- 2K
- Replies
- 3
- Views
- 381
- Replies
- 10
- Views
- 675