You are using an out of date browser. It may not display this or other websites correctly.
You should upgrade or use an alternative browser.
You should upgrade or use an alternative browser.
Liam's Z4C race car project
- Thread starter Liam22
- Start date
Liam22 said:JamieZ4C said:Stay away from the drill and angle grinder, Jamie :lol:
Funny you should say that...
20190901_172554.jpg
Boom! 13kg
20190901_183530.jpg
I bet people have suggested a CFRP roof panel already for some weight saving. They claim weight ~2kg, so if the design is very similar to the stock one, it should save 4kg from the highest point of the car.
https://www.geoffsteel.co.uk/shop/bmw-e86-z4-roof-skin/
The Geoff Steel c/f roof is on the shopping list. As much as anything, to offset the roll cage up there.
The last photo is a work in progress shot. The driver's side section is trickier, with electrical cables and the fuel filler passing through it. Based on what has already come out, the weight saving should be an easy 13kg.
The last photo is a work in progress shot. The driver's side section is trickier, with electrical cables and the fuel filler passing through it. Based on what has already come out, the weight saving should be an easy 13kg.
thx for the pics Liam, car is in the shop having similar done atm. though I am keeping part of the bulkhead. the weight of the cage is really worrying me. The easiest way to make a good car even better is making it lighter, and then adding 25kgs for a cage.. kinda defeats the whole purpose of stripping it out. really has me very worried.
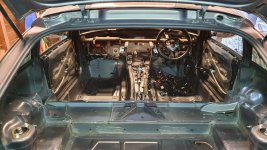
Progress has been very slow recently but I did find the time to complete the bulkhead removal this week. The drivers side was considerably more difficult than the passenger side.
First needed to disconnect all of the rear wiring loom: lamps, tailgate gubbins, number plate lights, N/S/R ABS sensor, charcoal canister and fuel cap release (after removing wheelarch liner).
Then some careful cuts around the protection for the fuel tank breather hose.


Altogether, it's added up to 13.1kg 8)

Tried my best to tidy up the cuts, minimize the raised surfaces and generally make it presentable. Once the roll cage goes in (soon, I hope!), the interior will be painted, at which point it will look a lot better.
First needed to disconnect all of the rear wiring loom: lamps, tailgate gubbins, number plate lights, N/S/R ABS sensor, charcoal canister and fuel cap release (after removing wheelarch liner).
Then some careful cuts around the protection for the fuel tank breather hose.
Altogether, it's added up to 13.1kg 8)
Tried my best to tidy up the cuts, minimize the raised surfaces and generally make it presentable. Once the roll cage goes in (soon, I hope!), the interior will be painted, at which point it will look a lot better.
Attachments
Got a few jobs done this weekend while waiting for roll cage install.
Started by fitting cooling ducts for the front brake discs. I will run hoses to these from the front bumper so that cold air is blown into the centre of the vents.

With the discs off I also took the opportunity to thoroughly clean the hub threads so that I could fit wheel studs. The wheel bolts are a real pain when swapping wheels frequently.
Here are the first few going in.

Then to the rear. Changed the pads for Pagid RS29 after running one down to the metal on the way back from the 'Ring. The disc was fine - very light scoring and fine to run again, but I'm glad I looked carefully because one of the discs had a nasty crack.

Its actually worse on the inside. This is disappointing. I've run Pagid OEM discs for racing previously but seriously considering changing for Brembo now. I think the top hat depth introduces a weakness here.
But the rears have been super hot. All of the friction material on the handbrake shoes has disintegrated! I removed it all, including the backing plates (2kg). This might help to keep the brakes cool, so I might give the Pagid discs one more shot.
Finally, I mustered the enthusiasm to remove the aircon compressor. Removed the drive belt and thermostat (which is why I've been putting it off). Three hard-to-reach aluminium bolts into later and it cleared the coolant hoses without needing anything else removing. 5.5kg though... so worth it!
Will need to measure up for a suitable length drive belt, and I'll replace the tensioner while I'm at it.
Started by fitting cooling ducts for the front brake discs. I will run hoses to these from the front bumper so that cold air is blown into the centre of the vents.
With the discs off I also took the opportunity to thoroughly clean the hub threads so that I could fit wheel studs. The wheel bolts are a real pain when swapping wheels frequently.
Here are the first few going in.
Then to the rear. Changed the pads for Pagid RS29 after running one down to the metal on the way back from the 'Ring. The disc was fine - very light scoring and fine to run again, but I'm glad I looked carefully because one of the discs had a nasty crack.
Its actually worse on the inside. This is disappointing. I've run Pagid OEM discs for racing previously but seriously considering changing for Brembo now. I think the top hat depth introduces a weakness here.
But the rears have been super hot. All of the friction material on the handbrake shoes has disintegrated! I removed it all, including the backing plates (2kg). This might help to keep the brakes cool, so I might give the Pagid discs one more shot.
Finally, I mustered the enthusiasm to remove the aircon compressor. Removed the drive belt and thermostat (which is why I've been putting it off). Three hard-to-reach aluminium bolts into later and it cleared the coolant hoses without needing anything else removing. 5.5kg though... so worth it!
Will need to measure up for a suitable length drive belt, and I'll replace the tensioner while I'm at it.
our local FIA body has let us all know that using factory lamps as rain lamps on race cars is no longer acceptable. They have mandated a specific design and we all now have to fit a central LED lamp, with a switch option to make it flash. This may or may-not be of any interest to you but i thought i'd let you know given you have modified the car to get a 'rain-light" effect.
Thanks terryo. Motorsport UK still permit factory fogs:
5.1. A rearward facing red warning light of a minimum of 21 watts, with surface area minimum 20cm2, maximum 40cm2, or of 21 watts with a surface area minimum of 50cm2 and with lens and reflector to EU Standards, must be located within 10cm of the centre line of the vehicle and be clearly visible from the rear.
Vehicles fitted with full width bodywork may alternatively use two lights equally located about the vehicle centre line.
Thanks for the YT commentMantazini said:Fantastic thread OP ... Keep up the good work and dont forget to share the pics
https://www.automac.co.uk/automac-products/Automac-Race-&-Rally-seat-side-mounts-E46-LHS-aetn5Kev said:Can i ask where you got the air duct back plates from? Fitting 345mm discs, 4 pots and RS29 pads has solved my brake problems but would still like to add some cooling
As you can see from my photo, I had to trim a little from the bottom to clear the Meyhle HD control arms - I think they are a bit meatier than OEM arms.
 Liverpool
The plan is to think about that when I have to remove the hatch for interior painting. This is also related to rear wing planning, as hatch security becomes quite important when you're adding downforce.mmm-five said:Is the plan also to go to carbon or fibre rear hatch & poly windows? There’d surely be lots of weight saving in that lump - especially if you can mount/secure it with lugs rather than hinges & locking mechanism.
So, after removing the A/C compressor I needed to replace the drive belt with a shorter item.
What I hadn't anticipated was that the tensioner pulley is now in the wrong place. It's kind of right in the middle between crank pulley and alternator. Even with a shorter belt there's not enough deflection to tension the belt properly.

I asked someone who races a E87 130i and they told me they had shredded a belt in 25 minutes. Their solution was to fit washers under the alternator (no tensioner pulley).
I thought I could do better.
Started researching tensioner pulleys on eBay in the hope to find a larger diameter pulley that would fit onto the OEM tensioner. The OEM pulley is 70mm diameter. Didn't take long to find a few 95mm pulleys. Took a punt on a Mercedes item because it also came on an INA tensioner with a similar design.
I just bought the pulley, the tensioner style gave me confidence that it would fit on the BMW tensioner. I really didn't need a new tensioner but I had already bought it, and it came with a new aluminium bolt.
Bingo! Same width, same centre bore, and same offset.

Fitted up and measured for a belt. 6PK938 did the job. The additional deflection of the larger pulley was enough to get the belt nice and tight.

What I hadn't anticipated was that the tensioner pulley is now in the wrong place. It's kind of right in the middle between crank pulley and alternator. Even with a shorter belt there's not enough deflection to tension the belt properly.
I asked someone who races a E87 130i and they told me they had shredded a belt in 25 minutes. Their solution was to fit washers under the alternator (no tensioner pulley).
I thought I could do better.
Started researching tensioner pulleys on eBay in the hope to find a larger diameter pulley that would fit onto the OEM tensioner. The OEM pulley is 70mm diameter. Didn't take long to find a few 95mm pulleys. Took a punt on a Mercedes item because it also came on an INA tensioner with a similar design.
I just bought the pulley, the tensioner style gave me confidence that it would fit on the BMW tensioner. I really didn't need a new tensioner but I had already bought it, and it came with a new aluminium bolt.
Bingo! Same width, same centre bore, and same offset.
Fitted up and measured for a belt. 6PK938 did the job. The additional deflection of the larger pulley was enough to get the belt nice and tight.
Liam22 said:So, after removing the A/C compressor I needed to replace the drive belt with a shorter item.
What I hadn't anticipated was that the tensioner pulley is now in the wrong place. It's kind of right in the middle between crank pulley and alternator. Even with a shorter belt there's not enough deflection to tension the belt properly.
20191001_133127.jpg
I asked someone who races a E87 130i and they told me they had shredded a belt in 25 minutes. Their solution was to fit washers under the alternator (no tensioner pulley).
I thought I could do better.
Started researching tensioner pulleys on eBay in the hope to find a larger diameter pulley that would fit onto the OEM tensioner. The OEM pulley is 70mm diameter. Didn't take long to find a few 95mm pulleys. Took a punt on a Mercedes item because it also came on an INA tensioner with a similar design.
I just bought the pulley, the tensioner style gave me confidence that it would fit on the BMW tensioner. I really didn't need a new tensioner but I had already bought it, and it came with a new aluminium bolt.
Bingo! Same width, same centre bore, and same offset.
20191004_091557.jpg
Fitted up and measured for a belt. 6PK938 did the job. The additional deflection of the larger pulley was enough to get the belt nice and tight.
20191005_164608.jpg
Good work! A link to the Mercedes tensioner would be nice, not that I think I'll be removing A/C from mine for a good few years.
When's the first race planned?
")
