how to take center console out

BlackSapphireZ

Member
 Woodstock, MD
i just want to remove the aluminum panel but i can't seem to get out.

I need to paint one of the plastics surrounding the shifter which got discolored...

EDIT (Sp3ctre) : Scroll 11 posts down for answer :D
 
Would like to know this too, the phone holder left some marks on the placky surround and i want to replace....
 
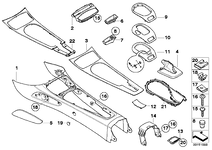
You'll get some idea of how it all goes together here http://www.realoem.com/bmw/showparts.do ... g=51&fg=35

You need to start with the leather surround on the handbrake and gearshift, and it comes apart from there. On the gearshift, you can "feel" the plastic lugs which hold it in, you need to press through the leather to depress these and then it'll come out easily enough.
 
i took the ebrake out, try to lift and would not lift. took out the shifter surrounding but i also need to take out the plastic pieces on the console as well. the metal aluminum is stuck
 
Start at the gearshift gaiter, getting that out will enable you to remove 9/10/11. You can then slide out 12, and 21 can unclip.

I can't remember how 4 unclips, but it comes up fairly easily. I think 15 is screwed down once you unclip the ashtray.

Once all these are exposed you'll see how 22 is fixed, I can't quite remember whether there are a couple of screws or it's all clips.
 
yea i took everything out and its FIRMLY in there. and under the E-brake surrounding,there doesn't seem to be any screws or clips to be "undone"

:(
 
Managed to get mine out eventually just by following my nose, what a pain this job was, anyway now it's done no problem, it's the finding out initially thats the hard bit. OK,

Step1.
Firstly you need to remove the screws that hold the centre section to the transmission tunnel, there are three down each side, the most forward one is behind the knee pad this is hard to remove but does prize off, the other two can been seen by the holes on the section shown below;
dfb.jpg

3ed.jpg


Step 2.
remove gear gaiter, handbrake cover and the screw in the bottom of the ash tray, i managed it without removing the gear knob by the way, once the ash tray screw is removed take out and disconnect the wire feeds from the ash try consoul, take it out completely, cut the cable tie from the handbrake gaiter and totally remove this also.
dfbb.jpg


Step 3.
Now we have to remove the rear section that houses the storage and CD stacker. Firstly remove the door by unscrewing the two retaining screws on the hinges, these are visable when the door is open, the door just pulls out when the screws are removed.
jkmhj.jpg


Step 4.
There are two small screws retaining the top cover of this section, remove these this section will then come off, you need to pull from the top/back of it to release some retaining clips, the pics shows where the screws are.
agrnh.jpg


Step 5.
Once this section is out it reveals two large retaining screws to be removed at the top;
bgfb.jpg


Then go to the bottm of the centre section and there is a small flap to pull out that will reveal two retaining screws at the bottom to be removed, the flap i am talking about is revealed by the removal of the door.
P1010508.jpg


Now all the securings are free the centre section between the seats will slide up out of locators and come free, this will enable the centre consoul to lift up wards and rearwrds for removal, Along the way you will need to apply common sense and remove any electrical connectors the need to be unplugged, once the centre consoul is out you will see the underside shows the obvious screws that are holding in the section you want out, basically you just need to remove them all to get the section out.
thmyu7.jpg

gju.jpg

P1010515.jpg

P1010518.jpg


Mine is all done and i am going to order the new section tomorrow, it is only £20 so i ain't gonna bother trying to paint it, hope this helps and you are able to get yous done too, let me know how you get on and please ask if there are any questions...... :thumbsup:

Andy
 
BlackSapphireZ said:
so how does the actual aluminum come out? thats my problem really

OK,Essentially the alloy trim you refer too is secured to the tranmission tunnel section by way of being screwed to the underside of it, so, once you have the centre section out of the car turn it over (as below)
thmyu7.jpg


you will see all the nuts that hold it on, simply unscrew these and it will come off the centre section (as below)
gju.jpg
 
These were the posts I was talking about, they are in Italian but you get the idea, and can always run through a translator.

http://www.motortribe.it/community/foru ... hp?t=17410

http://www.motortribe.it/community/foru ... hp?t=17411
 
srhutch said:
These were the posts I was talking about, they are in Italian but you get the idea, and can always run through a translator.
http://www.motortribe.it/community/foru ... hp?t=17410
http://www.motortribe.it/community/foru ... hp?t=17411

Thanks for posting "srhutch" ! :thumbsup: The Italian Forum posts are first class!

The replies earlier on this post by "plowy", gave me me the confidence to do my trim change on my 05 Z4. Thanks "plowy" too! :thumbsup:

Z4DashTrim640003.jpg


The pictures and instructions from the Italian Forum are a very good, accurate description of steps I took on my dash and console change from Aluminum to Madeira Wood. I copied and pasted some of the Italian to Windows "Word". then went to tools and language, selected translate. It worked! I guess you would have to go one group of words at a time. This is the best collection of instructions on this subject I have seen!

Best!
Jack
 
Back
Top Bottom