How to retrofit M Steering Wheel with Multi Function Control

I already have cc :) and i did know that the MF buttons are separate and i can add them to my current wheel, however there seems to be a fair few multi function wheels on ebay selling for substantially less then the MF buttons from my local stealer.

And after reading about the amount of people who have done this mod, everyone seems to have success with it, So i was going to risk it.

its just the cable that im unsure of. I thought the plug in the steering wheel is there for all Z4's. apparently there is 2 wires that may need to be added behind this to the back of the light control module - but i will break out the torch and screw driver and have a look tonight.

fingers crossed it will be pre wired
 
My Z4 was born on 08/2003 soo it doesn't have the retrofit cable prewired. I went to my dealer but he cannot find it using the item number at the start of the thread or by a parts search. does anyone know where i can get this part from?

if these are no longer available can someone tell me how to make it? eg connector pins, length of wire required etc.

Edit: I fitted a MFSW to my Z4 today. When i got the green clip off, i found some old auto cables that fit into to green connector pins 9 & 10

then just spliced the other end into the blue plug as per this post. Only took 2 hours including making my own retrofit cable. 8)

And with a bit of luck i connected the battery and everything worked first go :driving:
the guide on page 1 was a massive help. thanks
 
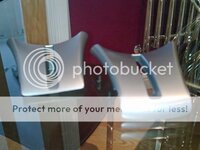
I would like to add something for those wanting to use silver spokes (hope you don't mind Sideshowbob :wink: ) I managed to fit silver spokes to my M wheel as is, others haven't had the same luck. With the in mind I recently did a little cut a shut job on my old, spare, bottom spoke using my little Dremel type tool. I didn't have the steering wheel available to offer it up to (and wasn't going to dismantle mine), so that's my excuse for the less than perfect finish. Hopefully it will offer a guide to others wanting to do the same. Have z4alfie to thank for the photos and being a guinea pig!

First thing I did, as it was my first time cutting this plastic, was to practice on a part I knew I wouldn't need.

This shows the cut and original spoke side by side.
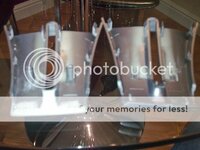
SpokesInside.jpg
Some points to note here:
1. On the original spoke, right, there is a small clip at the bottom of the central cutout. I believe this interferes with the thicker wheel, so removed it.
2. Where you can see white plastic in the spoke on the left, I used a sanding tool to cut back the plastic as much as possible, to allow more room around the spoke.
3. I cut the spoke a little below centre cutout, but you can see that better from the other side.
4. The initial cut left sharp corners. These were sanded from underneath to avoid damaging the surface on the top.

This shot shows how far down I made the, ahem, horizontal cut. (it looked perfectly square at the time :oops: )
SpokesTop.jpg

Another from the side to show the different profile, while it isn't shown that clearly I did trim back the folder edge on the bottom:
SpokesSide.jpg

Here a picture of the spoke on the wheel which z4alfie said went on without any drama, so I assume the cut is in the right place. I think a key point here was removing that clip from the underside.
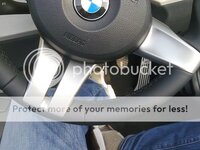
SpokeFitted.jpg
It isn't as straight / square as I would have liked, but if I'd had the wheel to hand it would have been tested and tweaked. Honest.

Here's a picture I took post hatchet job. Shows the repair to the screw lug. These things have a habbit of snapping when removing the spoke from the original wheel.
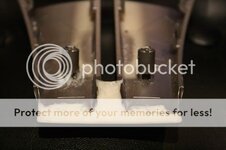
SpokesMended.jpg
As you can see from the base of the one on the right, they're a little flimsy. Just glueing it back on doesn't stand up to the rigours of trying to fit. This seems to have worked:
1. Using super glue the lug into place as the original.
2. Cut up three small triangular strips of plastic to match the profile of the spindly little uprights at the base of the lug - I used the offcuts from the main work as donor material.
3. Glue one of the small triangles to the side of the uprights and the third in between. They will stick out on all side, don't worry. Leave to set.
4. Using a Dremel (or similar) rotary cutting disk, trim down the plastic at the base of the lug so that there is nothing protruding.
Hopefully the picture illustrates exactly what I mean.

It goes without saying, if I can do something, it isn't that difficult! Give it a go.
 
Just a quick message to let people know the price of the M MFSW has gone up - my local dealers was looking for £280! Emailed Joe at Sopers who confirmed the price has gone up recently - he's now looking for £245 delivered. Expensive, but still better than the stealers.

Also, the retrofit cup holders have also gone up in price.
 
Hello all!!!
Great and really helpful how-to!!!
A question though: i own a 5/2005 2.0 and have already installed the buttons part of the retrofit kit on my steering wheel so propably now it should be ok . I wonder , though, if i should expext the buttons to be lighted when i turn on my lights? Do you ?
 
Just fitted this to my 2005/2.0. Seems the cable wasn't pre installed as the buttons don't light or work. Looks like I need to do the cable part :/
 
I popped into my local "friendly" stealers to see how much it would be, M wheel & Ipod ........

£1k!

2 days work!!!


Have someone else doing it, while I wait :driving:
 
Rach* said:
I popped into my local "friendly" stealers to see how much it would be, M wheel & Ipod ........

£1k!

2 days work!!!


Have someone else doing it, while I wait :driving:

I just did my steering wheel less than 10 minutes lunch time,have a look at the post in buy/sell section.
 
Just received mine from Sopers (Joe was on leave but colleage there was just as helpful) yep the price hsas gone up - got mine for £229.84 :D

Fitting tomorrow with fingers crossed after the aux fitting took longer than expected......
 
Mavz4 said:
Just received mine from Sopers (Joe was on leave but colleage there was just as helpful) yep the price hsas gone up - got mine for £229.84 :D

Fitting tomorrow with fingers crossed after the aux fitting took longer than expected......

and? have you done it?it is great in comparison to the original wheel,isn't it?
 
Just successfully installed the ///M MFSW I bought from fellow Forumite "stephendutton1963".

Thanks to this thread it was a doddle and took no time at all. Everything works and it looks and feels so much better than my standard wheel.

Many thanks to sideshowbob for a relevant and helpful post :thumbsup:
 
sideshowbob said:
Installation of M Sport MFSW and Retrofit cable.
If you do decide to fit the M sport wheel and your car was manufactured before September 2003, then you will also need to fit a retrofit cable which will enable the functions on the wheel to work.
If you need this retrofit cable it is about £5 and is bmw part no 61120394848

Just to add that some cars post September 2003 also need the cable, including my facelift '56 plate roadster. If you're unsure it's best to check the green plug beneath the lower steering wheel cowling to see if the cables are present. For more details see this thread
 
sideshowbob said:
Installation of M Sport MFSW and Retrofit cable.
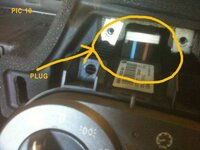
8/ Remove the plug from the rear of the light switch centre.

HELP!! My car is in bits and I'm trying to get this plug out, what's the technique?! Anyone knows it'd be great help as I'm running out of time before it gets dark!
pic10.jpg
Thanks
Mr G
 
you are supposed to remove the instrument cluster to access that plug


*EDIT - appears that you are doing it the right way looking at the instructions - but i did it via the instrument cluster hole - much easier to disconnect the plug
 
OK I managed to get it sorted out and I finally have a fully working MFSW. Ranski thanks for suggestion but I was going through the instrument cluster anyway, just having some trouble figuring how to release the plug.

I have a few suggestions to make to improve the how to, and prevent people coming up against the same problems as I did.

1) Check that your car has the cable required for the MF buttons to work.
Don't presume that it will be there even if you have a post facelift car, never mind post sep03 as mentioned in the OP.
More details can be found in this thread, including this picture of the plug beneath the steering cowl with/without cable courtesy of Inkey$.
comparisona.jpg


2) You can use a standard size tyre wrench to remove the center bolt to release the steering wheel.

If fitting the cable for MF controls
3) The plugs you need to remove for the dash console and for the light switch have a lever which releases the plug. The lever is the white part of the plug and is held in place by a raised catch on the main black part of the plug. Push down the catch to release the lever, and then rotate the lever to release the plug.

4) When fitting the scotch lock connectors, fit to the original wire as far back from the end of the cable which goes into the plug as possible to ensure that the blue and brown plugs can fit back into the black "parent" plug. If you don't you may have trouble getting the plug back together and end up having to "unlock" the scotch locks and adjust their position, and re-use them. In my experience, this is very fiddly, time consuming and frustrating.

5) The cost of the cable has risen from £5 to £17. £17 for what is essentially two wires seems mightily expensive. If you can locate the scotch lock connectors elsewhere, you could order two bushing contacts (part 1) from BMW and use those, only thing you'd need to remember is which is which as they'd both be black.
It's part number 61130006663 and only £0.98 for 75cm cables (which you can trim to the size you need). (item 1 on the bmwfans link)
So £2 vs £17.

There we are, hope some of you benefit from this!
 
Just installed mine today, thanks to sideshowbob and others....everything went smoothly. One question, what is the R/T button for? Is that for automatic shifting? And is there a way to change from one source to another like CD to Aux to Radio on the MFSW? Thanks

Todd
 
Mr Gringo - very pleased to hear you got it sorted. Great write up and advice. :thumbsup:

BettyBMW03 - The R/T button is for the additional phone option. Swaps between radio and telephone on a standard MF phone enabled car. There is no way to change the source as far as I know without clever rewiring.
 
Well I fitted my Mfsw today- thanks to all for guidance- really is easy!
One question- should the rt button on the right hand spoke nit work to select iPod? It does nothing at the mo!
 
paddy wright said:
Well I fitted my Mfsw today- thanks to all for guidance- really is easy!
One question- should the rt button on the right hand spoke nit work to select iPod? It does nothing at the mo!

Paddy,

have you got Bluetooth?I know that switches between radio and telephone,but if you don't have it,I doubt it works.I am sure someone will confirm if I am right or wrong :)
 
Back
Top Bottom