You are using an out of date browser. It may not display this or other websites correctly.
You should upgrade or use an alternative browser.
You should upgrade or use an alternative browser.
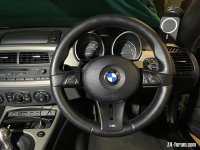
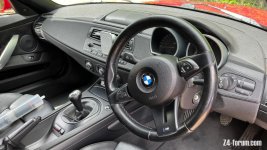
How-To: Refurbish an MSport Steering Wheel
- Thread starter inkey$
- Start date


 Attleborough, Norfolk
Brian, I have a spare standard wheel we could swap over while you get yours sorted if that's easier for you?jock156 said:Can you still drive/ steer with the button surrounds removed? ie. remove the buttons to recoat but still use the car?
Special Kay
Active member
pride and place, your hard graft has certainly paid dividends 
jock156 said:Can you still drive/ steer with the button surrounds removed?
 I was driving mine without buttons or airbag for a couple of days!!
a340driver
Member
I started doing mine today, after reading everything I could find on this forum!
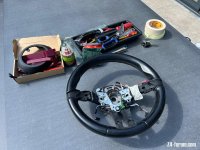
..and promptly managed to break both of the stubs that accept the 2 screws on the bottom piece. The BMW dealership I bought it from offered to tidy up the the steering wheel when I bought it in 2011 and it looks like they already broke quite a few of the clips as well. Also painting over the original covering caused a poor surface to develop, admittedly after 7 years or so.
Everything else came apart quite well. I used plastic scrapers and my nails to remove the soft covering then used 800 grit to try and get a smooth surface - we shall see. Took most of the afternoon being slow and careful.
Currently everything has 3 coats of plastic primer which has acted as filler as I've gently sanded back after each coat . The backside of the bottom cover had the stubs superglued back in earlier and now I've used epoxy resin to try to strengthen them. I only have a few of the (very) stiff clips left so I'm in emergency mode!
I'm thinking as the stubs were very tight in the wheel after I had to pull them out of their slots, it might be worth a little lubrication, not just to get them back in without troubling the epoxy (as they were quite stiff coming out), but also when putting the torx back in- any thoughts?
I quite like the finish of the leather, it's always been treated and cleaned so I think I'm going to leave it as is.
Tomorrow will be more gentle sanding back to get the right texture and start applying the matt black paint. I wasn't going to apply a clear coat but after seeing the results on this thread I'm going to buy some tomorrow. Very Nice work!
Attachments

a340driver
Member
Thanks inkey$! All back on today in between showers. I can't believe how much better it looks. Thanks for putting up a great guide 
inkey$ said:After reading a few threads on here, I'm experimenting with the plastics.
Forgot to thank you for the write up as this is what I used to do mine
inkey$ said:Look forward to seeing some pictures of your hard work
Final result
Attachments

axelleveau
Member
1536Z4 said:Final result
Thanks for posting that, I now know exactly what I want for mine will look like as I want to match my black and white interior
axelleveau said:Thanks for posting that, I now know exactly what I want for mine
Not going to post photos of the custom gagues I have ordered now
")
a340driver
Member
a340driver
Member
I also managed to torque it to 62.5NM after forgetting I had a torque wrench!