Ok, so my car has lost a little bit of coolant, say a pint every 1000 miles since I got it. Finally got around to sorting it as I noticed a drip from the expansion tank whilst underneath it last week. I also noticed that the bottom of the rad had bowed quite a bit, causing the lower bracket that holds the bottom of the fan shroud and the oil cooler mounting plate in place to not hold them securely.
So ordered a tank (Behr) and a rad (Hella) from euro, as well as the transmission cooler thermostat (auto's only) from Euro and set about it on Friday night.
Took plenty of pics, so here we go..
Bottom of my rad bowed;

Firstly, this is best done with the engine cold/cool, last thing you need is to scald yourself!
Remove the undertray (12 x 8mm torx bolts) and put to one side.
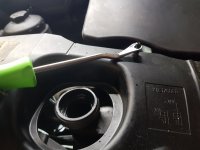
Then you need to remove the 8 x plastic rivets that hold the plastic cover above the rad pack - These have a No2 philips head that unscrews, allowing you to lever them out;
View attachment 9

You#ll also need to remove the 2 x T30 torx bolts at the sides, these do have a habit of corroding on the exposed underside of the threads, as the are is in the flow of rain etc, so I gave them a squirt of release agent the dat before, from through the front grilles and they came out easily;
Then you can pull the panel off, revealing the A/C condenser, radiator and fan;
Remove the fan power connector by squeezing the sides and pulling it free;


BE CAREFUL with the fine green wire, it's the fan speed sense wire, and if you break it, your AC will stop working (I've had a couple of cars where this has corroded at the connector causing this too)

Remove the clips securing the top hose to the tank, this has 2 connectors, so lever up the clips and pull it free;


There is another hose on the back of the tank, this is released in the same way, you then need to pull out the retaining clip that secures the lower part of the tank to the cooler mounting plate, DON'T thorow away this clip as it's needed for the new tank, also the white coolant level sensor also needs to be removed and swapped, this DOESN'T have a seal on it, as it sits in a sealed pocket, sensing the position of the magnet on the float inside;
Clip locked and opened;


You can then pull the tank free;
Continued in next post as reached max pics..
Mike
So ordered a tank (Behr) and a rad (Hella) from euro, as well as the transmission cooler thermostat (auto's only) from Euro and set about it on Friday night.
Took plenty of pics, so here we go..
Bottom of my rad bowed;
Firstly, this is best done with the engine cold/cool, last thing you need is to scald yourself!
Remove the undertray (12 x 8mm torx bolts) and put to one side.
Then you need to remove the 8 x plastic rivets that hold the plastic cover above the rad pack - These have a No2 philips head that unscrews, allowing you to lever them out;
View attachment 9
You#ll also need to remove the 2 x T30 torx bolts at the sides, these do have a habit of corroding on the exposed underside of the threads, as the are is in the flow of rain etc, so I gave them a squirt of release agent the dat before, from through the front grilles and they came out easily;
Then you can pull the panel off, revealing the A/C condenser, radiator and fan;
Remove the fan power connector by squeezing the sides and pulling it free;
BE CAREFUL with the fine green wire, it's the fan speed sense wire, and if you break it, your AC will stop working (I've had a couple of cars where this has corroded at the connector causing this too)
Remove the clips securing the top hose to the tank, this has 2 connectors, so lever up the clips and pull it free;
There is another hose on the back of the tank, this is released in the same way, you then need to pull out the retaining clip that secures the lower part of the tank to the cooler mounting plate, DON'T thorow away this clip as it's needed for the new tank, also the white coolant level sensor also needs to be removed and swapped, this DOESN'T have a seal on it, as it sits in a sealed pocket, sensing the position of the magnet on the float inside;
Clip locked and opened;
You can then pull the tank free;
Continued in next post as reached max pics..
Mike


")