Got brave - removing the wood! FINISHED

csquire4

Member
 Essex
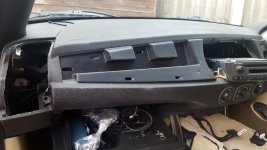
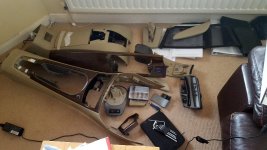
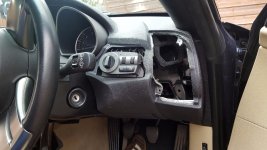
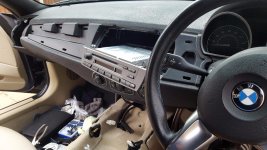
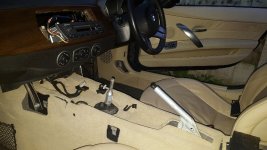
Hello all, I've finally got the courage to deal with my wood and get it sprayed piano black. First task is getting the 3 pieces of trim removed.

I am a total novice at this sort of stuff but through various guides on this and other forums I'm making good and steady progress.

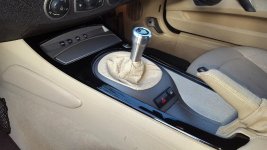
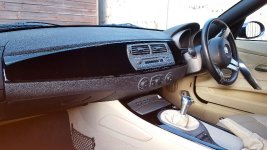
Removed all the centre console (not broken anything yet). Apparently there is one bugger of a clip behind the dash to deal with and then I should be there, but at the moment I'm at the "can't go back, totally committed" stage :headbang:

Unfortunately I've got a busy bank holiday so it won't get to the paint shop until next week assuming I can get the last 2 pieces out.
 

Attachments

  • Wood Removal.jpg
    Wood Removal.jpg
    82.2 KB · Views: 3,041
A job begun is half done :D (Mary Poppins) :thumbsup: Will be watching your progress with interest.
 
Dashboard is easy. Presume the clip is the one on the longest piece right on the passenger side. Don't ever recall that being an issue.
 
Watching with interest. This will be my winter project when it's off the road for a few months.

Interestingly, anyone had any experience of painting the aluminium trim? Guessing due to the texture, it'll need filling and rubbing down first?

Planning on hydro dipping mine carbon.
 
Removing wood from your Zed will have 2 benefits. It will look a million times better in piano Black and you'll be able to have a celebratory bonfire! :)

Good luck.
 
Cheers guys. Did think about dipping but not sure about durability so probably going for paint. The quote from bmw to buy the 3 pieces in piano black was £1023, couldn't believe it!.

Hope to have the before and after pictures by end of next weekend.

Anyone know how to remove the lower fold down flap door that covers the multime changer/storage area. The bmw guide says to open the door and just pull but I can't get it to budget even after removing the 2 small screws on the hinges.
 
srhutch said:
Dashboard is easy. Presume the clip is the one on the longest piece right on the passenger side. Don't ever recall that being an issue.

Then perhaps left off from a previous removal on yours, or you did it before and knew how. It's a total pita and requires a certain dexterity to reach to it. Once removed it's obvious how easy it undoes
 
csquire4 said:
Cheers guys. Did think about dipping but not sure about durability so probably going for paint. The quote from bmw for the 3 pieces in piano black was £1023, couldn't believe it!.

Hope to have the before and after pictures by end of next weekend.

Anyone know how to remove the lower fold down flap door that covers the multime changer/storage area. The bmw guide says to open the door and just pull but I can't get it to budget even after removing the 2 small screws on the hinges.

I couldn't get the door to come off either but a driver (torx I think) managed to pass down to reach the screws down the bottom if the door was at a certain angle.
 
For that 'door' you have to put a locking pin (I used a thin hex key) in each side. You'll see tiny holes on the edge of the door. That locks the hinges and allows you to open to about 45 degrees and it unclips
Tricky
 
Cheers Bazza. That's what I resorted to get to the screws, hoping to make it easier when I put it back together so will try cj10jeeper technique. Cheers cj10jeeper.
 
csquire4 said:
Cheers guys. Did think about dipping but not sure about durability so probably going for paint. The quote from bmw for the 3 pieces in piano black was £1023, couldn't believe it!.

Hope to have the before and after pictures by end of next weekend.

Anyone know how to remove the lower fold down flap door that covers the multime changer/storage area. The bmw guide says to open the door and just pull but I can't get it to budget even after removing the 2 small screws on the hinges.
Had mine dipped durability great , guy who did mine gave all parts 3 coats of airplane grade clearcote laquer :thumbsup:
 
cj10jeeper said:
srhutch said:
Dashboard is easy. Presume the clip is the one on the longest piece right on the passenger side. Don't ever recall that being an issue.

Then perhaps left off from a previous removal on yours, or you did it before and knew how. It's a total pita and requires a certain dexterity to reach to it. Once removed it's obvious how easy it undoes

It was there, the metal pinch clip. Dash would be hanging off without it.
 
blackabbot said:
Had mine dipped durability great , guy who did mine gave all parts 3 coats of airplane grade clearcote laquer :thumbsup:

I was going to say the same - get plenty of lacquer on there!
 
Got the last 2 pieces out today. The awkward clip behind the dash took about 20 mins of fiddling before I got it out, really don't see the point of it. It's scary when you start pulling the dash, it's very secure and you're constantly thinking it will break but eventually came free. The small one on the side (surround for light switches) has no special clips but again requires quite a bit of effort.

So now everything is out and nothing broken or lost (yet!). I have bagged up the screws and clips in freezer bags and labelled it all up to aid putting it all back together. Er' indoors is less happy about the state of her living room floor :rofl:
 

Attachments

  • Removal 1.jpg
    Removal 1.jpg
    78 KB · Views: 1,201
  • Removal 4.jpg
    Removal 4.jpg
    78 KB · Views: 1,201
  • Removal 2.jpg
    Removal 2.jpg
    181.1 KB · Views: 1,038
  • Removal 3.jpg
    Removal 3.jpg
    204.8 KB · Views: 1,038
My local bodyshop sprayed my wooden trim for £60 (I gave him £80).

I have spent today reinstalling everything. I took it steady so took me a few hours but I'm very pleased with the result and also quite proud of myself as I've never tackled anything as big as this before. There were few moments when I thought 'what have I done?' but I bagged and labelled the screws and clips and that made it much it easier.

Very satisfying to get rid of the 'grannies sideboard' look.
 

Attachments

  • After 2.jpg
    After 2.jpg
    84.8 KB · Views: 1,146
  • After 1.jpg
    After 1.jpg
    94.9 KB · Views: 1,146
  • Before 1.jpg
    Before 1.jpg
    96 KB · Views: 1,146
Back
Top Bottom