Since I got my G29 I have been powering my Dash cam from the cigarette lighter socket as the main fuse box is in the boot. This has meant a less than tidy install and the inability to close the sliding panel on the centre console.
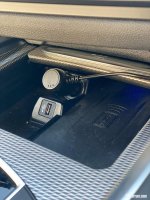
A bit of googling revealed there is a fuse box adjacent to the OBD port in the drivers footwell. To access this you will need a flat bladed screwdriver as there are 3 plastic clips holding on the trim piece you need to remove. Locations are shown in pics below.
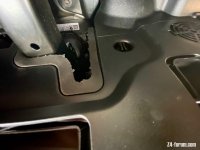
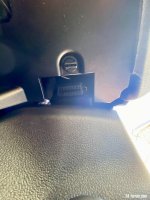
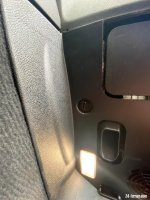
Once you have turned the slotted part of the clip 90 degrees you will be able to drop the trim piece slightly. Be careful doing this as there are two wired connections attached to the trim piece as shown below. Also be careful not to damage the trim piece or cut yourself on a sharp edge. (Ask me how I know)
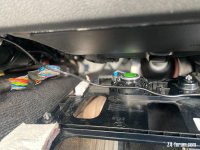
Ignore the black wire going across the pic, this is my current power lead to the cigarette powerpoint.
The two wired connections go to a footwell light and a small speaker. The footwell light is the white connector block, I found it easier to unplug the connector block from the trim piece which allowed easier access to the wired plug at the rear, then simply insert the connector block back into the trim piece ready for reassembly. The small blue wired connector is a bit of a faff to get off, but it will come. Once these connections are removed the following error will appear if the ignition is switched on.
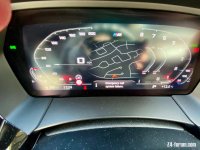
This will disappear once everything is reconnected on assembly, I'm assuming that it is the connection to the small speaker that causes the error when disconnected.
You now have access to the fuse box under the trim piece.
You want to remove the 20 amp fuse directly above the blue square fuse (below it in the pic shown as you are lying on your back in the footwell) this should be F46 which supplies the 12v cigarette lighter socket.
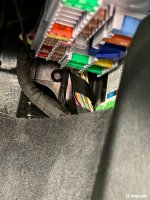
Obtain the fuse removal tool from the rear fuse box in the boot and remove this 20 amp fuse.
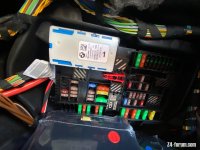
I have an Aguri dash cam and purchased this hardwire kit from Amazon.
https://www.amazon.co.uk/gp/product/B07H35NCNQ/ref=ppx_yo_dt_b_asin_title_o02_s00?ie=UTF8&psc=1
This allows you to "piggyback" the 20 amp fuse from position F46 that you have removed. Simply select the correct size from the piggybacks supplied plug your 20 amp fuse into it along with the supplied fuse and and plug the piggyback into F46 where you removed the 20 amp fuse from originally. Now you need to correct the red wire from the hardwire kit to the piggyback and find a suitable earthing point for the black wire. Once fitted it should look like this.
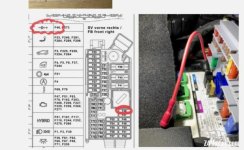
I used, earthing point above and behind the accelerator pedal.
Once happy that your connections are good do a test before routing the wiring by connecting up your dash cam to the hardwire kit. If all is well you can now disconnect the dash cam and run your wire behind the trim.
I removed the trim piece adjacent to the drivers side door at the end of the console above the OBD port to facilitate running the power wire.
Starting from the dash cam I used a trim removal tool to help tuck the wire behind the windscreen and pillar trim.
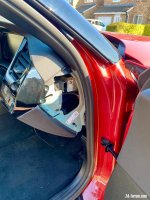
Then it is a simple case of tidying the wiring under the trim area, reconnecting the two wiring plugs and replacing the trim piece that allowed access to the fuse box.
The power to the dash cam will go off ten minutes after exiting the vehicle.

A bit of googling revealed there is a fuse box adjacent to the OBD port in the drivers footwell. To access this you will need a flat bladed screwdriver as there are 3 plastic clips holding on the trim piece you need to remove. Locations are shown in pics below.


Once you have turned the slotted part of the clip 90 degrees you will be able to drop the trim piece slightly. Be careful doing this as there are two wired connections attached to the trim piece as shown below. Also be careful not to damage the trim piece or cut yourself on a sharp edge. (Ask me how I know)

Ignore the black wire going across the pic, this is my current power lead to the cigarette powerpoint.
The two wired connections go to a footwell light and a small speaker. The footwell light is the white connector block, I found it easier to unplug the connector block from the trim piece which allowed easier access to the wired plug at the rear, then simply insert the connector block back into the trim piece ready for reassembly. The small blue wired connector is a bit of a faff to get off, but it will come. Once these connections are removed the following error will appear if the ignition is switched on.

This will disappear once everything is reconnected on assembly, I'm assuming that it is the connection to the small speaker that causes the error when disconnected.
You now have access to the fuse box under the trim piece.
You want to remove the 20 amp fuse directly above the blue square fuse (below it in the pic shown as you are lying on your back in the footwell) this should be F46 which supplies the 12v cigarette lighter socket.

Obtain the fuse removal tool from the rear fuse box in the boot and remove this 20 amp fuse.

I have an Aguri dash cam and purchased this hardwire kit from Amazon.
https://www.amazon.co.uk/gp/product/B07H35NCNQ/ref=ppx_yo_dt_b_asin_title_o02_s00?ie=UTF8&psc=1
This allows you to "piggyback" the 20 amp fuse from position F46 that you have removed. Simply select the correct size from the piggybacks supplied plug your 20 amp fuse into it along with the supplied fuse and and plug the piggyback into F46 where you removed the 20 amp fuse from originally. Now you need to correct the red wire from the hardwire kit to the piggyback and find a suitable earthing point for the black wire. Once fitted it should look like this.

I used, earthing point above and behind the accelerator pedal.
Once happy that your connections are good do a test before routing the wiring by connecting up your dash cam to the hardwire kit. If all is well you can now disconnect the dash cam and run your wire behind the trim.
I removed the trim piece adjacent to the drivers side door at the end of the console above the OBD port to facilitate running the power wire.
Starting from the dash cam I used a trim removal tool to help tuck the wire behind the windscreen and pillar trim.

Then it is a simple case of tidying the wiring under the trim area, reconnecting the two wiring plugs and replacing the trim piece that allowed access to the fuse box.
The power to the dash cam will go off ten minutes after exiting the vehicle.
