I recently fitted the BlackVue dr750x 2ch dash cam and thought I would share my experience with it so far.
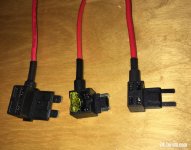
Fitting was relatively straight forward apart from access to the fuse box, remove the 3 retaining screws from the panel above the passenger footwell and then unscrew the fuse box retaining screw, this then allows it to drop down and slide forward (a certain amount of pulling and tugging is required) there’s also a connector at the front right that needs to be disconnected to allow it to drop further down, as others have said it’s a right pain in the neck (literally). To connect into the fuse box I used a couple of piggy back fuse’s, these are the mini type, (took 3 attempts to get the right size), to fuse number 8 cigarette lighter and number 77 interior light.
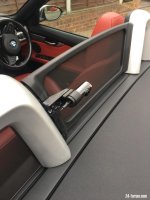
I also removed the clip out panel above the fuse box, sun visor, A pillar and cill trim and then removed the rubber seal to the door cill for ease of routing the cables, at the rear I then removed the trim where the seatbelt pulls out and then the wind deflector and mounting clip to the passenger roll hoop and then the hoop cover, which simply pry apart starting at the bottom, a set of trim removal tools make things easier, either side of the roll hoop there’s 2 screw holding the rear trim in place, removing these allowed enough movement to feed the rear camera cable underneath.
Once the all the cables were in place I refitted all the trims and cill seal.
To mount the rear camera I used a piece of metal Strapping bent into a L shape and fitted it behind the wind deflector bracket top screw running the camera cable up to it from where it came out below the hoop cover.
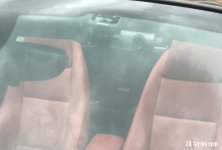
I mounted the front camera at the top of the screen on the passenger side next to the rear view mirror, it’s not in the centre as recommended but because the e89 screen is quite short the camera would have been too low down and would capture more bonnet than road.
Not having used a dash cam before I can’t really compare the video quality but I’m very happy with it although I’ve only replayed a few clips.
The bracket I made for the rear was a little flimsy and caused the camera to shake so I’ve glued a piece of right angled plastic too it to give it some rigidity which seems to work, a slight heavier gauge steel would probably have worked better but overall I’m pleased with the result.
One issue I had was with the power supply, fuse number 8 (20 amp) worked fine but number 77 (10 amp) powered down when the car shuts down after about 20 minutes, meaning I couldn’t use the parking mode, I tried numerous times checking I had the correct fuse but due to the confined space of the fuse box I gave up and ended up running a constant live feed straight from the battery, feeding it behind the carpet trim in the boot and up to where the seatbelt pulls out and then along the route of the cable of the rear camera, so now everything works perfectly.
The dr750x has Wi-Fi to connect to your smartphone for altering settings and for ease of viewing video footage it can also be connected to a network so you can view recordings or real-time footage when at home, or it can have a SIM card fitted and connect to the cloud anywhere. I fitted a 256gb micro SD card instead of the 16gb supplied with it, this can also be easily removed and inserted into a pc/laptop to transfer any video footage.
Fitting was relatively straight forward apart from access to the fuse box, remove the 3 retaining screws from the panel above the passenger footwell and then unscrew the fuse box retaining screw, this then allows it to drop down and slide forward (a certain amount of pulling and tugging is required) there’s also a connector at the front right that needs to be disconnected to allow it to drop further down, as others have said it’s a right pain in the neck (literally). To connect into the fuse box I used a couple of piggy back fuse’s, these are the mini type, (took 3 attempts to get the right size), to fuse number 8 cigarette lighter and number 77 interior light.
I also removed the clip out panel above the fuse box, sun visor, A pillar and cill trim and then removed the rubber seal to the door cill for ease of routing the cables, at the rear I then removed the trim where the seatbelt pulls out and then the wind deflector and mounting clip to the passenger roll hoop and then the hoop cover, which simply pry apart starting at the bottom, a set of trim removal tools make things easier, either side of the roll hoop there’s 2 screw holding the rear trim in place, removing these allowed enough movement to feed the rear camera cable underneath.
Once the all the cables were in place I refitted all the trims and cill seal.
To mount the rear camera I used a piece of metal Strapping bent into a L shape and fitted it behind the wind deflector bracket top screw running the camera cable up to it from where it came out below the hoop cover.
I mounted the front camera at the top of the screen on the passenger side next to the rear view mirror, it’s not in the centre as recommended but because the e89 screen is quite short the camera would have been too low down and would capture more bonnet than road.
Not having used a dash cam before I can’t really compare the video quality but I’m very happy with it although I’ve only replayed a few clips.
The bracket I made for the rear was a little flimsy and caused the camera to shake so I’ve glued a piece of right angled plastic too it to give it some rigidity which seems to work, a slight heavier gauge steel would probably have worked better but overall I’m pleased with the result.
One issue I had was with the power supply, fuse number 8 (20 amp) worked fine but number 77 (10 amp) powered down when the car shuts down after about 20 minutes, meaning I couldn’t use the parking mode, I tried numerous times checking I had the correct fuse but due to the confined space of the fuse box I gave up and ended up running a constant live feed straight from the battery, feeding it behind the carpet trim in the boot and up to where the seatbelt pulls out and then along the route of the cable of the rear camera, so now everything works perfectly.
The dr750x has Wi-Fi to connect to your smartphone for altering settings and for ease of viewing video footage it can also be connected to a network so you can view recordings or real-time footage when at home, or it can have a SIM card fitted and connect to the cloud anywhere. I fitted a 256gb micro SD card instead of the 16gb supplied with it, this can also be easily removed and inserted into a pc/laptop to transfer any video footage.


 Finland

