Build myself a new hardtop

I must admit it looks great from every angle apart from side on.

I believe the coupe windscreen is raked more than the roadsters (my windscreen fitter told me this) hence why this one looks a little odd and ''bulbous''.

Fantasitc job though and i'm glad you manage to make one, it's seriously amazing and a credit to you :thumbsup:
 
Have you any pictures taken directly from the side taken at the level of the car rather than looking down on it?
 
Big fat A* for effort! Brave attempt and a tastey outcome!

My mind changes on a daily basis in regards to my Coupe / Roadster preference :roll:
 
Hello you all,
Thanks for your comments, and compliments, it really made my weekend! http://www.z4-forum.com/forum/posting.php?mode=reply&f=2&t=74520#

I did start this project with no intention to make more of them, not least to take it into production. Sure I made a number of molds, mainly from the original hardtop, but it’s not enough to start production. , however I can do some inquiries for reproduction, I have a few company`s in my network who are perfectly equipped to make these parts and could ask them what the parts would going to cost if they are going to produce them. It would all depends on how many of them are needed. And if you want light weight and Carbon fibers to be used keep in mind that it`s 10 times more expensive than glass fibers.
Here a description of my build steps.

The hard top consist of three composite parts, outside shell, inside shell which are bonded to each other, and the part with the fabric trim on it to make it look nice and dampen the noise, just like the original hardtop. I started to dismantle the original hard top and made a mold from the inside shell, and the composite frame that holds the rubber insert that seals the door window, another 4 small molds then I made a model from the outside shell that looked the same as the original Coupe roof from cheap polyester. Next was the construction of the underside of the extensions to the rear attachment points on the car, and the part forward to the door window (after I carefully protected the paint with a layer of tape and put this under a coat of release wax and PVA (Polyvinyl Alcohol) witch dissolves in water to be sure I could get it off when cured. On top of this I placed a piece of thick honeycomb sandwich panel where the rear window would be placed.

Then came the most difficult part of the build which is the top cross member where the boot lid hinges are bolted on. I found a used boot lid on eBay and made a set-up on the ground to take several measurements.
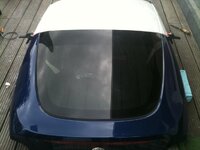
dakenkofferbakdekselprefit_zps99051d76.jpg
http://i300.photobucket.com/albums/nn6/shadow19544/dakenkofferbakdekselprefit_zps99051d76.jpg

I first had the idea to buy a original steel part from a damaged car, to use this as a model but after a long surge where not able to find one. A new part costs 1200 Euro so I decided to build it on the car, using foam, very thin plywood, (aircraft grade), after I was pretty sure it was ok, I covered it with a couple of carbon,/epoxy layers. Next step was the side parts where the rear window rest, I bought an amount of that brown clay that car designers are often use to build a 3D shape of their drawings. I never used this material and after while working with it I really liked the stuff, you must heat it up to approx 55 – 65 degrees C and it become very soft and you can get it on very easily, so I put a thick layer of the stuff onto the honeycomb base. When the clay is cold it`s hard and then you start to scrape and chafe it into the desired shape and contour. Nice thing is if you scrape to much away or don’t like the shape, simply heat up some clay extra and applying a new layer of plaster on it.

I Found it particularly difficult to get the contours en shape exactly the same on both sides, and it took a lot of time to get it to my liking, I put a layer of bondo on it to make it a smooth and covered it with 2 components paint, and prep it to draw a mold of it, inside this mold I later laminate a thick male mold in it to use them for the thermo forming of the acrylic small rear windows. Then laminated carbon side panels around the door window and the rear window, removed all the clay cleans the surface and bonded the side panels on it , after curing poured a small amount of liquid foam into it to fill the cavities and make it ”solid” Brings a total of 7 molds altogether, then I temporally put the polyester dummy roof on the inside shell and prepped it for making a mold of it and after curing laminated the roof Outside shell in it, which did not went well, it always takes more time than you think for such a laminate because I always vacuum it, but it was leaking and I could not find the leak, anyway it was already past midnight before I got everything in the oven and I went to bed, during the rest of the night the temp control failed and the temp become too high and went above the Tg (the temp where the mold material gets soft), luckily it happened short before the timer switched the power off. Otherwise I think the whole workplace would have catch fire. The mold is not completely ruined but needs to be worked upon the get it back in shape. I started this project in 2011 but I didn’t worked on it constantly, for example when the temperature dropped below 5 degrees C I had to stop, My workshop is only 160 f2 a Z4 don`t fit, and I had to plan the big jobs carefully because I had to bring it back in the original state to drive to work.
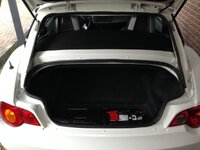
metkofferklepopen2_zps705590d7.jpg

http://i300.photobucket.com/albums/nn6/shadow19544/metkofferklepopen2_zps705590d7.jpg
 
In many years of being on forums and going to car shows I have to say this is one of the best mods I've seen in terms of the effort and respect deserved :thumbsup: I love it when someone pushes the boundaries and does something totally original.....I'd never be brave or skilled enough!

I think some of the comments about the side view are harsh, given that 95% of people who will ever see this mod will either:
1) See it out on the road and therefore wont be able to the difference from a coupe in a fleeting pass
2) Wont know the first thing about cars and just think 'ooh thats a nice car'
 
That is amazing! It looks great, from all angles. Can't criticise the side on surely?? It's still a roadster underneath and you can't change the windows to look like a coupe.

Top effort, very impressed.
 
From a hardened and lifelong car modder I see this as a truly a remarkable piece of work. I'd be proud to have such a part adorning my Zed :thumbsup:

Well done and thanks for taking the time to detail some of the stages of the process.
 
janranger said:
I had to plan the big jobs carefully because I had to bring it back in the original state to drive to work.
re-reading this - I must admire your work even more - trying such a big mod on a daily driver is COMPLETELY different to a car you can garage and come back to.
 
Beedub said:
from the back it looks ACE, from the side it looks terrible...

i think its needs to be a lower roofline to work better, like the coupe tops for the s2000.

Hi Beedub,
I took the pictures from a higher angle, I am tall, 6.4 feet, maybe that gives the impression that a lower roofline looks better. But it`s already lower than the original hardtop !
I did`nt compared the roofline height with a Coupe, but anyway the rollover protection behind the headrests prevents a lower roofline. It barely fits as it is. Removing them is not a option if you drive it top down.

Regards,
Jan
 
bony_13 said:
In many years of being on forums and going to car shows I have to say this is one of the best mods I've seen in terms of the effort and respect deserved :thumbsup: I love it when someone pushes the boundaries and does something totally original.....I'd never be brave or skilled enough!

I think some of the comments about the side view are harsh, given that 95% of people who will ever see this mod will either:
1) See it out on the road and therefore wont be able to the difference from a coupe in a fleeting pass
2) Wont know the first thing about cars and just think 'ooh thats a nice car'

Thanks for your support and comment on the side view, but this is a part where I am not very happy with too, but I knew from the start that I had to live with it due to the rounded rear of the roadster door windows.
Design wise you would never use this shape, but as a design rule FFF Form Follows Function I had no choice, a quick change of the door windows is not an option..

About being brave, maybe it`s being not thinking trough about the time it will take you, like a phrase in a Red Hot Chili Pepper song: " I am quick to start but slow to finish" skilled, :wink: I must confess that I have a lot of experience with composite building, after I build my first airplane from a kit CFM Shadow (superb British design) http://i300.photobucket.com/albums/nn6/shadow19544/AirplaneJan_zpsdbdca29d.jpg I started with two other man the development and build of a new airplane from scratch and on top of that the engine conversion as well, One of the two others financing it, the other one took take care of the commercial side and I was responsible for the technical side of it. Man what a adventure I stepped in, it took 6 years to first flight, http://i300.photobucket.com/albums/nn6/shadow19544/PH-DACfirstflight_zpseb137f36.jpg I was diagnosed having developed Parkinson disease,lost my pilot licence and 2 years later the salesman left, and the other stopped financing, both lost confidence that we would ever get the Certificate of Airworthiness. the actual certification took another 4 years to get the CoA, in the flight testing the excellent test pilot made a mistake and we almost got killed, his flying skill and the fact that I apparently build it well saved us, because we overstressed the airplane a lot. I didn't told my family and it took a year and a lot of talking with the test pilot before I allowed him and myself to resume the flight test program, besides the family were curious and wanted to know why I didn't went flying anymore. In the end (I think the dutch CAA civil servant thought, "for godsake give him the CoA he`s pain in the ass and won't give up), and we received the CoA! The feeling that you against all critics, your own persistence payed off makes it all worthwhile. and that`s true, giving up is not ever an option! http://i300.photobucket.com/albums/nn6/shadow19544/ontheapron_zpsb374db97.jpg Best regards, Jan
 
Back
Top Bottom