Broken Pop Up Nav Screen Plastic Housing Replacement

  • Thread starter Thread starter Anonymous
  • Start date Start date
A

Anonymous

Guest
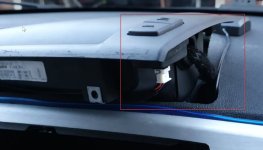
My 2003 Z4's Nav screen (have the professional pop up Navigation) has just had the rear plastic shell come out after the plastic ring around the Left hand side where the motor turns it broke. So just because a tiny and thin plastic ring around the housing has broken it looks like I'm up for a VERY VERY expensive repair job. :thumbsdown:

The Nav and screen still work but with the broken plastic housing the screen will not pop up or move and the rear plastic housing won't even clip on.

Any ideas how I could repair it without thousands of dollars? It seems the Nav screen comes as one unit and even the cheapest on Ebay is over $500. Anyone have a non working Nav screen they are selling?

I am devastated with this as this is yet another in a myriad or costly repairs I've had to make on this car lately.

Nw89mer.png
wdW6wnp.png
 
mj2k said:
Could it be plastic welded?


Sent from my iPad using Tapatalk HD

This.

Strong epoxy should do just fine!

You can't buy the parts separately, but you can find deals on eBay if you patient...
 
Thanks guys for the advice. I checked with BMW here in Australia and they want $4000 for a replacement Monitor :o :o as you can't buy just the plastic housing. Even the BMW guy said he wouldn't bother for a 9 year old Z4.

I called a place that does plastic welding but they said all the electronics must be removed as the heat guns would damage them and suggested I might be better off using superglue. :cry:

I will have to rip up the dashboard and remove the whole screen unit and see if I can somehow patch it up....can't believe the repair cost from a small failure of a $5 piece of plastic :headbang:
 
it's piss easy to remove dude..

Take out the central vents, and you'll see two screws at the top corners -> take them out.
Back of the screen (windscreen edge) you'll find a central section of the screen housing that will pop off -> Pop it off and remove the three screws
You'll now be able to lift out the screen (start with the right edge -> lift it up and then move the screen right and up to give enough clearance for the motor.
Disconnect the wiring harness and then the screen is out of the car completely.


Now, to get to the actual scree - it'll be piss easy with the back already removed!

Disconnect the cables from either side of the board that lead out through the side holes, then remove the blue clip you can see in the first pic.
Flip the unit over and on the other side to the motor, you'll see a small black plastic ring that's sort of like a big black washer.
Carefully prise this away from the hole (making sure to release the little back clip - you'll see the one I mean ;)) as you do.
Once removed, you should be able to wiggle the screen up and out, carefully feeding the cables through the holes as you go.


Finally, if memory serves, undo the four bolts holding the top circuit board, carefully lift it and remove the four bolts holding the green screen mounts.
Carefully lift the whole thing, making sure you carefully disconnect the light sensor and any other cables that are getting tight.

And then you're done ;)

All in all - it's about 30 minutes work the first time, and about 5 every time after that!
Really is simple dude :)


Putting it back together is just the reverse, and once all done, simply click the screen cover in place, sit back and enjoy your handywork!
 
Sk93, my many thanks for your detailed instructions, they were INVALUABLE while I was pulling it all apart...

Well after quite a few hours and lots of swear words the job is all complete. I have successfully super glued the broken plastic ring around the screen housing BUT it appears that was the reasonably easy part. Trying to place the screen again between the two protruding plastic elements on either side (one of which is connected to the motor) was very difficult. It required all the wiring coming into the screen on both sides to be disconnected from the PCB board and removed. The green, blue and red cables you see in the first picture actually run BELOW the top PCB board so that had to be unscrewed and the wires carefully removed. I also had to undo some screws on both side of the large outside housing in order to make more room for the screen to land between the two plastic rolls on either side and then retighten the screws.

Once the screen was sitting nicely between the two gears I tested it first by plugging the power cables back into it (but without formally putting it all back together)
See video here of the disassembled Nav operating..

https://flic.kr/p/nAwm77

It's now all back together and thankfully BMW will NOT be getting the $4,000 they were asking for! :driving: :driving: I had a massive sense of accomplishment afterwards that I haven't felt in years!! I just hope my repair lasts.
 
drzed said:
Sk93, my many thanks for your detailed instructions, they were INVALUABLE while I was pulling it all apart...

Well after quite a few hours and lots of swear words the job is all complete. I have successfully super glued the broken plastic ring around the screen housing BUT it appears that was the reasonably easy part. Trying to place the screen again between the two protruding plastic elements on either side (one of which is connected to the motor) was very difficult. It required all the wiring coming into the screen on both sides to be disconnected from the PCB board and removed. The green, blue and red cables you see in the first picture actually run BELOW the top PCB board so that had to be unscrewed and the wires carefully removed. I also had to undo some screws on both side of the large outside housing in order to make more room for the screen to land between the two plastic rolls on either side and then retighten the screws.

Once the screen was sitting nicely between the two gears I tested it first by plugging the power cables back into it (but without formally putting it all back together)
See video here of the disassembled Nav operating..

https://flic.kr/p/nAwm77

It's now all back together and thankfully BMW will NOT be getting the $4,000 they were asking for! :driving: :driving: I had a massive sense of accomplishment afterwards that I haven't felt in years!! I just hope my repair lasts.


groovy! I should have pm'd you my number thinking about it.. I've taken the damn thing apart so often it's second nature to me.. but yes, the first time was an absolute minefield of confusion, headscratching and swearing :thumbsup:

Really happy you got it back together and working again - and especially that you didn't have to fork out mega bucks :thumbsup:
 
I would love to find a way to completely disconnect the motor so the screen is left in the open position. I really don't see what the point of it flipping closed is for. I know you can close it while driving (doesn't bother me), but as soon as you press a button it pops up again.

So to avoid it breaking one day, it would be great to find a way to just disconnect the motor with the screen in the open position and be done with it 8)
 
mr_z4mc_oz said:
I would love to find a way to completely disconnect the motor so the screen is left in the open position. I really don't see what the point of it flipping closed is for. I know you can close it while driving (doesn't bother me), but as soon as you press a button it pops up again.

So to avoid it breaking one day, it would be great to find a way to just disconnect the motor with the screen in the open position and be done with it 8)
Iirc , you'd need to remove screen, split screen casing , an then just unplug the motor connection from the circuit board
 
exactly as Mark says.
the only other way is rather permanent - cut the wire that leads out of the casing to the back of the motor.
no going back from that however.
 
Guys old thread being woken up here

I want to remove and sell my nav setup and factory stuff as I dont require it.

The wires connected to the Nav, are they easy to remove. What to do with the loom after? Just let it be? Any errors going to be thrown?
Thanks
BobbyFactory Nav.jpg
 
yyz_bobby said:
Guys old thread being woken up here

I want to remove and sell my nav setup and factory stuff as I dont require it.

The wires connected to the Nav, are they easy to remove. What to do with the loom after? Just let it be? Any errors going to be thrown?
Thanks
BobbyFactory Nav.jpg
If you remove the panel below the air vents you will see the other end the cables that are in the fabric braiding in your picture its on a connector plug behind that panel, so it just unplug and then your monitor will lift out
The small white plug in your picture leave alone as its internal monitor wiring
 
markplant said:
The head unit you have left will still work you just won't have a display

Oh so that loom will not detach from the navigation screen, it has to be removed from another point behind the vents panel?

I was thinking if there would be wires there that would connect to my CAN IN / OUT wires on the new headunit I have put in.

Long term I am going to go scrap dealers see if i can find a centre dash speaker cover and wire up a speaker into that gap and cover it nicely. Preferable to a cheap cubby or plastic cover.
 
Bobby, out of curiosity, where/how will you be selling your screen? I need one for my 2005 Z4, since the two halves seem to have separated and it now sits crookedly on the dash. Thanks!
 
I'm trying to disconnect the monitor in my 2005 Z4 and the cable seems like it's connected by some black rubber shrink wrap. I can't figure out how to disconnect the cable for the monitor. Any suggestions?
 
I can't figure out how to disconnect the cable for the Monitor so I can take out the screen. It's like a shrink wrap rubber. Not easy to disconnect from wiring harness.
 
BerjB said:
I can't figure out how to disconnect the cable ffor the Monitor so I can take out the screen. It's like a shrink wrap rubber. Not easy to disconnect from wiring harness.

Please send pics. I remember it being slightly awkward but didn’t seem too bad removing the screen.
 
This might help as I think enuff_zed had a similar question: https://z4-forum.com/forum/viewtopic.php?t=133280

Also this post might help with more specific step by step by pvr: https://z4-forum.com/forum/viewtopic.php?t=33734
 
Back
Top Bottom