You are using an out of date browser. It may not display this or other websites correctly.
You should upgrade or use an alternative browser.
You should upgrade or use an alternative browser.
2010: A year of mods! Eisenmann update P2
- Thread starter PawnSacrifice
- Start date
a11y said::withstupid:

Cheeky sod... a slight (albeit crucial) omission... I'm half tempted to edit the offending post
PawnSacrifice said:Z4 Beemer, peddy, sadly (because of what has become of me) I was on the web first thing this morning looking at the weather forecast. Still mild here at the moment... plus I cycled to work. Tomorrow should do it, if not Wednesday is down to 1°C. As long as the steam's entirely 1 sided I should be happy... it would take a lot to spoil my good car mood right now
Hmm, pop a balloon over both pipes on both sides of the exhaust, zip tie it to hold it in place - turn the engine over then shut it off (before the balloons burst).
Then visually inspect each of the "exhaust back-pressure measurement receptacles" to see the variance in back pressure at each side of the vehicle.
CAUTION: I'm not a thermo-dynamicist and I don't even really know if that's what this is about, but dunno, it may work
*EDIT* No, I'm pretty sure this wouldn't work at all - you'd maybe get an idea whilst the engine was running as to which was causing the most back-pressure, but I suspect once the engine had stopped the balloons would equalise in size. I doubt you'd see the difference in size of inflation as the balloons would pop pretty quickly too.
Can't think of any other way to measure back-pressure off the top of my head
Siftah said:Hmm, pop a balloon over both pipes on both sides of the exhaust, zip tie it to hold it in place - turn the engine over then shut it off (before the balloons burst).
Then visually inspect each of the "exhaust back-pressure measurement receptacles" to see the variance in back pressure at each side of the vehicle.
CAUTION: I'm not a thermo-dynamicist and I don't even really know if that's what this is about, but dunno, it may work
*EDIT* No, I'm pretty sure this wouldn't work at all - you'd maybe get an idea whilst the engine was running as to which was causing the most back-pressure, but I suspect once the engine had stopped the balloons would equalise in size. I doubt you'd see the difference in size of inflation as the balloons would pop pretty quickly too.
Can't think of any other way to measure back-pressure off the top of my head
HA! :lol: I like your thinking, but it has too much depth for me.
I'm concerned, and others are interested, what this is going to look like when it's steaming... will I have two, sorry four, nice shiny tail pipes with only two seemingly doing anything. Consensus on here, Twitter (well, Z4 Beemer), at the manufacturer and from Mike at A-L Tuning, is that there will be a LHS bias. There will. But how much bias and how noticeable?
Oddly I checked when I got to work today and the bias was very much with the RHS... didn't film properly though. Need some colder weather - which I am happy to wait 10 months for, weather gods :wink:
Great Mods mate...
Really loving the clear indy's and exhaust..
Allways Loved Eisenmann..Best quality exhaust about.
Was wondering does 1 side give more condensation in cold weather? Noise? Or even?
Really want clear indys of on my 2003 Sterling but the Hassle and Cost is simple too much I reckon i'd mess up my ligths
Really loving the clear indy's and exhaust..
Allways Loved Eisenmann..Best quality exhaust about.
Was wondering does 1 side give more condensation in cold weather? Noise? Or even?
Really want clear indys of on my 2003 Sterling but the Hassle and Cost is simple too much
PawnSacrifice said:HA! :lol: I like your thinking, but it has too much depth for me.
Hold your hand over both sides of the exhaust and you should be able to feel the difference in the pressure. You can hold your hand tightly over the pipe (as if you were checking for leaks), the worst that will happen is the car will stall.
Do it within a few mins of starting the car up, make sure the gas isn't too hot and doesn't burn your hands
PawnSacrifice said:I'm concerned, and others are interested, what this is going to look like when it's steaming...
I'm always concerned about how I look when steaming, it's unlikely to ever be pretty
Z4 Beemer said:
I would be tempted to put 4 equal sized potatoes in each of the pipes, just the right size so that they fit firmly. Start the car up and see which pipe spits the potato out first! :? Pretty sure the left side of the car will win.
Potatoes! yes! much more scientific than my silly balloon idea. I'd recommend maris pipers as they're more starchy and should "squish" better.
Z4 Beemer said:I am of course kidding.

You were kidding?
Oh, yeah, I mean, You *were* kidding, course
Z4 Beemer, Siftah, good grief!
My neighbours think I'm insane anyway... spending hours pampering and tinkering (I wrote "fiddling", but that sounds a while new kind of wrong) with the car. A situation which has recently been made worse by me inspecting the exhausts for signs of life any time I move the car. Now, on top of all this, you're suggesting that I start firing vegetables about the place... knowing my luck I'd take out next door's cat
Hmmm.... :evil:
I will return, hopefully tomorrow, with video evidence.
+49 said:Great Mods mate...
Really loving the clear indy's and exhaust..
Allways Loved Eisenmann..Best quality exhaust about.
Was wondering does 1 side give more condensation in cold weather? Noise? Or even?
Really want clear indys of on my 2003 Sterling but the Hassle and Cost is simple too muchI reckon i'd mess up my ligths

Thanks... I was very lucky with the lights, thought I was going to have to split them. Luck, pure blind luck I bought the ones I did. Reference the condensation, see above :roll:
czechT698 said:The balloon method could be done with condoms because of their ability to withstand more (or how to say it...) seriously.... It could work... Put a camera in the back and start it up, we coudl see which is more inflated if properly attached...
Go stand in the corner, with the other two :|
So, exhaust went down well on most accounts. The cut out on the RHS letting it down. I decided to go it alone. Well not quite alone, there is a lot of info on here about exhausts and bumper options. Have a look at the link below - another way of doing this (to the method I chose) and also one of the best examples of a collaboration I've seen on a forum…
CJ's Quad setup
My method was different from CJ's, I decided I wanted to use plastic… make use of the skills (if you can call them that) plastic welding my new headlights. Below is what it did and how. While the end result is less than I desired, I believe the methods are sound.
I had already rounded off the existing RHS bumper cutout to mirror the LHS, as far as possible - there was a little in-filling that would be required. I needed to create a couple of templates to make a lip for under the cutout which would also allow me to roll the edges.
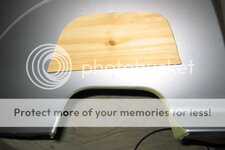
The photo below shows a wooden cut out to match (roughly) the profile of the bumper and masking tape cut to match the shape…
CJ, I tried the bottle method, but couldn't get a match.
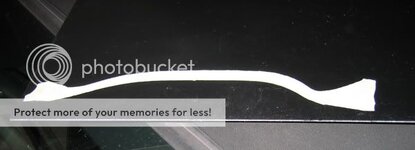
I applied the masking tape to a sheet of 2.5mm ABS plastic (purchase online), this gave me the sizing for the sheet of plastic that I needed to shape.
CJ's Quad setup
My method was different from CJ's, I decided I wanted to use plastic… make use of the skills (if you can call them that) plastic welding my new headlights. Below is what it did and how. While the end result is less than I desired, I believe the methods are sound.
I had already rounded off the existing RHS bumper cutout to mirror the LHS, as far as possible - there was a little in-filling that would be required. I needed to create a couple of templates to make a lip for under the cutout which would also allow me to roll the edges.
The photo below shows a wooden cut out to match (roughly) the profile of the bumper and masking tape cut to match the shape…

CJ, I tried the bottle method, but couldn't get a match.
I applied the masking tape to a sheet of 2.5mm ABS plastic (purchase online), this gave me the sizing for the sheet of plastic that I needed to shape.

The next part has no pictures due to timings, but basically:
1. pre-heat an oven to 175C - remove all but the bottom shelf (set as low as possible)
2. cover the wooden cutout in silver foil
3. cover an oven tray in silver foil - the oven tray needs to be long enough for the end of the plastic sheet to sit on the edges of the tray.
4. place the oven tray, with plastic, in the oven
5. between 5 - 10 minutes the plastic will become malleable and sink in the middle
6. as soon as the plastic sinks, open the door and working in the oven (why you need to move the shelves) carefully wrap the plastic around the wooden profile block - I used a tea towel to hold the plastic - it's too hot to handle with bare hands... for me anyway.
7. remove from the oven and the plastic will harden quickly.
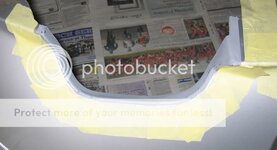
Below is my shaped plastic:
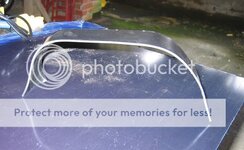
TO ADD: I didn't feel it was vital to get the profile perfect as I was able to bend it slightly as it was being attached to the bumper.
Making sure that I had the shaped plastic the correct way round for the RHS I then applied the masking tape cutout and cut the plastic to shape. This gave me the final piece I needed.

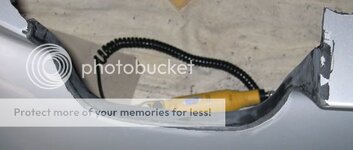
I then plastic welded the my new piece to the bumper. I used small cuts of the ABS plastic to fold into any gaps on the front.
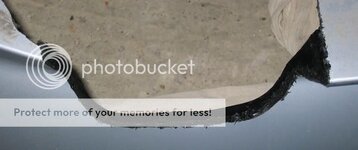
As you can see above, it was a mess. Dremel tool with the sander attachment saw to that (took some time). I finished with a 800 + 1200 grit paper:
The new part was primed (Hlafords plastic primer) and then sanded (1500):
Using the BMW paint and lacquer kit I painted silver - moving the masking area out slightly.

1. pre-heat an oven to 175C - remove all but the bottom shelf (set as low as possible)
2. cover the wooden cutout in silver foil
3. cover an oven tray in silver foil - the oven tray needs to be long enough for the end of the plastic sheet to sit on the edges of the tray.
4. place the oven tray, with plastic, in the oven
5. between 5 - 10 minutes the plastic will become malleable and sink in the middle
6. as soon as the plastic sinks, open the door and working in the oven (why you need to move the shelves) carefully wrap the plastic around the wooden profile block - I used a tea towel to hold the plastic - it's too hot to handle with bare hands... for me anyway.
7. remove from the oven and the plastic will harden quickly.
Below is my shaped plastic:

TO ADD: I didn't feel it was vital to get the profile perfect as I was able to bend it slightly as it was being attached to the bumper.
Making sure that I had the shaped plastic the correct way round for the RHS I then applied the masking tape cutout and cut the plastic to shape. This gave me the final piece I needed.

I then plastic welded the my new piece to the bumper. I used small cuts of the ABS plastic to fold into any gaps on the front.

As you can see above, it was a mess. Dremel tool with the sander attachment saw to that (took some time). I finished with a 800 + 1200 grit paper:

The new part was primed (Hlafords plastic primer) and then sanded (1500):

Using the BMW paint and lacquer kit I painted silver - moving the masking area out slightly.

Finish isn't great, mostly due to my backhandedness at sanding and painting. Also, as I did a very localised spray job there is a noticeable lip around the edge. I am happy with the plastic work though and, when I get a chance, will be taking this off to the guy that did my front bumper, get a proper paint job.
A couple of photos on the car, the jagged edges are the ridge next to the masking, not a plastic issue!

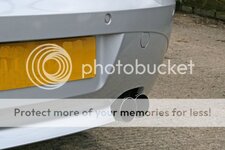
I decided to pass on a couple of offers to go away this Easter to get this done... am glad I did
Also, no steam update. Sorry people.
A couple of photos on the car, the jagged edges are the ridge next to the masking, not a plastic issue!


I decided to pass on a couple of offers to go away this Easter to get this done... am glad I did
Also, no steam update. Sorry people.
Similar threads
- Replies
- 2
- Views
- 937
- Replies
- 10
- Views
- 658