108 Refurb 2020

yg54sg

Active member
Hi All, I have read various threads on the 108's majority of which are years old has anyone had a set of 108's for several years and worked out the best refurb method to keep them free of corrosion? Its come to that time again where mine are in dire need of a refurb but I am unsure what to go with.

From reading all the threads it seems to me that putting them back to stock with the diamond cut rim you will always get corrosion after a year or so which is what happened the last time I had a returb so I think thats out.

Those that have had them completely power coated , I have found this to be the worst as I had it done on the stars and its flaked off in large lumps over the last 6 years.

I am thinking whatever the stock method is that the centres are done in ( standard paint?) seems the most durable and maybe have this done over the entire rim and stars? I have a spare rear that is factory with no work ever done on it while the outer rim is corroded to hell the centre star is perfect unlike the powder coated ones.

Options seem to be:

1) Painted Star / Painted Rim
2) Powercoat Star & Rim
3) Painted Star / DIY strip of rim to bare and use poorboys / wax / WD40 to keep corrosion away

I think I have ruled out diamond cut & clear coat as it seems to have a limited life.

I guess as usual its all down to how good the paint shop is, I had a bumper sprayed at a local paint shop looked amazing for 2 years then compared to the rest of the car 6 years on looks like rubbish. I hate to say it but the dealers repair work seems to be a cut above others as I also had a rear wing sprayed 10 years back and that looks perfect compared to the bumper.

Would be grateful for any input before I blow the £500 .... again! lol
 
It's not really an answer to your questions, but my 2nd E86 had 108s when I got it that had been refurbed by a previous owner, but I don't know if they were powder-coated or painted.

Anyway knowing it would be a matter of time before they would need doing again I bought a set of 295s on here and sold the 108s while they still looked good. :lol:

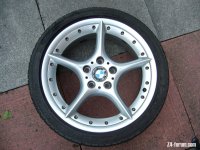
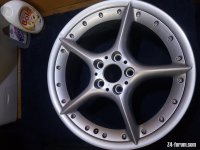
108 Front 1.JPG

If you want stick with 108s "mr_wilks" just bought a set needing a refurb, so it might be worth watching the classifieds on here!
 
Mine are in a shocking state too. I'm tempted to try the plastidip metallic sprays as a cheep n cheerful first-try solution when the winters go on next month.

My winters (non-108) are matt black plastidip and look as good now as when i dipped them 3 years ago, so its worth a try imo.
Will buffer the sharp ends of the stars with some paint-on rubber paint before spraying so the plastidip doest just rip over it.
Watch this space...
 
Got a scrappy set arriving tomorrow , i'l keep this thread updated , already regretting the purchase :oops: its been a while , not sure i have the inclination once i hit the first stubborn bolt :cry:
 
You did right mr tidy although to my taste ive always thought the 108's were the best. Good idea with the plasti dip chris , might be worth a try. Seems that 108's no matter how they are refurb'd end up knackered in the end , I guess addressing the reasons why they corrode faster than other alloys is probably the key ? From what I can see there are a few areas:

- Gaps between the star and the rim on front and back and under the star point .... (possibly fill with clear silicone sealant so its totally watertight after the paint job?)

- Bolt holes where the star is bolted to the rim, when they do up the bolts after a paint job the paint gets scratches away behind the bolt so corrosion starts working its way under the paint from there ( maybe need some type of sealant in there?)

I also have a set of Style 71's 17" I bought for my compact back in 2001, they are of the same split rim design and also came in the accessories book for the z4 when that was released , offsets are all correct too at 45/49 I think (same as 3 series e36) Id like to use those as my winter wheels and the 108's as summer but they also need a refurb so its a case of finding a good solution for both sets!

I read about the guys that have totally bare metal rim alloys and just keep them waxed all year round but reading CJ's thread he said this was a mistake when he forgot to wax them for a few weeks and pitting started . Makes me think I should just DIY refurb both sets to a polished rim no lacquerand send the inners off for standard paint then wax the hell out of them with a weekly dousing of WD40 on the parts you cannot get too with the wax? I think its either that or both inner and outer painted with whatever paint they use OEM. I think I am def avoiding power coating.
 
I think the biggest issue with them is the reaction between the titanium bolts and the alloy star and rim that causes galvanic corrosion (I think) and eventually lifts any sort of finish around the bolt-heads.

The thing that swung it for me was the 295s are also a 5 spoke design but without the split rims, and being an E89 wheel they sit much further out in the arches because of the different offsets.
 
If anyone figures out how to strip off powder coat diy I’m all ears. I’ve got 7 of these buggers in the yard all needing attention
 
Hi guys .
I also have the 108,s on .
I had them refurbished and at the time i wasnt so pleased as the place stripped them put them back together and powder coated the whole lot :cry: .
I got it cheap as this wasnt what i asked for .
That said when i bought another set as i had buckled a couple i had them done the same way taken apart stripped then back together and powder coated the whole lot bolts an all .
These have lasted nearly 3 years i have a couple of stone chips but no corrosion at all . :thumbsup:
The picc is of the original one that has a flat spot i intend to get it fixed and use as a spare , still it had been on the car about 15 months .
 

Attachments

  • 16032944494445079007345645484270.jpg
    16032944494445079007345645484270.jpg
    131.5 KB · Views: 799
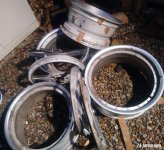
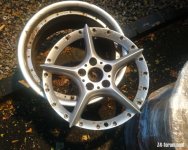
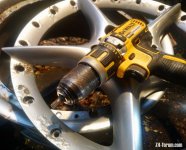
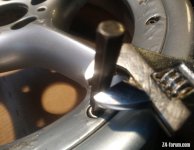
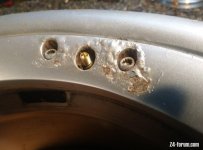
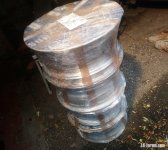
Said id keep the thread updated , arrived home 5-10pm , wheels stacked outside garage , fed the terriers then set about unwrapping & splitting , good to see i still had the knack :oops: 5o mins later ready for refurb :thumbsup:
 

Attachments

  • DSC_2529-01.jpeg
    DSC_2529-01.jpeg
    241.1 KB · Views: 777
  • DSC_2527-01.jpeg
    DSC_2527-01.jpeg
    165 KB · Views: 777
  • DSC_2528-01.jpeg
    DSC_2528-01.jpeg
    153 KB · Views: 777
  • DSC_2526-01.jpeg
    DSC_2526-01.jpeg
    105.6 KB · Views: 777
  • DSC_2524-01.jpeg
    DSC_2524-01.jpeg
    115.3 KB · Views: 777
  • DSC_2519-01.jpeg
    DSC_2519-01.jpeg
    236.6 KB · Views: 777
For those attempting first split there are a few tips that might help you.
1) strike each bolt head hard with lump hammer a few times prior to first turn.
2) don't be afraid to leave ones that don't move initially, often you will come back to it, repeat process & it moves.
3) get a feel for that moment that too much effort will round or snap the head.
4) once moved a turn or two having a spare bit in a decent battery drill saves a lot of effort & time
 
Could you tell me the size of the torx bit please, as ive got a set of 108’s that need a refurb and when ive tried a torx bit in the bolt head it feels a little loose.
Also, do you reuse the bolts or replace, as ive read that the bolts stretch ?
 
Dune19670 said:
Could you tell me the size of the torx head please, as ive got a set of 108’s that need a refurb and when ive tried a torx in the bolt head it feels a little loose.
Also, do you reuse the bolts or replace, as ive read that the bolts stretch ?

Been a while since i bought mine , like 6-7 yrs :o & probably split 15-20 sets with them , think its a M8 12 point spline , i have one approx 70mm which i use to "strike" the bolts hoping to free the seized or glued thread plus one approx 25mm i use in battery drill to remove once loose .
No way i'm replacing 80 bolts at £2 apiece , they are titanium , not worried about re using , the threaded part of the wheel barrel i would be more concerned over as its this area that seems to suffer rust or from freeing seized bolts , occasionally after the refurb process you find the odd bolt that just spins in the hole , it is only a very few & it isnt the bolt itself as swapping 2-3-4 only proves the same thing happens so its the rim not the bolt that has changed .
 
I seem to recal it being that also. M8 12 spline.
Mr Wilks method works a treat I also used some thread release spray but tbh I’m not convinced it did much.
The place near me was quoting ~40-50 quid +vat per piece to powder coat if I separated them. I spoke to them about the bolts breaking the powder when tightening and they said that shouldn’t happen if coated correctly. They offered a service that straightens wheels which they would’ve done and then let me separate the wheel for them to be sorted.

Any idea on torque setting for the bolts mr wilks
 
domsz4 said:
Any idea on torque setting for the bolts mr wilks

Now that's a topic in itself :P bearing in mind the age of the wheels , the possible number of times they have been apart previously , acid dipped , powdercoated , sandblasted etc for me it comes back to "feel" over the original recommended torque settings as they would have been devised on new materials .
Dependent on condition ( some obviously in worse order than others ) i have found on occasion that on tightening some bolts reach a point where they spin at the point you think they are reaching the point of being tight .
I also do them to a point where they all feel "tight" then go back a few hours later / day after & nip them all & its surprising how many get a turn more , i don't apply any glue to the threads & i don't apply any bead of silicone between the faces prior to re assembly .
If you have yours apart & want a powdercoat finish i can recommend http://tillingltd.co.uk/index.html near Preston , be about £160 for the 8 items :thumbsup:
 
Had mine done 5 years ago they were stripped back then powder coated rim and star then the star was painted and a diamond cut lip and all new bolts.

5 years on and the thing i thought would go was the Diamond cut lip but they still look the same the stars have picked some chips and let a bit of water in and the powder coated inner rim is starting to go in places.

The Diamond cut still looks as it does in pics in this album

https://www.flickr.com/photos/gaza62/albums/72157628883260773
 
mr wilks said:
domsz4 said:
Any idea on torque setting for the bolts mr wilks

If you have yours apart & want a powdercoat finish i can recommend http://tillingltd.co.uk/index.html near Preston , be about £160 for the 8 items :thumbsup:
Thought it might be something like that. I can’t imagine the actual torque would be massive anyway.

160 is very good I was quoted 40 per item +vat but that was including dipping and prep
 
Mr Wilks , you have inspired me to DIY split them then I think I’ll use your guys in Preston to paint. I took 5x 10⁸’s and 4x 71’s to the local tyre shop today to remove the tyres.

I have now put them in my garage and emptied 2 cans of wd40 into the bolts and the gaps between the inner and outer parts of the wheel.

I have ordered 3 different quality 12 point m8 bolt bits from 3 different manufacturers so hopefully a couple of them will be decent.

My questions are :

1) does the paint shop require them to be stripped of existing paint before you drop them off ? Any prep work to do ?

2) when they paint them is it ok to have the parts of the rim and inner that mate together to be painted ?

I intend giving each bold a whack with the hammer on the bit like you said. It looks like the 71s and the 108s use the same bolts , at least the heads are the same.
I have a spare rear 108 I can use as a donor should I break a bolt ... but let’s hope not

Thanks for your help on this .
 
yg54sg said:
Mr Wilks , you have inspired me to DIY split them then I think I’ll use your guys in Preston to paint. I took 5x 10⁸’s and 4x 71’s to the local tyre shop today to remove the tyres.

I have now put them in my garage and emptied 2 cans of wd40 into the bolts and the gaps between the inner and outer parts of the wheel.

I have ordered 3 different quality 12 point m8 bolt bits from 3 different manufacturers so hopefully a couple of them will be decent.

My questions are :

1) does the paint shop require them to be stripped of existing paint before you drop them off ? Any prep work to do ?

2) when they paint them is it ok to have the parts of the rim and inner that mate together to be painted ?

I intend giving each bold a whack with the hammer on the bit like you said. It looks like the 71s and the 108s use the same bolts , at least the heads are the same.
I have a spare rear 108 I can use as a donor should I break a bolt ... but let’s hope not

Thanks for your help on this .

"Sam" at Tilling will do any prep the rims / stars require so you just leave them once parted into 8 pieces .
Ive had countless sets of these refurbed & always mated the star & rim together fully painted / powdercoated .
Collecting mine on Saturday , will post up some pics :thumbsup:
 
Many thanks Mr wilks , while I was typing the last message , 2 of the bits arrived from amazon. I set to work in the garage and have removed all bolts from my spare 108 successfully. A couple were very stiff and gave that creaking sounds but a bit of elbow and they came right out. It seems to be the bolts nearest the star tops that are the stiffest the ones , the ones in the middle between stars seem easier.

My only issue now is the inner star and the rim appear to be stuck , have tried stamping on the back of the star with some wood around the rim and a few whacks with the hammer on the back of the star too but scared I might crack something!

This particular one has never been apart for a refurb , did bbs use any glue ?

Look forward to the pics , will find an image host and upload some from my phone.

With regards to the bolt holes assume they block them before they dip ? I don’t need to do that do I ?

Thanks
 
Back
Top Bottom