[SOLVED] 2012 SDrive35IS Roof Issues A68D

Justjeff1972

Member
 Nebraska
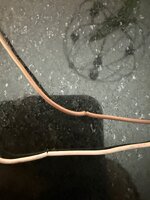
Hello All... I solved my SOS Failue problem and now have a roof problem. The roof opens fine but, while closing, I get the A68D fault and the roof travel stops. Description is "Micorswitch, roof shell 2 closed, right." With the car connected to Protool and watching life data from the microswitches on the rear roof shell, both switches change state when manually cycled. While closing, the roof stops about 2 inches above the rear deck and gives the warning. Neither the right or left switches indicate that they are closed when the error comes in but the only code it throws is the A68D. I've done a visual inspection on the wire loom and everything appears to be in good condition with no chafing. Manipulating the wires with the switch depressed does not cause it to change state so I don't think it is a broken wire. It almost seems like the logic is looking for the switch too soon. This just started happening. I have not done any coding on the convertible top or anything else that would affect that. I recorded a video here:

In order to latch the roof, I have to turn off the car and wait for hydraulic pressure bleed off and for the roof to drop to the deck. Once it is past whatever point is throwing the code, I can clear the code and latch the roof. This means that I'd have to keep a tablet and Protool handy in order to reliably be able to close the roof. Not ideal.

All of the coding options for the roof are in German. I wouldn't have any idea where to start adjusting sensitivity to see if I can get it working reliably again. Any help would be greatly appreciated.
 
⌛ E89: Collection of the 9 typical age-related defects in the roof environment

...both switches change state when manually cycled.
That's only a static view exactly in that position of the roof shells. Don't underestimate the mechanical dynamic in the wiring while moving the shell's.

With the car connected to Protool and watching life data from the microswitches on the rear roof shell, both switches change state when manually cycled.
AFAIK Protool can display only "YES" and "NO".

INPA instead shows exactly when a sensor signal is disturbed by a short or damage.
That's a unique INPA feature!

While closing, the roof stops about 2 inches above the rear deck and gives the warning.
That is
  • a broken sensor wire
  • two shorted sensor wires due to broken insulation at the same point
There are six bows of up to 180° our sensor wires as well as the hydraulic hoses get bended. That is exactly the place your wiring is faulty.

I've done a visual inspection on the wire loom and everything appears to be in good condition with no chafing.
Not possible at all, even not for me!

It almost seems like the logic is looking for the switch too soon.
Pardon, what a nonsense.

Did you ever had a look at the collection of the typical roof issues and it's examples?
I don't think so.

All of the coding options for the roof are in German. I wouldn't have any idea where to start adjusting sensitivity to see if I can get it working reliably again. Any help would be greatly appreciated.
Funniest idea ever!

Question:
How to code a mechanical switch touched by a hydraulic ram to change it's "sensitivity"?

God thank's that all coding options are in German! Keep your fingers off, that is absolutely the wrong direction.


Examples:
6 sensor lines in the upper bow of the rear roof shell representing all 116,000 Z4 worldwide:

MS roof shell 2 right - broken
E89_MSDS2_rechts_cpr.jpg

HS roof shell 2 right - still working fine :D
E89_HSDS2_rechts_cpr.jpg

MS roof shell 2 left- still working fine
E89_MSDS2_links_cpr.jpg

In addition the same situation in the 2 inner bows, as well as for all hydraulic hoses:
E89-1_cpr.jpg
 
Last edited:
  • Like
Reactions: B21
Thank you for the links and photos. I’ll cut the zip ties and do a more thorough inspection of the harness. I’ve read elsewhere that these switches are not Open/closed but rather have two different resistance measurements based on state. I have a new switch on order, just in case. I won’t have time to deal with this until next weekend and want to have materials on hand, so it was worth the cost for the part. If it isn’t the switch, I can hold onto it for an eventual failure. Shame they are not the same for both sides.
 
It's never one of the switches in the rear roof shell. Don't touch it, as you won't get a new one mounted.
 
Understood. I cancelled the order. When You repair these do you rewire across both bows (behind the switch and forward of the ram) or just the damaged one? Does it break in one bow more frequently than the other? Also, do replace the wires for the hall switch at the same time, while the harness is unwrapped?

The car has less than 50k miles and has been garaged for its life. I’m the third owner.
 
Well,
Have a look at my rebuild weeks ago:

I remove the rear roof shell (2x3 T40 glued(!) screws, have to be heatened with a heat gun, individual number of spacers per screw) and re-wire it over all 3(!) bows on both sides of the car down to the CTM, 2x2 wires on the right, 2 wires on the left.

Short explanation of the roof's functionality:
 
Last edited:
When you say glued, does that mean red loctite? Since you said remove with heat, I assume so. When you re-install do you use red or medium blue for future disassebly ease. I'd imagine those bolts are not very subject to backing out even with repeated roof cycles. Again, I appreciate you taking the time to help. I think I have enough information to move forward. I have flexible control wire, cloth loom tape, and abrasion resistant wire wrap, similar to what it looks like you've installed. I also have a variety of marine heat shrink. Do you make the repair with solder or have you ever used solder seal butt connectors (the heat shrink kind with the solder in the seal)?

Again, thanks for taking the time to help. I'll be sure to follow up with photos and the solution. Enjoy what's left of your Sunday evening.
 
Regarding the roof shell read this HowTo carefully:

Guide for replacing old hydraulic lines

You have to replace the 6 old screws with new ones from BMW. These are pre-glued! Don't risk anything else.

54377220536

The two connectors of the window heating are very instable and will be teared off from the window. I spray some silicone spray on it, wait 10 mins and pull the plugs very, very carefully off.


New wires can be connected via male MQS pins directly into the original connectors of each sensor as well as with female MQS pins into the CTM plugs.

I prefer soldering new wires into the existing lines and hate those "solder seal butt connectors", as they are too big in most areas.

Bild1.jpg
 
Last edited:
  • Like
Reactions: B21
Does anyone know the torque value for the rear roof bolts? Tech manual copy I have only says 54 37 11AZ. There is no torque table to reference to find that value. Thanks.
 
In general, these are links / references to another sheet.

11AZRoof shell to linkage
E89M8x2023 Nm
Perfect. I have a downloaded version of a 2013 manual but it is missing the table of contents and the torque tables... Are there any good sites to get a trusted version of to document or even a link to the torque tables? I'm fine paying for a download...even signing up for TIS for a day if that is the right answer, but $2700 a year for access to TIS is a little over the top for a do it yourselfer and I don't want to get scammed and end up buying a copy of the download I already have. If there are links that you cannot post here, please PM. The three connection points are the circles in the picture... right? (two to the roof and one on the linkage for the lift arm) Thanks.

I read on the link you sent for the roof hydraulics that the gap between the front and rear roof should be 4mm. I was going to 3D print some gauges to set in the gap before I tighten down the screws. Is there a better process? I didn't see anywhere in your post (thankfully Google understands German becuase I do not) or on the hydraulics thread. The hydraulics thread lists the gap but not how he achieved it.

Lastly, the manual I have says to remove the tab on the center bottom of the rear shell before re-fitting the shell and then to re-install after adjusting and tightening down the shell. I didn't see anything about this in your post or the hydraulics post from LordLolzeye for the hydrualics. Is this step necessary? Any harm in doing it that way?1762002835531.png
1762002879174.png

Thanks again.
 

Attachments

  • 20250913_122615_cpr_circles.jpg
    20250913_122615_cpr_circles.jpg
    368.5 KB · Views: 6
Disregard about the torque tables. I figured out why my search didn't find it in the manual... The table is 54 37 and the line is 11AZ. I searched "54 37 11AZ" which only brought up the link in the manual but didn't find the table.

1762003765538.png

Mine lists 19 Nm vice 23 Nm. Are the torques between the pre and post facelift Z4s that different? Like I'd mentioned, my manual is a 2013 35is.
 
Don't worry about the difference, I didn't mention that before.

Important: the 6 screws have to be renewed!

Once the screw has been tightened to this torque, the screw's adhesive does the rest.

No readjustment is necessary if the 6 screws are marked with a white marker before loosening them.
 
Last edited:
I read on the link you sent for the roof hydraulics that the gap between the front and rear roof should be 4mm.
Didn't read that till now. :rofl:

If the original screw positions were marked beforehand, you will find them again during reinstallation.

My screw numbering (from front to back):

Right side: 1, 2, 3, (7 for the rear screw of the front roof shell, if it needs to be loosened)

Left side: 4, 5, 6, (8)

During reinstallation, I first secure screws 1 and 3, then 4 and 6 with their respective shims.

Next, I take a test drive to check the gap between the two shells. The screws on the left or right may need to be readjusted.

After successful installation, I finally insert screws 2 and 5 with their shims. A second test drive, then tighten all screws to the specified torque.

The two connectors of the window heating are very instable and will be teared off from the window. I spray some silicone spray on it, wait 10 mins and pull the plugs very, very carefully off.
Be very, very careful when putting back the window heating connectors to not crack it off the window!
 
Last edited:
In case anyone had any doubts, RobbiZ4 was right. Gonna tear into the left side while I’m here.

Some observations from a new Z4 owner working on his car for the first (of many) times.

- The roof bolts take a lot of heat. I used a 1500 W heat gun on high with my hand on the paint side to make sure I wasn’t overheating the paint. Even with that, it took a 1/4” impact to get it loose. You’ll need a 3” T40 for the middle bolts because the linkage is in the way. Too short and you hit the linkage. Too long and you can’t get between the front roof and the bolt.
- The roof weight is manageable. I took it off by myself. I’ll have help to put it back on though and make sure everything is lined up.
- Mark the center of the screws location on the bracket with a paint pen. Mark it front to back and side to side because the screw has room to move in two directions in its opening.
- the service manual specifies how wide the gap should be between the front and rear roof. The 2013 manual I have says 2mm +/- 1mm. Another thread I saw had 4mm. If anyone knows the correct answer for a pre-facelift E89, please feel free to share. I’m planning to 3d print some gauges and use that to adjust the gap. If it works well, I can post them on Thingiverse. If anyone needs some, let me know and I can send them out, just cover shipping. It will only be a couple of cents in material each. Good use of remnant spools.
-Robbi suggested spraying the defroster connections with silicone spray. I did that and the came off pretty easily with a bit of wiggling. No major drama. Not sure if it helped but it definitely didn’t hurt and I already had it in hand.

I still have to figure out how to get the wires out of the front roof without taking that off. Manual says to not take off both. Warns about that a few times so better to heed that advice. I may just splice in wires from where it comes out of the front roof and worry about the section from the trunk to the new wire another time. I’m taking a break before I make a stupid decision. I’ll go back to it in a bit and figure out the way forward.

IMG_0297.jpegIMG_0295.jpeg
 
- The roof bolts take a lot of heat. I used a 1500 W heat gun on high with my hand on the paint side to make sure I wasn’t overheating the paint. Even with that, it took a 1/4” impact to get it loose. You’ll need a 3” T40 for the middle bolts because the linkage is in the way. Too short and you hit the linkage. Too long and you can’t get between the front roof and the bolt.
I heat it to 220 °C by placing a 5 mm nozzle directly onto the screw heads for about 20-30 seconds. The rear (horizontal) screws usually don't need to be heated.

- the service manual specifies how wide the gap should be between the front and rear roof. The 2013 manual I have says 2mm +/- 1mm. Another thread I saw had 4mm. If anyone knows the correct answer for a pre-facelift E89, please feel free to share. I’m planning to 3d print some gauges and use that to adjust the gap. If it works well, I can post them on Thingiverse. If anyone needs some, let me know and I can send them out, just cover shipping. It will only be a couple of cents in material each.
IMHO that's far too complicated. As described above, adjust it to the previous markings, check it once, correct it if necessary, and then attach it.

I still have to figure out how to get the wires out of the front roof without taking that off.
Not taking off the front shell, but loosing both rear screws (as said, 7 & 8 with individual shims) sitting behind the two long horizontal springs. These can be found after removing the front roof trim panel.

Two inner zip ties must be removed (and later on re-placed with new ones - take photos!!), then the wiring harness can be pulled out.

Easy going. ;)
 
Last edited:
Six for six. The left side wires were on the verge too. PO timed that well. I’m pretty comfortable in my belief that he didn’t know it was a problem because he demonstrated that the top worked even before I asked. First two weeks of ownership have been fun. Can’t wait to see what comes next. (Oil pan…oil pan comes next).
 

Attachments

  • IMG_0308.jpeg
    IMG_0308.jpeg
    948 KB · Views: 4
Back
Top Bottom