So I have just put in the footwell speakers for my budget upgrade, I am following up with a bit of a write up with a few pics and tips rather than a full how to, its a fairly simple job if a little fiddly from time to time mostly due to access.
I started off with the door speakers..most people use this guide for removing the door card https://www.youtube.com/watch?v=LnyP_-vs3T4
The guy is a bit brutal with his removal , try to be a bit gentler, you will inevitably break one or two clips though so worth having some on hand..i got mine here https://www.amazon.co.uk/gp/product/B08BKNXZSP/ref=ppx_yo_dt_b_asin_title_o05_s00?ie=UTF8&psc=1
There are 4 screws on the door cards, one is difficult access, in the above video the guy is saying the trim is super tight and he keeps on wrenching it away, that big pop it makes when he finally wrestles it off is the the sound of the mount snapping off The fourth screw is hidden behind a tricky to remove clip cover, after trying a selection of trim tools and screwdrivers to remove it i found the only thing that got it out was the tiniest flat head in a set of precision screwdrivers by going in at the top flat part, pic attached for reference
.jpg")
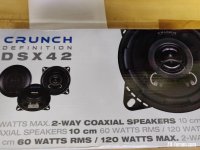
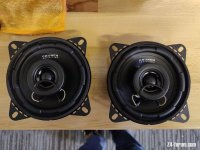
I opted for German made Crunch dsx42 speakers due to a very reasonable price of £30 a pair and very favourable reviews and I have to say they lived up to those reviews, well built and great sounding, the door speaker change yielded the most dramatic improvement in the whole change and if you were to go no further you would still have a substantial improvement on the old system, Clarity is the keyword here, midranges are massively improved, suddenly you are hearing frequencies not heard before, guitars go from muddy and distorted to crystal clear and defined and vocals are much improved a real day and night improvement.


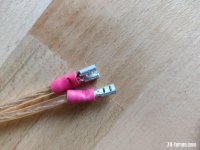
Now the speakers are not plug and play, you will have to cut the connectors off and make new connectors on the harness (i used electric block connector as I had some lying around but you may want to solder or use bullet connectors, or good old fashioned twist em up and insulating tape ..c'mon we've all done it) the speakers came with spade connectors and some wiring to connect up to your harness.
Fitting is a bit trickier, there are no listed adaptor rings for the e89, now i think connects2 make an adaptor of 102mm which by my measurements should work but i offer no guarantee https://connects2.com/Product/ProductItem/CT25BM10 they also do a 100mm which may also work.
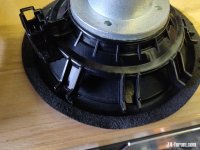
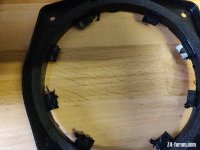
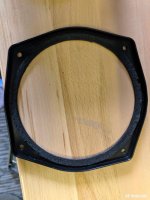
The speakers are crap though eh and I'm on a budget so i went down the cut and shut route of taking them apart with a dremel and using the mounting points from them, cut through the ridges on the rear and the speaker will lift out, then just cut away any excess and smooth all around with a file or sand attachments on your dremel , the following pics are from the footwell speakers but its the same process for all of them, obviously you don't get a factory look finish but once everything is in place there is nothing to see when all covers go back on


In all honesty the hardest part of the whole process was putting the door cards back on which was just plain fiddly for some reason but straightforward enough to get there eventually without too much cursing, mainly just getting everything lined up properly and popped in.
Shoulder speakers were the easiest of the lot, cover just pops off, unscrew and cut the loom, refit with your new speakers as you did with the doors, again i cut up the crappy old speakers for the adaptors but you could try some of the connects2 adaptors should you wish.
Originally i tried some Pioneer speakers to save a few quid but if anything they sounded worse than the originals so I returned them and went with another set of Crunch. The head unit obviously heavily uses the front sound stage and the change of the rears is not as dramatic as the front but what you do notice again is the clarity and how much cleaner the soundtrack is, well worth 30 quid.
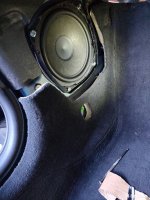
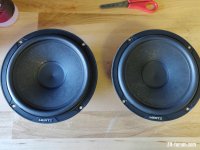
Footwells were the trickiest to work on and speakers are generally more expensive at the larger size, I settled on a pair of Hertz 165 at 81 quid seemed good blend of quality and price https://www.amazon.co.uk/gp/product/B07H2CY8F6/ref=ppx_yo_dt_b_asin_title_o01_s00ie=UTF8&psc=1

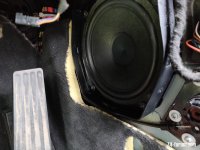
You start by unscrewing the 3 posi head screws under the dashboard on each side and lifting away the plastic trim, drivers side has 2 electrical connectors, passenger side just 1, then remove the panels. This just leaves the fiddly side trims, you will need to unscrew the bonnet release catch lever on the driver side which then shows a hidden screw once these are removed its just a matter of teasing them out. The Hertz speakers has no wiring or connectors so i had to make up a wee loom
for some odd reason the passenger speaker was secured with 4 8mm bolts and the drivers 4 t20 torx screws..go figure..same process here with stripping down the speakers for mounts...again no mounts listed as fitting the e89 ..I found these online which have the same basic shape with narrower mounts at the bottom, whether it fits or not I don't know but its certainly the right shape/size but i can offer no guarantee https://www.amazon.co.uk/Front-Speaker-Adapters-Rings-Spacers/dp/B01LVTW1N2
The driver side has an extra mount for some reason that you can reuse, just drop your new speaker straight in and place the adapter over the top

You'll need to cut into the wiring and connect up again as with the other speakers but its all pretty straightforward.
Here's a wiring diagram i used to ensure the positive/negative terminals are wired up correctly, its from a different car and set up but the 6 speaker we are replacing here match up perfectly

A little silicone lubricant on the speaker panels when back on will help a lot as they are quite tricky to put back on, also gloves when taking off as there are some sharp edges but the speakers themselves go in pretty easily
The speakers are a very good upgrade, with mid bass a big improvement I could actually physically feel the bass in the car for the first time rather than just hearing a bit now and then, there is still some distortion with deep bass if you run at full belt but I think without a dedicated amp and proper subwoofers that will always be the case
View attachment 2View attachment 1
So all in this has cost me £141 and it has transformed the sound quality which with the heavily equalized head unit was always going to be a challenge without spending a small fortune. I run the settings at +3 rear for the fader, +8 treble and +7 bass and it really does sound so much better, previously you couldn't even run the bass at 0 without distortion even on mid basses never mind anything deep.
As mentioned you could just replace the door speakers and even with a set of modest speakers you gain a substantial and the most dramatic improvement imho, followed by the footwells giving lovely mid basses and lots more clarity throughout the range, the shoulder level speakers probably gave the least improvement but I think that's mainly down to how the head unit sends the signal as they were always quite quiet to begin with, however when you install one speaker at a time and you test the difference from side to side its very clear that the new speakers offer more clarity and range, indeed on one test track there were certain keyboard elements that couldn't be heard at all in the factory speaker that were clear and bright in the new one, for 30 quid a no brainer to improve the overall function
It seems this post got a bit more involved than i thought it would but I hope it goes some way to guide anyone wanting to give it a shot as there is very little out there on the web to help
I started off with the door speakers..most people use this guide for removing the door card https://www.youtube.com/watch?v=LnyP_-vs3T4
The guy is a bit brutal with his removal , try to be a bit gentler, you will inevitably break one or two clips though so worth having some on hand..i got mine here https://www.amazon.co.uk/gp/product/B08BKNXZSP/ref=ppx_yo_dt_b_asin_title_o05_s00?ie=UTF8&psc=1
There are 4 screws on the door cards, one is difficult access, in the above video the guy is saying the trim is super tight and he keeps on wrenching it away, that big pop it makes when he finally wrestles it off is the the sound of the mount snapping off
The fourth screw is hidden behind a tricky to remove clip cover, after trying a selection of trim tools and screwdrivers to remove it i found the only thing that got it out was the tiniest flat head in a set of precision screwdrivers by going in at the top flat part, pic attached for referenceI opted for German made Crunch dsx42 speakers due to a very reasonable price of £30 a pair and very favourable reviews and I have to say they lived up to those reviews, well built and great sounding, the door speaker change yielded the most dramatic improvement in the whole change and if you were to go no further you would still have a substantial improvement on the old system, Clarity is the keyword here, midranges are massively improved, suddenly you are hearing frequencies not heard before, guitars go from muddy and distorted to crystal clear and defined and vocals are much improved a real day and night improvement.
Now the speakers are not plug and play, you will have to cut the connectors off and make new connectors on the harness (i used electric block connector as I had some lying around but you may want to solder or use bullet connectors, or good old fashioned twist em up and insulating tape
..c'mon we've all done it) the speakers came with spade connectors and some wiring to connect up to your harness.Fitting is a bit trickier, there are no listed adaptor rings for the e89, now i think connects2 make an adaptor of 102mm which by my measurements should work but i offer no guarantee https://connects2.com/Product/ProductItem/CT25BM10 they also do a 100mm which may also work.
The speakers are crap though eh and I'm on a budget so i went down the cut and shut route of taking them apart with a dremel and using the mounting points from them, cut through the ridges on the rear and the speaker will lift out, then just cut away any excess and smooth all around with a file or sand attachments on your dremel , the following pics are from the footwell speakers but its the same process for all of them, obviously you don't get a factory look finish but once everything is in place there is nothing to see when all covers go back on
In all honesty the hardest part of the whole process was putting the door cards back on which was just plain fiddly for some reason but straightforward enough to get there eventually without too much cursing, mainly just getting everything lined up properly and popped in.
Shoulder speakers were the easiest of the lot, cover just pops off, unscrew and cut the loom, refit with your new speakers as you did with the doors, again i cut up the crappy old speakers for the adaptors but you could try some of the connects2 adaptors should you wish.
Originally i tried some Pioneer speakers to save a few quid but if anything they sounded worse than the originals so I returned them and went with another set of Crunch. The head unit obviously heavily uses the front sound stage and the change of the rears is not as dramatic as the front but what you do notice again is the clarity and how much cleaner the soundtrack is, well worth 30 quid.
Footwells were the trickiest to work on and speakers are generally more expensive at the larger size, I settled on a pair of Hertz 165 at 81 quid seemed good blend of quality and price https://www.amazon.co.uk/gp/product/B07H2CY8F6/ref=ppx_yo_dt_b_asin_title_o01_s00ie=UTF8&psc=1
You start by unscrewing the 3 posi head screws under the dashboard on each side and lifting away the plastic trim, drivers side has 2 electrical connectors, passenger side just 1, then remove the panels. This just leaves the fiddly side trims, you will need to unscrew the bonnet release catch lever on the driver side which then shows a hidden screw once these are removed its just a matter of teasing them out. The Hertz speakers has no wiring or connectors so i had to make up a wee loom
for some odd reason the passenger speaker was secured with 4 8mm bolts and the drivers 4 t20 torx screws..go figure..same process here with stripping down the speakers for mounts...again no mounts listed as fitting the e89 ..I found these online which have the same basic shape with narrower mounts at the bottom, whether it fits or not I don't know but its certainly the right shape/size but i can offer no guarantee https://www.amazon.co.uk/Front-Speaker-Adapters-Rings-Spacers/dp/B01LVTW1N2
The driver side has an extra mount for some reason that you can reuse, just drop your new speaker straight in and place the adapter over the top
You'll need to cut into the wiring and connect up again as with the other speakers but its all pretty straightforward.
Here's a wiring diagram i used to ensure the positive/negative terminals are wired up correctly, its from a different car and set up but the 6 speaker we are replacing here match up perfectly
A little silicone lubricant on the speaker panels when back on will help a lot as they are quite tricky to put back on, also gloves when taking off as there are some sharp edges but the speakers themselves go in pretty easily
The speakers are a very good upgrade, with mid bass a big improvement I could actually physically feel the bass in the car for the first time rather than just hearing a bit now and then, there is still some distortion with deep bass if you run at full belt but I think without a dedicated amp and proper subwoofers that will always be the case
View attachment 2View attachment 1
So all in this has cost me £141 and it has transformed the sound quality which with the heavily equalized head unit was always going to be a challenge without spending a small fortune. I run the settings at +3 rear for the fader, +8 treble and +7 bass and it really does sound so much better, previously you couldn't even run the bass at 0 without distortion even on mid basses never mind anything deep.
As mentioned you could just replace the door speakers and even with a set of modest speakers you gain a substantial and the most dramatic improvement imho, followed by the footwells giving lovely mid basses and lots more clarity throughout the range, the shoulder level speakers probably gave the least improvement but I think that's mainly down to how the head unit sends the signal as they were always quite quiet to begin with, however when you install one speaker at a time and you test the difference from side to side its very clear that the new speakers offer more clarity and range, indeed on one test track there were certain keyboard elements that couldn't be heard at all in the factory speaker that were clear and bright in the new one, for 30 quid a no brainer to improve the overall function
It seems this post got a bit more involved than i thought it would but I hope it goes some way to guide anyone wanting to give it a shot as there is very little out there on the web to help
Attachments
-
 IMG_20201024_113010 (2).jpg119.2 KB · Views: 3,707
 -
 IMG_20201007_165536.jpg133.6 KB · Views: 3,704
 -
 IMG_20201007_165544.jpg166.3 KB · Views: 3,705
 -
 IMG_20201024_091438.jpg170.4 KB · Views: 3,705
 -
 IMG_20201024_091442.jpg182.8 KB · Views: 3,705
 -
 IMG_20201024_094444.jpg122 KB · Views: 3,702
 -
 IMG_20201023_170238.jpg147 KB · Views: 3,703
 -
 IMG_20201023_172058.jpg252 KB · Views: 3,704
 -
 IMG_20201024_101450.jpg170.8 KB · Views: 3,701
 -
 IMG_20201023_153402.jpg142.8 KB · Views: 3,690


")