You are using an out of date browser. It may not display this or other websites correctly.
You should upgrade or use an alternative browser.
You should upgrade or use an alternative browser.
How-To: E86 CD changer cables for BlueMusic Bluetooth
- Thread starter inkey$
- Start date
I purchased a GROM USB3 with the BT attachment (Which looks identical to the blue music one - except the wiring goes into an auxiliary cable as opposed to the cd changer cables).
The GROM worked great and recently appears to have packed in. The USB function doesn't work nor the bluetooth. From reading other reports online, a number of people have said their GROM units have failed after about 2 years of use.
I don't want to keep changing this every 2 years. Does anyone have any recommendations for the best bluetooth kit available purely for streaming music?
I was thinking to just get the bluemusic one but have also read a lot of reviews stating they have stopped working after a short while.
Bluemusic one is cheap enough to buy two or three in reserve. So far, so good with mine although its relatively young still. Cant understand why it would pack in though, as it's a simple enough powered attachment.
Cant recommend it enough actually. I have OEM mic in the car and when a call comes in or goes out, the music stops, the nav screen flips up and I can answer from the wheel.
Cant recommend it enough actually. I have OEM mic in the car and when a call comes in or goes out, the music stops, the nav screen flips up and I can answer from the wheel.
inkey$ said:Bluemusic one is cheap enough to buy two or three in reserve. So far, so good with mine although its relatively young still. Cant understand why it would pack in though, as it's a simple enough powered attachment.
Cant recommend it enough actually. I have OEM mic in the car and when a call comes in or goes out, the music stops, the nav screen flips up and I can answer from the wheel.
Thanks for your feedback! I'm trying to explore if GROM will repair or replace the existing unit. Failing that, I may go for a bluemusic one!
Major Mojo
Member
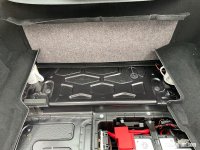
inkey$ said:1) Remove battery cover floor panel.
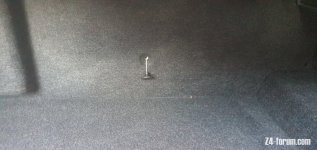
2) Remove the two plastic retaining screws holding in the carpet where the boot ‘steps’ up.
3) Pull back carpet to bulkhead.
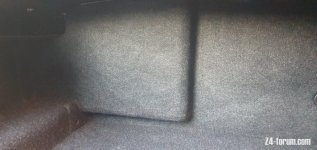
4) Lift out right side trim panel enough from the bottom and place something sturdy underneath to keep it held up (this requires a little force once you’ve push-released the trim tabs that fold into the rear bulkhead section)
5) Repeat this step on the left side, being careful not to damage the trim. Wedge this side too.
6) You should now have a gap almost the back bulkhead of around 10cms to root around in.
7) Cables should be somewhere in the centre. Get your hand up and into the recess behind the rear centre console. For me, thats where they were.

My entire attempt at this has been a balls up. I got to step 6, but cannot see how you managed the bottom half of that photo? After pulling out the carpet screws on the bottom piece (15 minutes of "unscrewing" got now where so I ripped the out) I propped up the two side panels with cups this is what mine looks like:

But the problem is my bulkhead carpet piece is rigid just like the floor piece covering the battery! I manage to pull it out a bit but only enough to get a finger in. I can feel the bundle but cannot see or get at anything. What did you do to actually get the bulkhead carpet up?!?!? :headbang:
inkey$ said:Failing that then other options are things like AUX with powered BT dongle
Hi all, this is a great write up, I have tried the AUX BT dongle but the sound are not coming out on all speakers. Once I switch back to radio or CD it works fine. Is this normal?
Major Mojo: man that sucks. Step 6 is the really difficult part. Feels counterintuitive to pull the edges of that rear bulkhead trim up (the rigid horizontal bit behind your mugs in the picture you posted), but it does go and you need to wedge something under it very quickly.
Just needs some force in one corner then the other. Helps also if you can pull up and away those side panel trim bits you currently have the mugs holding up. Just the one side works to get things moving.
AnthonyK: Have you checked the volume of the phone? Sometimes it needs to be turned up. Think is also depends on if you have DSP or not (‘not’ is easier).
Major Mojo
Member
inkey$ said:Major Mojo: man that sucks. Step 6 is the really difficult part. Feels counterintuitive to pull the edges of that rear bulkhead trim up (the rigid horizontal bit behind your mugs in the picture you posted), but it does go and you need to wedge something under it very quickly.
Just needs some force in one corner then the other. Helps also if you can pull up and away those side panel trim bits you currently have the mugs holding up. Just the one side works to get things moving.
Thanks Inkey. I sliced the crap out of a couple of knuckles last weekend but I am driving back to London from Ireland on Monday so will give it a go again this weekend...fingers crossed!
My hands only just recovered too :lol: Keep going and keep us posted.Major Mojo said:inkey$ said:Major Mojo: man that sucks. Step 6 is the really difficult part. Feels counterintuitive to pull the edges of that rear bulkhead trim up (the rigid horizontal bit behind your mugs in the picture you posted), but it does go and you need to wedge something under it very quickly.
Just needs some force in one corner then the other. Helps also if you can pull up and away those side panel trim bits you currently have the mugs holding up. Just the one side works to get things moving.
Thanks Inkey. I sliced the crap out of a couple of knuckles last weekend but I am driving back to London from Ireland on Monday so will give it a go again this weekend...fingers crossed!
BobbyBoucher
Member
Anyone in S Wales area want to show me how to fit this (lockdown permitting lol).
Felt inclined to respond since ordered this from Amazon and just got it installed. A few remarks:
- my 04 Z4R has DSP, Satnav, and old school fixed telephone. In Vin decoder I dont have cd changer prep listed. Still the cables were there and it works without an extra adapter!
- Sound quality on a DSP car is great, way better than via the FM transmitter I used earlier. Unfortunately on the Satnav screen it does NOT show track title or artist, which non Satnav units seem to do via RDS display.
- Push up the back carpetliner was very hard for me too. In the Grom YT video it shows as easy but my car also has a more rigid type, plus an extra rigid bulge on the left (whats in there?) and a pulling cord of some sort which holds it back. I barely managed to get my hand under and blindly attached the dongle.
Im looking for a way to fixate it since now its just loose in the space behind the carpet


Hi
I’ve been following these instructions with my mid-2006 E86 Z4 and am stuck at step 7. I can feel the cables (or at least what I think are the cables) connected into the CD changer, however I cannot get the connectors loose. I don’t want to pull on the cables for fear of the wiring ripping out of the connector. Is there a clip or a trick to getting the connectors loose from the CD changer?
Thanks,
Malcolm
Malcolmvs said:Hi
I’ve been following these instructions with my mid-2006 E86 Z4 and am stuck at step 7. I can feel the cables (or at least what I think are the cables) connected into the CD changer, however I cannot get the connectors loose. I don’t want to pull on the cables for fear of the wiring ripping out of the connector. Is there a clip or a trick to getting the connectors loose from the CD changer?
Thanks,
Malcolm
Hi Malcolm.
For me, the cable was situated in the little recess behind the CD changer area and all I needed to do was unfurl them out and connect up the the adaptor. Yours may be taped down perhaps? Could you get a camera phone in there and take a few pics to see whats going on? Mine doesn't have a CD changer, so will likely be slightly different.
inkey$ said:Yours may be taped down perhaps?
Mine is connected into the CD changer. I think there is a clip in the connector that secures the connection to the CD changer. I'll try get a camera in there and see how to release it. I'll post an update when I do
Weston Matt
Member
I only have the smaller connector plugged in to my changer. There is no other plug in the changer. Ideas anyone?
ZedsDeadbabyZedzdead
Member
Hi
I’ve attached the Bluemusic dongle to the back of the multi changer successfully and paired with the Bluetooth on my phone however my oem business heaD unit will not display the CD option so how would I connect please?
I’ve attached the Bluemusic dongle to the back of the multi changer successfully and paired with the Bluetooth on my phone however my oem business heaD unit will not display the CD option so how would I connect please?
FelipeFlop
Member
Massive thanks for this guide.
Made it an ‘almost’ painless experience. I already had an intravee installed so it was just a matter of unplugging that and plugging in the dongle.
The intravee was fine, but my phone length, plus the connector, plus the lightning to 30 pin adapter meant I couldn’t put the phone on the shelf and shut the cubby door. Plus I had to take my phone out of it’s case to get the adapter to plug in properly. Was a lot of faff.
So to have instant audio Bluetooth connectivity is a revelation!
+1 for the write up.
Installed this afternoon. The bulk of the effort was getting the carpet up, and then fiddling around trying to find the plugs. (I don't have the changer either - the wires were there, but were taped down to the bulk head out of sight, which threw me slightly).
Once located, installation took seconds. Delighted with the end result. Thanks for sharing the knowledge!
Jamesgofast
Member
Hi,
Im about to attempt to install a Grom USB into the back of my E86 via trunk install. Im using this install as a guide as it also connects via the CD changer prep cables (I have nav head unit, non DSP).

Ive seen a different install method which requires removal of a ton of trim pieces in order to reveal the trunk back wall where the amp etc is. This method above seems much more straight forward.. however, forgive me for being a n00b, but how do you remove the plastic 'screws' or 'buttons' that hold the carpet down? Ive been trying to lever them up with a trim removal tool but they wont pop so readily and Im worried im going to shear their heads off. Any clues?

Cheers
Im about to attempt to install a Grom USB into the back of my E86 via trunk install. Im using this install as a guide as it also connects via the CD changer prep cables (I have nav head unit, non DSP).

Ive seen a different install method which requires removal of a ton of trim pieces in order to reveal the trunk back wall where the amp etc is. This method above seems much more straight forward.. however, forgive me for being a n00b, but how do you remove the plastic 'screws' or 'buttons' that hold the carpet down? Ive been trying to lever them up with a trim removal tool but they wont pop so readily and Im worried im going to shear their heads off. Any clues?

Cheers