Windshield Weather Strip - Part #?? SOLVED

StudioWizard

Member
 Los Angeles, CA, USA
I recently attempted to buy the rubber seal that goes around the windshield. I ordered an OEM part, but it's actually the thicker moulding that runs about an inch off the windshield. This is part # 51317017021, which is the WRONG part. So, I talked to another parts dealer that gave me this part #: W0133-3047755.

Can anyone here verify if the second one is the one I need? (In the picture, it's the area I'm pointing to.) I'm nervous I'll get the outer moulding again. haha

Thanks!
 

Attachments

  • PXL_20230506_185754582.jpg
    PXL_20230506_185754582.jpg
    194 KB · Views: 943
Also, I've watched a couple of videos about replacing this stripping and it appears there's no glue - simply friction. Is that correct?

The moulding, which is above it, DOES have glue. How do I know? Because I excitedly removed the part from the package to install on the windshield and quickly realized it was the wrong size plus I had black glue on me.
 
StudioWizard said:
I recently attempted to buy the rubber seal that goes around the windshield. I ordered an OEM part, but it's actually the thicker moulding that runs about an inch off the windshield. This is part # 51317017021, which is the WRONG part. So, I talked to another parts dealer that gave me this part #: W0133-3047755.

Can anyone here verify if the second one is the one I need? (In the picture, it's the area I'm pointing to.) I'm nervous I'll get the outer moulding again. haha

Thanks!
I recently bought BMW part 51317017021 Cover, windshield. This is the correct part. Take a look on www.realoem.com
diag_25nv.png
Screenshot_20230511_222909_Chrome.jpg51317017021.jpeg
Part W0133-3047755 appears to be a SKU number used by Partsgeek.com for BMW part 51317017021.
I purchased a genuine BMW 51317017021 from an Ebay seller. Link here : https://www.ebay.co.uk/itm/202005140978?mkcid=16&mkevt=1&mkrid=711-127632-2357-0&ssspo=66fpUu8-SBC&sssrc=2349624&ssuid=gngtrv3rtq2&var=&widget_ver=artemis&media=COPY
Photos of 51317017021 that I received and have yet to fit :20230511_224834.jpg20230511_224720.jpg20230511_224709.jpg20230511_224655.jpg20230511_224646.jpg
Well respected forum member Bigwinn (Stuart) has fitted one recently. PM him and ask for his advice/tips. I'm sure he won't mind :D :thumbsup:
 
This is NOT the correct part for me. I already ordered it and it's a moulding that fits above the windshield. Please look at the picture I posted at the top of this thread. The part, 51317017021, is not the seal that goes directly on top of the windshield. The part you ordered has glue on it as well and the seal I need is a friction seal - no glue whatsoever.

I guess I'll have to go to a local BMW parts center to get this figured out.
 
Be aware that this trim is put around the glass before the whole thing is bonded into place. So the chances of getting a new one in there depend on how much of the old trim came out (it does look like it came out in one but it's hard to tell) and what sort of gap is left behind. If it's still the factory fit glass then it's possible the silicone bead is tidy enough to leave space for a new one to go in. If its ever been replaced they usually use so much silicone that I can see it being a nightmare of a job.
 
As my windscreen surround is slowly perishing and needs replacing I took note a couple of years ago of a post by forum member Zriha from Zagreb, Croatia. He removed and fitted with relative ease a windscreen surround (51317017021) on his E85. He also made a short video of the process.
This is his original post : https://z4-forum.com/forum/viewtopic.php?p=1870705#p1870705
This is a link to his video : https://youtu.be/UEIlxAS_4x4
I shall be referring to his video when I attempt to change mine in the next few weeks.
Watch this space.
:thumbsup:
 
So it looks like I may have been proved wrong, which makes me happy!

Thanks for sending the video. It was helpful just watching what he was doing. I found another video in English if that helps anyone:

https://www.youtube.com/watch?v=zhJNncAsoVc

One other thing that made me think the part I received was wrong was that it had some glue or tar already applied to the part. Does anyone know if that's supposed be there? When I went to the BMW shop today, they said the replacement the molding is two parts: the molding plus a glue kit.
 
StudioWizard said:
So it looks like I may have been proved wrong, which makes me happy!

Thanks for sending the video. It was helpful just watching what he was doing. I found another video in English if that helps anyone:

https://www.youtube.com/watch?v=zhJNncAsoVc

One other thing that made me think the part I received was wrong was that it had some glue or tar already applied to the part. Does anyone know if that's supposed be there? When I went to the BMW shop today, they said the replacement the molding is two parts: the molding plus a glue kit.
No glue or tar etc involved at all. Zriha cleans the glass and surrounding groove before fitting the new rubber without any glue/sealant. The rubber strip hooks over the edge of the glass and presses into the groove all around. The strip has a larger overlap at the top edge which goes over the rubber moulding that the hood seals against. Photo of the top corner of my perished surround :thumbsup: 20230511_224033.jpg
 
I installed the molding. There are some details that I would have useful if instructions had been included. I'll pass this info on and hopefully it'll be useful to others.

The molding I received already had a bead of black glue or silicon running inside the channel of the molding. When I took it out of the package, I started noticing I had black tar on my hands. I didn't know where it was coming from until I looked closed at the molding. So, buyer beware: sometimes this part ships with the glue bead inside the channel.

With some trial and error (which is not good for a job like this), I learned that it's probably best to start on one of the top corners because that corner will tend to rise up if it isn't seated really well. And if you've already seated the side part, then it's impossible to pull it down to make that corner tighter. I had to pull it back out and in so doing, the corner of my brand new cowl developed a tiny tear. I will fix it later, but it was disappointing.

I also didn't realize that there's basically a little outside channel that runs along the sides. This is another reason I thought I had the wrong part.... Once it fits in, though, it looks right.

So, once you get one corner seated right, start seating some of the side molding, then stop. Now start seating more of the top molding. This is because it's all a little loosey goosey until it's sitting right and if you've done the entire side, you might realize it's not seated quite right.

Then, make your way across the top continuing to seat it. When you get to the corner, it should fit just right. Now go check the first corner to see if it's still seated right. If so, you can either finish that side molding or go to the other corner and start seating some of the side molding. If both corners are tight, you can proceed to doing more of the sides.

Here's where I ran into trouble. I couldn't tell if the molding was supposed to go on the outside or inside of the cowl. I switched a couple of times and, to be honest, I'm still not sure which is the right way. I believe the cowl should be on the outside. It's not a perfect fit and I was surprised by that. I'm using OEM parts, so they should fit exactly right.

The first picture shows the cowl on top of the molding....
PXL_20230515_025735323.jpg

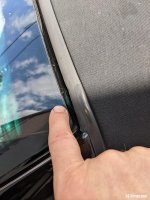
This second one shows the top corner fit...
PXL_20230515_025750115.jpg

It also seems like this part looks different from other Z4 moldings. The ones I've seen like like just one piece whereas mine looks like it's got a channel on the sides.

Does this look right to you?
 
Looks a good job. I've had my screen changed twice recently[1] and the corner is nowhere near as good as that. Since the trim went in it must be the original screen.

The cowl sits on top of the moulding since it fits in after the screen goes in.


[1] Needed a new screen. Bloke turns up with non OEM trim which is far too tight. He spends ages trying to force it on until it tears. Bonds in new glass and goes away. Two weeks later, another glass (Z4 screens don't come back out again in one piece) and another non OEM trim. Before he can tear this equally tight one, I get my engineers hands on it and stretch the channel open by running a drill bit round it.
 
Hi mate, I did mind at the weekend all when ok but couldn't get it in properly on the passenger side just would not seat in properly, got mot Wednesday so shall ask them to have a look. Here's the part number I used :)
 
A point to note if it doesn't sit well- its possible that if you have had a previous screen replacement that the sealant used to re-seat the screen has blocked the channel a bit- I found that if you gently cut some away it sat better
 
spammy said:
20230513_112821.jpg

That's the correct part. Be careful to notice if there's a bead of black glue inside the channel. If there is, handle the molding VERY carefully or else you'll find you have black tar/glue all over you. I used Goof Off to get it off my hands/gloves and anything else. I also wiped down the molding with a rag lightly doused in goof off to get any residual tar off.
 
Back
Top Bottom