What have you done to your car today?

Cor, 1k. Worth as much as an MOT failure these days.

Printed a stronger prototype for the head unit bracket with some reinforcement sections to try and stop it flexing, but still only out of PLA. Think the height and tilt are good now, could do with getting it closer to the dashboard now, which means printing a new back cover for the screen I think. Had already been considering that so not terrible.

Survived me poking and prodding it whilst heading to Manchester for a Smith and Sniff live recording at least. Screen didn’t get any condensation appearing from the heater being on it so my original criteria has been satisfied.

IMG_7398.jpeg

IMG_7397.jpeg
 
Had a flat tyre this week, so took it down to my regular tyre place. Appears the cowboys that refurbished my wheels had torn a chunk out of the inner tyre edge and had tried to bodge it with tonnes of sealant. Tyre bloke didn’t know how it had even survived this long. Two new tyres - £271.

Decided to finally find the b-pillar airbag module and while stripping the car out, found that the foam under the passenger side carpets was soaked. Seems the butyl tape in my door membrane has failed at the bottom. Wet vac what I could and have left them up to dry for a few days. Got some Tec-7 sealant on the way.

All-in-all, not a great week of Z ownership :cry:
 
My window gave out today. Grating noises when moving it up and down, and when going up it would stop half way.
Took the doorcard off, and found out the cable is completely frayed. No spare parts, and as I need the car I cut the cable which freed the window, moved it all the way up, and made sure it wouldn't move. Did have to cut through the foam to get to the mechanism though, as the stuff they use to stick it to the door was VERY plentiful and VERY sticky. I'll have to get some new foam I guess.
Checked out some threads on replacing the window regulator, but it seems like an absolute right pain in the ass to do. Time to shop around Monday morning to the local indies to find out how much it'll be to get it sorted :(
 
ryushe said:
My window gave out today. Grating noises when moving it up and down, and when going up it would stop half way.
Took the doorcard off, and found out the cable is completely frayed. No spare parts, and as I need the car I cut the cable which freed the window, moved it all the way up, and made sure it wouldn't move. Did have to cut through the foam to get to the mechanism though, as the stuff they use to stick it to the door was VERY plentiful and VERY sticky. I'll have to get some new foam I guess.
Checked out some threads on replacing the window regulator, but it seems like an absolute right pain in the ass to do. Time to shop around Monday morning to the local indies to find out how much it'll be to get it sorted :(

Window regulator is fiddly but not too bad of a job. I managed to do it, so can’t be too hard! :lol:

This video was a great help for me https://youtu.be/QPF3dh11F9U?si=85tazW37AN831p8x


I did my membranes at the same time and used butyl tape, which has failed. I’ve been recommended Tec-7 sealant instead, so I’m redoing them. Also worth putting sound deadening in the door skins, if not already. Gives a much more satisfying ‘clunk’ when closing them afterwards.

This stuff is magic at removing the old sealant, if you can get it https://www.autofinesse.com/products/oblitarate-tar-and-glue-remover
 
While having the wheels off the car, washed them properly. GTechs wheel armour still strong after three years (with only modest amount of miles and contact washes).
 
SqerrNipz said:
This video was a great help for me https://youtu.be/QPF3dh11F9U?si=85tazW37AN831p8x
Thanks much for that, gave me a lot more confidence in giving it a shot myself!
Seems it's doable in a few hours. Now to order parts (clips, membrane, window regulator).

Side question, suggestions for what to use to stick a new membrane in place?
 
ryushe said:
SqerrNipz said:
This video was a great help for me https://youtu.be/QPF3dh11F9U?si=85tazW37AN831p8x
Thanks much for that, gave me a lot more confidence in giving it a shot myself!
Seems it's doable in a few hours. Now to order parts (clips, membrane, window regulator).

Side question, suggestions for what to use to stick a new membrane in place?

I used butyl tape from Amazon, but it’s failed in some places. Been recommended this sealant instead https://tec7.com/en-IE/products/mount-seal/tec7
 
Could someone confirm the membrane for the door is part number 51487016655?
For us that's the left hand drivers side door, for by far most of you the passenger door :)
 
Today I hoovered out pine needles, sycamore seeds and leaves from the engine bay and scuttle panel. Wiped around the engine bay.
Cleaned around the door and boots shut. Hoovered the interior and boot. Cleaned the leather seats. Did a little paint correction.
Bought a can of Holts tyre sealant and some grey coloured polish.
Now need to buy some valve extenders.
 
Replaced the Starter motor, DISA valves, CCV valve & hoses, and O2 sensors on my 2006 E86 3.0Si. With 105k miles, my coupe will be nineteen years old in May, and all the parts mentioned were original. I did these jobs following a couple no-click-no-start events and after checking and observing oil film on the throttle body (TB) butterfly. I’ll comment on O2 sensors separately.

Replacing the Starter, DISA’s, and CCV valve should be simpler with the manifold off the car, right ? That turned out to be true, but removing the manifold was not as simple as I expected. Descriptions and videos gloss over the challenge of freeing the CCV under the intake and separating the brake booster vacuum line that passes through the intake manifold. Only the N52B engines have the separate CCV valve. This is not meant to be another TIS or a full recounting, just a few things I did not see or fully understand when I read through threads on this forum and when I watched George Auster’s YouTube videos on this task (his videos are not for a Z4).

Per usual, I disconnected the battery negative terminal before I began the job. Removal of air box, MAF, noise generator, and TB are well covered and not unique to the Silver Tops. I followed George Austers’ advice to free up the CCV, starting with releasing all four CCV heater connectors from their electrical block at the rear of the manifold. I struggled a while with freeing the CCV hoses from intake and oil pan. They need to be disconnected but also freed from all the wiring looms, and they must twist around just right to allow the manifold to be removed. With the manifold unbolted, I gently pulled it away from the engine enough to use a small pick and undo the last-of-five electrical connectors for the CCV heater and the connector for the small DISA valve.

Before starting, I expected the manifold to simply lift straight up while the brake booster vacuum line stayed in place and slipped past the TB port. But the manifold plenums didn’t seem to allow that, so I disconnected the brake booster vacuum line union at the rear of the intake. Prying the brake booster one-way valve out of the booster grommet released brake vacuum enough to disconnect the vacuum line union without too much frustration. The brake vacuum line can then pull out from the manifold, back-to-front as the unbolted manifold is removed – I was surprised that the vacuum line has enough flex to allow this. Perhaps I might have muscled it past the TB port of the intake without disconnecting, but I didn’t trust the pipe not to break. This front part of vacuum line through/under the intake is the same for LHD and RHD cars.

With the intake off, the R&R of the starter motor was very simple! YES, I did put the nut back onto the positive starter stud ! :) After a quick partial cleaning on the exposed lower engine block, I moved on to the intake tasks.

The CCV valve is fastened to the intake by three T30’s, one of which hides behind a bracket which is secured by the other two T30’s (see photo) - doing this in the car is a pain, +1 for intake off ! I also removed CCV hoses, under-side intake CCV heater (one T30), CCV heater connection block (two T30’s), both DISA valves (three T30’s for small DISA, four T30’s for large DISA), and the MAP sensor (two T30’s). There was oil pooled in the small DISA plenum of the intake :( . The sealing silicone edge of the small DISA flap was cracked and beginning to separate – found just in time !! Replacing CCV valve or DISA’s separately would not have addressed my issues fully.
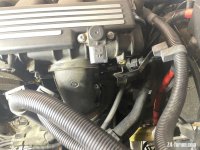
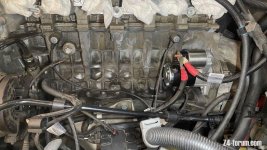
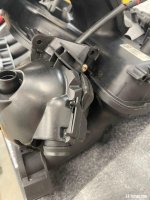
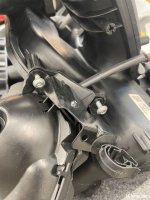
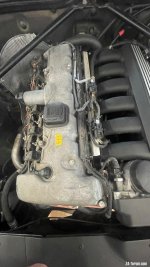
Intake Cleaning and Reassembly: I removed as much oil as I could from the intake with rags. Then I did a series of acetone rinses, isopropyl alcohol rinses, two hot detergent-water washings, and finally a hot water rinse and a complete air dry. I replaced the intake gaskets. Then I cleaned and lightly silicone-lubed the O-rings for the MAP sensor and the intake CCV heater. The MAP sensor, intake CCV heater, CCV 4-connector block, new CCV system, and new DISA valves were all reinstalled onto the clean and dry manifold – a gratifying conclusion to a messy process !! :)

Putting it all back together was much more pleasurable, and it was great to start up the engine and have it all work ! Hopefully the only tasks for Summer are driving, adding fuel, and maybe an oil change.
 

Attachments

  • Brake Vacuum Pipe bracket (next to MAP).jpg
    Brake Vacuum Pipe bracket (next to MAP).jpg
    129 KB · Views: 1,160
  • New Starter, brake vacuum pipe, and so much room!.jpg
    New Starter, brake vacuum pipe, and so much room!.jpg
    135.1 KB · Views: 1,160
  • CCV hidden T30 screw 1.jpg
    CCV hidden T30 screw 1.jpg
    111.8 KB · Views: 1,160
  • CCV hidden screw 2 - Bracket that hides 3rd T30.jpg
    CCV hidden screw 2 - Bracket that hides 3rd T30.jpg
    116.5 KB · Views: 1,160
  • Fully buttoned up, ready for Spring !.jpg
    Fully buttoned up, ready for Spring !.jpg
    85.4 KB · Views: 1,160
Removed my fog lights that Spongebob Squarepants and his mates had been using as their home, and fitted brand new ones. They look sparkly :)
 
Z4Mariner said:
but removing the manifold was not as simple as I expected. Descriptions and videos gloss over the challenge of freeing the CCV under the intake and separating the brake booster vacuum line that passes through the intake manifold.

FairPlay to you. when I was trying to remove the mainfold in order to access the starter motor, I couldnt get one of the CCV pipes underneath removed. Its kind of put me off the idea of replacing them...however, some would say, if you are replacing them, it doesnt matter if you damage/cut them.......
 
PedroSouth said:
jacobpt said:
Cheers mate really happy with them: I went for the 19” Atomics with 225/35 and 265/30. Haven’t had chance to drive anywhere with them yet but will report back on ride coming from the 18”

Wheels here: https://www.bmautosport.co.uk/new-19-atomic-csl-alloy-wheels-in-hyper-silver-with-deeper-concave-9-5-et45-rearrare-fitment

Thanks, yes be interested in the feedback on the ride. Enjoy!

Had a good chance to test the ride on the CSLs over the weekend - jaunt out to hit some great peak district roads smooth stuff like cat and fiddle and some harsh b-roads in-between

I had no issues with the ride, it is slightly firmer compared to 18” but not crashy - I’d say in keeping with a sports car, so I’m really happy :)

I am on Bilstein B4s and Eibach springs so maybe it would be another story on a oem setup - and for pure comfort I can see how 17/18” are preferred

The enthusiastic ride testing somehow detached a hanger on my backbox, which is now bouncing around and making the worst knocking sounds imaginable haha - maybe its a sign to upgrade for some more straight six noises
 
Back
Top Bottom