You are using an out of date browser. It may not display this or other websites correctly.
You should upgrade or use an alternative browser.
You should upgrade or use an alternative browser.
What have you done to your car today?
- Thread starter Buckz
- Start date
- Featured

Sorry guys missed the post and replies,don’t do what I did and leave the trim removal tool in the door and end up removing the door card again to fish it outSqerrNipz said:Dubbedown said:SqerrNipz said:Dead easy to remove the doorcard. There are torx screws (T20 from memory) 2 behind the door pull cover, 1 behind a plastic cover behind the door handle itself and 1 behind the airbag sign (which just pops out).
Once screws undone, just a case of carefully prising the doorcard off. Held on with plastic inserts around the sides and bottom, then metal clips along the top edge. A thick trim remover tool will help. Once you get one of the inserts to pop, just work your way round from there. Don’t forget to disconnect the door handle clip, speaker wires and window switches before pulling the doorcard completely off
You will likely snap a couple of the inserts as they get brittle over time. Think 4 of mine snapped in total, between both door cards. Cheap as chips from BMW though.
This is a fantastic video on window regulator replacement, but also includes taking doorcards off… https://youtu.be/QPF3dh11F9U?si=Q_PG4foSxO1P_ET1
Much appreciated. May try to add some sound deadening as well.
Well worth it, I did mine while the cards and door membranes were off. Gives a satisfyingly, solid clunk when closing the door

Robster68 said:Sorry guys missed the post and replies,don’t do what I did and leave the trim removal tool in the door and end up removing the door card again to fish it out
Just as well that you aren’t a surgeon!
 south yorkshire
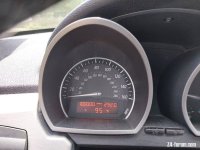
Excellent- well done, here’s to another 100kBumpyZ4 said:Made it to the 100K milestone.
ronk said:Robster68 said:Sorry guys missed the post and replies,don’t do what I did and leave the trim removal tool in the door and end up removing the door card again to fish it out
Just as well that you aren’t a surgeon!


axelleveau
Member
Collected those puppies to replace the "vanished" rear ones which I posted about a few weeks back...
Going from 19" to 18" to have less risk of damage, cheaper rims and tyres and more comfort, done with support and approval from a friend of mine who is tyre engineer One rear rim is a slightly different design to the other three but I got a good deal on marketplace and had to do with it as for some reason CH replicas are out of stock everywhere :|


Nothing fancy in term of size, 18x8 and 18x9, all ET40 (will figure out spacing if required), should get Michelin PS5 in 225 front and 255 rear, it simply is what works best for those rims, car use and power
Going from 19" to 18" to have less risk of damage, cheaper rims and tyres and more comfort, done with support and approval from a friend of mine who is tyre engineer
One rear rim is a slightly different design to the other three but I got a good deal on marketplace and had to do with it as for some reason CH replicas are out of stock everywhere :| Nothing fancy in term of size, 18x8 and 18x9, all ET40 (will figure out spacing if required), should get Michelin PS5 in 225 front and 255 rear, it simply is what works best for those rims, car use and power
 Finland
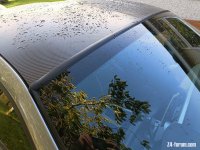
Removed the old tired windscreen surround and fitted a new one
Was a bit nervous because I've read a few posts on here saying it's a windscreen out job but others saying it's not.
Went for it ...took less than an hour all in.
Looks so much better
Was a bit nervous because I've read a few posts on here saying it's a windscreen out job but others saying it's not.
Went for it ...took less than an hour all in.
Looks so much better
Attachments

Thanks everyone for the tips and tricks to adjust the hand brake After 3 weeks of b******ng about adjusting then readjusting I gave up and took to my local indy as I don't have the necessary tackle or space to get the car up in the air to have a really good look. Anyway on closer examination my indy mechanic rang me to tell me that no amount of b******ng about would have adjusted the handbrake as there was some friction material on 3 of the shoes and the 4th one had as much friction material as butter on a British Rail sandwich. Shoes duly replaced and whilst he had it I bit the bullet and did the discs and pads as the fronts were badly scored any way. Result is that the handbrake now works and I don't have a grating noise for the first 100 yards everytime I set off. All in all a project well worth doing
darich said:Removed the old tired windscreen surround and fitted a new one
Was a bit nervous because I've read a few posts on here saying it's a windscreen out job but others saying it's not.
Went for it ...took less than an hour all in.
Looks so much better
We need a separate “how to” created on this for future use.
chanlon1 said:darich said:Removed the old tired windscreen surround and fitted a new one
Was a bit nervous because I've read a few posts on here saying it's a windscreen out job but others saying it's not.
Went for it ...took less than an hour all in.
Looks so much better
We need a separate “how to” created on this for future use.
I didn't take any photos but I could cobble something together if was something that would be useful
There is a how to video on you tube:chanlon1 said:darich said:Removed the old tired windscreen surround and fitted a new one
Was a bit nervous because I've read a few posts on here saying it's a windscreen out job but others saying it's not.
Went for it ...took less than an hour all in.
Looks so much better
We need a separate “how to” created on this for future use.
https://youtu.be/BHIDZqw3XFM?si=glMhMnrcta4IaaXt
paddy wright said:There is a how to video on you tube:
https://youtu.be/BHIDZqw3XFM?si=glMhMnrcta4IaaXt
That looks far too easy!
chanlon1 said:#paddy wright said:There is a how to video on you tube:
https://youtu.be/BHIDZqw3XFM?si=glMhMnrcta4IaaXt
That looks far too easy!
It is that easy!
darich said:It is that easy!
it just pushes in? Doesn't get glued down in any way?
chanlon1 said:darich said:It is that easy!
it just pushes in? Doesn't get glued down in any way?
There's a sticky back plastic sort of edging to it, but no adhesive, no special tools.
It's held in by the shape of it.