You are using an out of date browser. It may not display this or other websites correctly.
You should upgrade or use an alternative browser.
You should upgrade or use an alternative browser.
What have you done to your car today?
- Thread starter Buckz
- Start date
- Featured
raymond.harper
Senior member
If you are having your ring adjusted there is a need for lubrication. A suitable nipple can be screwed onto the column and the shaft suitably lubed up.
Barty said:IMG_6484.jpeg
Loaded up the Z and set off for Saarbrücken with a few friends, including Bas’ Barchetta he painstakingly restored last winter. Once out of the Netherlands, we only took the backroads and we will keep doing so all the way to Italy. Passed through Adenau too, with the obligatory pitstop at the Cockpit bistro just off the ring (where they had the 1000km ADAC Endurance race).
Today, it’s the Vosges from Saarbrücken to Mulhouse, with a day in the Alps Monday
Nice Barty. Enjoy!
I’m sat at Cockpit now. Back to UK tomorrow

Special Kay
Active member
"So yesterday I popped over to see enuff_zed to get the ring adjusted."
I don't know whether to laugh or to just respect individual ideosyncrasies. Either way, this has been the best 'one liner' I've heard all day
I don't know whether to laugh or to just respect individual ideosyncrasies. Either way, this has been the best 'one liner' I've heard all day
raymond.harper said:If you are having your ring adjusted there is a need for lubrication. A suitable nipple can be screwed onto the column and the shaft suitably lubed up.
Not quite sure what I have walked in on here
") Be careful when your lubing up your shaft!.
Be careful when your lubing up your shaft!. My mind is obviously in the gutter, he was talking about his steering shaft lol.
axelleveau
Member
Weekend's progress on my rear end refresh:
- Put back on the subrframe + suspension assembly all I had left to put on at this stage, hooked the braided brake lines on there too ready to welcome calipers
- Started disassembling the calipers for rebuild and painting. Of course a bleed screw decided to shear so after trying and failing to get it off by hammering a torx bit in there (don't do it!), I drilled into it as deep as safe to do (until seeing the bleed hole in there), did some heat/cool shock and hammered the thread a bit after cuting a flat imprint with the grinder. It then came out with a flat head and hammer driver. Why all those steps? Well because I tried more and more as the bugger was stuck in good!

- While the grinder was out I finally got round to bust out the exhaust studs (one is gone missing on the undertray), clearly no chance to get them out without a combination of cutting the flange and using a air hammer but at least they are now out. Got the oxygene sensors back on and routed the wiring. Fingers crossed it will be smooth sailing getting the car back on the road from there


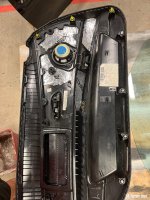
Finishing sound deadening on door card,replacing all broken plastic clips,door airbag captive nuts and window plastic sliding pieces,hopefully door cards have been removed for the last time,unless windows regulator packs up 
Attachments
 Devon
Devon
Checked my hood drains today, heard water sloshing about in the driver's side sill and was running out the front jacking point. Sure enough the rubber bung was full on muck but pipe clean. Recently cleaned the hood so maybe the solution cleared the pipes, anyway left the bung off. Other side okay as did same last year. Must have been all the rain we had over the weekend overwhelmed the drain. Gave the wheel arches a clean up while I was there 
tomoz4white
Member

Great photo, white really suits the pre facelift E85 especially with the black grill. And those headlights finish the looktomoz4white said:Took a trip around the local lake to keep the battery topped up...
Shame they made so few in the colour. Dare I say that I prefer it to Sterling Grey tomoz4white
Member
MikeyH said:Great photo, white really suits the pre facelift E85 especially with the black grill. And those headlights finish the looktomoz4white said:Took a trip around the local lake to keep the battery topped up...
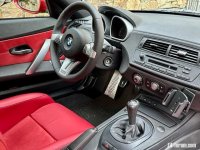
Thanks mate. Yeh, I've made some subtle changes over the years, with the grille, lights, clear side repeaters, headrest hoops painted piano black and the interior panels are wrapped in carbon fibre effect, so the car is very white and black all round. All OEM parts are in the loft so it could all be reverted back in 1 day, if I ever fancied going back to the factory look....
tomoz4white
Member
OMG, thank god Pondrew hasn't seem this oneraymond.harper said:If you are having your ring adjusted there is a need for lubrication. A suitable nipple can be screwed onto the column and the shaft suitably lubed up.
3002 tii
Active member
Robster68 said:Finishing sound deadening on door card,replacing all broken plastic clips,door airbag captive nuts and window plastic sliding pieces,hopefully door cards have been removed for the last time,unless windows regulator packs up
Is removing the door card difficult? Should one expect to replace all the clips when doing so (i.e. will they likely break when removing door card)?
Dubbedown said:Robster68 said:Finishing sound deadening on door card,replacing all broken plastic clips,door airbag captive nuts and window plastic sliding pieces,hopefully door cards have been removed for the last time,unless windows regulator packs up
Is removing the door card difficult? Should one expect to replace all the clips when doing so (i.e. will they likely break when removing door card)?
Dead easy to remove the doorcard. There are torx screws (T20 from memory) 2 behind the door pull cover, 1 behind a plastic cover behind the door handle itself and 1 behind the airbag sign (which just pops out).
Once screws undone, just a case of carefully prising the doorcard off. Held on with plastic inserts around the sides and bottom, then metal clips along the top edge. A thick trim remover tool will help. Once you get one of the inserts to pop, just work your way round from there. Don’t forget to disconnect the door handle clip, speaker wires and window switches before pulling the doorcard completely off
You will likely snap a couple of the inserts as they get brittle over time. Think 4 of mine snapped in total, between both door cards. Cheap as chips from BMW though.
This is a fantastic video on window regulator replacement, but also includes taking doorcards off… https://youtu.be/QPF3dh11F9U?si=Q_PG4foSxO1P_ET1
3002 tii
Active member
SqerrNipz said:Dubbedown said:Robster68 said:Finishing sound deadening on door card,replacing all broken plastic clips,door airbag captive nuts and window plastic sliding pieces,hopefully door cards have been removed for the last time,unless windows regulator packs up
Is removing the door card difficult? Should one expect to replace all the clips when doing so (i.e. will they likely break when removing door card)?
Dead easy to remove the doorcard. There are torx screws (T20 from memory) 2 behind the door pull cover, 1 behind a plastic cover behind the door handle itself and 1 behind the airbag sign (which just pops out).
Once screws undone, just a case of carefully prising the doorcard off. Held on with plastic inserts around the sides and bottom, then metal clips along the top edge. A thick trim remover tool will help. Once you get one of the inserts to pop, just work your way round from there. Don’t forget to disconnect the door handle clip, speaker wires and window switches before pulling the doorcard completely off
You will likely snap a couple of the inserts as they get brittle over time. Think 4 of mine snapped in total, between both door cards. Cheap as chips from BMW though.
This is a fantastic video on window regulator replacement, but also includes taking doorcards off… https://youtu.be/QPF3dh11F9U?si=Q_PG4foSxO1P_ET1
Much appreciated. May try to add some sound deadening as well.
Dubbedown said:SqerrNipz said:Dubbedown said:Is removing the door card difficult? Should one expect to replace all the clips when doing so (i.e. will they likely break when removing door card)?
Dead easy to remove the doorcard. There are torx screws (T20 from memory) 2 behind the door pull cover, 1 behind a plastic cover behind the door handle itself and 1 behind the airbag sign (which just pops out).
Once screws undone, just a case of carefully prising the doorcard off. Held on with plastic inserts around the sides and bottom, then metal clips along the top edge. A thick trim remover tool will help. Once you get one of the inserts to pop, just work your way round from there. Don’t forget to disconnect the door handle clip, speaker wires and window switches before pulling the doorcard completely off
You will likely snap a couple of the inserts as they get brittle over time. Think 4 of mine snapped in total, between both door cards. Cheap as chips from BMW though.
This is a fantastic video on window regulator replacement, but also includes taking doorcards off… https://youtu.be/QPF3dh11F9U?si=Q_PG4foSxO1P_ET1
Much appreciated. May try to add some sound deadening as well.
Well worth it, I did mine while the cards and door membranes were off. Gives a satisfyingly, solid clunk when closing the door
Hopefully your door membranes are in better shape than mine were! If not, they’re about £40 each from BMW.